 首页 - 部署原创
笔记
这里简单介绍我的首页创建过程,以及邮件功能的设计过程。
2021-12-09 @Young Kbt
# 序言
在学习完 Nginx 的知识后,我看着 Nginx 的欢迎页面细想了很久,眼中的世界太过单调,总觉得不够好看,而且无法给我的服务器提供任何信息介绍,而周围的朋友直接是将其代理到其他页面。
当时我就有了一些想法,替换 Nginx 的欢迎页面,将新的页面作为入口页面,介绍网站功能的同时,提供博客、项目导航入口。比如我部署的一个项目,那么在首页就会有提示,如点击跳转,这样就不必记住项目的 URL 地址,只需要记住服务器地址,那么服务器其他的内容,都汇聚于首页。
如果你是从 Github 或者 Gitee 进入到我的博客,那么可以去看看我的服务器首页,希望不会让你失望,点击跳转 (opens new window)。
如果你看完了下面的内容,需要我的服务器首页、404页面、邮箱功能、下载站点功能的源码,那么 点击跳转 (opens new window)。
# 首页部署
首先准备好一个首页,不需要打包之类的,Nginx 的首页只是一个 index.html 加点 CSS 和 JS 文件即可,不需要像一个项目那样完整。
利用工具连接服务器,我是用的是 Xftp,将其上传到 Nginx 的默认路径下。
Nginx 的默认路径下如果你不知道,打开 Nginx 的配置文件,看 80 或者 431端口的 location / { ... } 里的 root 指定的路径,那就是 Nginx 的默认路径。
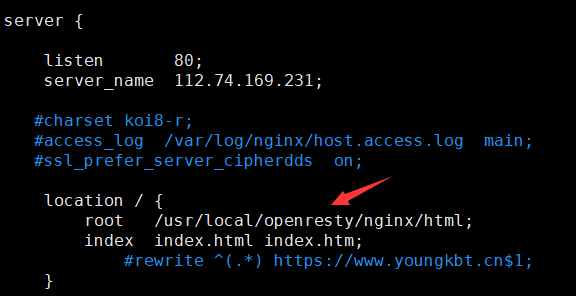
这就是我的默认路径,所以将首页以及静态文件上传到 Nginx 默认路径下。
在本地,我的首页结构如下:
.
├── index.html
│   ├── assets (静态文件目录)
│   │   ├── css(样式目录)
│   │   ├── fonts(字体目录)
│   │   ├── images(图片目录)
│   │   ├── js(JavaScript 目录)
│   ├── vendor(JavaScript 库)
│   │   ├── bootstrap
|	│	├── jquery
2
3
4
5
6
7
8
9
10
上传到服务器后,因为默认路径下可能有太多文件,所以我对其分类,创建一个 static 文件夹。
根目录
├── index.html
|—— static(静态文件目录)
│   ├── assets
│   │   ├── css(样式目录)
│   │   ├── fonts(字体目录)
│   │   ├── images(图片目录)
│   │   ├── js(JavaScript 目录)
│   ├── vendor(JavaScript 库)
│   │   ├── bootstrap
|	│	├── jquery
2
3
4
5
6
7
8
9
10
11
根目录,就是 /usr/local/openresty/nginx/html 目录。
上传首页后,记得修改 index.html 有关 css 和 js 的引入路径,因为 Nginx 的获取资源规则和本地的不一样。
在本地,我们在 index.html 可以这样写:(部分)
<link href="vendor/bootstrap/css/bootstrap.min.css" rel="stylesheet" />
<link href="assets/fonts/iconfont.css" rel="stylesheet" />
<script src="vendor/jquery/jquery.min.js"></script>
2
3
但是上传到 Nginx 后,我们必须在开头加上 /,代表 Nginx 的根目录,所以我们需要这样写:(部分)
<link href="/static/vendor/bootstrap/css/bootstrap.min.css" rel="stylesheet" />
<link href="/static/assets/fonts/iconfont.css"  rel="stylesheet"  />
<script src="/static/vendor/jquery/jquery.min.js"></script>
2
3
然后,访问服务器的域名,即可访问这个首页。当然,如果希望访问域名的后面再加个 /home,如访问 https://www.youngkbt.cn/home ,也能访问首页的话,需要在配置文件进行配置。
server {
    listen 80;		# 431 是 https 的默认端口,80 是 http 的默认端口
    server_name www.youngkbt.cn;
    # ...... 其他 location

    location /home {
        alias  /usr/local/openresty/nginx/html;
        index  index.html;
    }

    # ...... 其他 location
}
2
3
4
5
6
7
8
9
10
11
12
这里使用的是 alias 指令,因为 root 指令会把 location 后面匹配的请求拼接到目录后,而 alias 指令则会忽略 location 后匹配的请求。
alias 指令不会忽略匹配后面的请求,如访问 /home/aa,则忽略 /home,但是把 /aa 拼接到目录后,但是这不影响我们访问 /home 就能访问到首页,这里只是介绍使用 alias 指令的特点。
JS 文件
在首页,我简单实现了 Element UI 的消息提示效果,也实现了邮箱发送功能,这里提供源码:
$(function () {
  var storageName = "isSend";

  // 防止重复发送
  var isSend = false;
  $(".button").on("click", function () {
    if ($("#name").val() == '') {
      addTip("姓名不能为空,请填写", "danger");
      return;
    } else if ($("#email").val() == '') {
      addTip("邮箱不能为空,请填写", "danger");
      return;
    } else if ($("#subject").val() == '') {
      addTip("标题不能为空,请填写", "danger");
      return;
    } else if ($("#message").val() == '') {
      addTip("消息不能为空,请填写", "danger");
      return;
    } else {
      var email = $("#email").val();
      var reg = /^([a-zA-Z]|[0-9])(\w|\-)+@[a-zA-Z0-9]+\.([a-zA-Z]{2,4})$/;
      if (reg.test(email) && (sessionStorage.getItem(storageName) != "true" || isSend == false)) {
        if (confirm("确认要发送吗?")) {
          sendEmail();
          sessionStorage.setItem(storageName,true);
          isSend = true;
        }
      } else if (sessionStorage.getItem(storageName) == "true" || isSend == true) {
        addTip("请不要重复发送消息", "warning");
      } else {
        addTip("邮箱格式不正确,请填写", "danger");
      }
    }

    // 获取表单信息
    // console.log($("#contact").serialize());
  })
  function sendEmail() {
    $.post("/sendEmail", $("#contact").serialize(), function (res, error) {
      if (res == 'OK') {
        addTip("发送消息成功", "success");
        setTimeout(() => {
          window.location.reload();
          sessionStorage.removeItem(storageName);
          isSend == false;
        }, 1500);
      } else {
        console.log("失败的原因:", error);
        addTip("发送失败,可能发送超时或消息被拦截,请稍后再重试", "tip");
      }
    });
  }

  // 添加消息提示
  function addTip(content, type) {

    var time = new Date().getTime();
    // 获取最后消息提示元素的高度
    var top = $(".tip:last").attr("data-top") == undefined ? 0 : $(".tip:last").attr("data-top");
    // 如果产生两个以上的消息提示,则出现在上一个提示的下面,即高度添加,否则默认 20
    var lastTop = parseInt(top) + ($(".tip").length > 0 ? $(".tip:last").outerHeight() + 17 : 20);

    if (type == "success" || type == 1) {
      $("#page-wraper").append(`<div class="tip tip-success ${time}" style="top: ${parseInt(top)}px" data-top="${lastTop}"><i class="iconfont icon-dagouyouquan icon"></i><p class="tip-success-content">${content}</p></div>`);
    } else if (type == "danger" || type == 2) {
      $("#page-wraper").append(`<div class="tip tip-danger ${time}" style="top: ${parseInt(top)}px" data-top="${lastTop}><i class="iconfont icon-cuowu icon"></i><p class="tip-danger-content">${content}</p></div>`);
    } else if (type == "info" || type == 3) {
      $("#page-wraper").append(`<div class="tip tip-info ${time}" style="top: ${parseInt(top)}px" data-top="${lastTop}><i class="iconfont icon-info icon"></i><p class="tip-info-content">${content}</p></div>`);
    } else if (type == "warning" || type == 4) {
      $("#page-wraper").append(`<div class="tip tip-warning ${time}" style="top: ${parseInt(top)}px" data-top="${lastTop}><i class="iconfont icon-gantanhao icon"></i><p class="tip-warning-content">${content}</p></div>`);
    }

    // 动画往下滑动
    $("." + time).animate({
      top: parseInt(lastTop) + "px",
      opacity: "1",
    })

    // 消息提示 3 秒后隐藏并被删除
    setTimeout(() => {
      $("." + time).animate({
        top: "0px",
        opacity: "0",
      });

      setTimeout(() => {
        $("." + time).remove();
      }, 500);
    }, 3000);
  }
})
2
3
4
5
6
7
8
9
10
11
12
13
14
15
16
17
18
19
20
21
22
23
24
25
26
27
28
29
30
31
32
33
34
35
36
37
38
39
40
41
42
43
44
45
46
47
48
49
50
51
52
53
54
55
56
57
58
59
60
61
62
63
64
65
66
67
68
69
70
71
72
73
74
75
76
77
78
79
80
81
82
83
84
85
86
87
88
89
90
91
消息提示效果的 CSS 文件内容:
/* 消息提示样式 */
.tip{
  position: fixed;
  display: flex;
  height: 48px;
  top: -10px;
  left: 50%;
  opacity: 0;
  min-width: 320px;
  transform: translateX(-50%);
  transition: opacity .3s linear,top .4s,transform .4s;
  z-index: 99999;
  padding: 15px 15px 15px 20px;
  border: 1px solid #ebeef5;
  border-radius: 4px;
  grid-row: 1;
  line-height: 17px;
}
.tip p{
  line-height: 17px;
  margin: 0;
  font-size: 14px;
}
.icon{
  margin-right: 10px;
  line-height: 17px;
}
.tip-success  {
  color: #67c23a;
  background-color: #f0f9eb;
  border-color: #e1f3d8;
}
.tip-success .tip-success-content{
  color: #67c23a;
}
.tip-danger {
  color: #f56c6c;
  background-color: #fef0f0;
  border-color: #fde2e2;
}
.tip-danger .tip-danger-content{
  color: #f56c6c;
}
.tip-info {
  background-color: #edf2fc;
  border-color: #ebeef5;
}
.tip-info .tip-info-content{
  color: #909399;
}

.tip-warning {
  color: #e6a23c;
  background-color: #fdf6ec;
  border-color: #faecd8;
}
.tip-warning .tip-warning-content{
  margin: 0;
  color: #e6a23c;
  line-height: 21px;
  font-size: 14px;
}
/* 下面是二维码样式 */
.social-tip{
  margin-bottom: 170px;
  display: none;
}
.square{
    width: 0;
    height: 0;
    border-bottom: 7px solid rgba(118, 25, 172, 0.3);
    border-right: 7px solid transparent;
    border-left: 7px solid transparent;
    position: relative;
    left: 36%;
}
.social-info{
  width: 200px;
  position: absolute;
  line-height: 48px;
  left: -95%;
  margin-left: -40px;
  background-color: rgba(118, 25, 172, 0.3);
  color: #fff;
  padding: 0 15px 15px;
}
.social-info img{
  width: 160px;
  height: 160px;
}
2
3
4
5
6
7
8
9
10
11
12
13
14
15
16
17
18
19
20
21
22
23
24
25
26
27
28
29
30
31
32
33
34
35
36
37
38
39
40
41
42
43
44
45
46
47
48
49
50
51
52
53
54
55
56
57
58
59
60
61
62
63
64
65
66
67
68
69
70
71
72
73
74
75
76
77
78
79
80
81
82
83
84
85
86
87
88
89
90
91
如下效果:
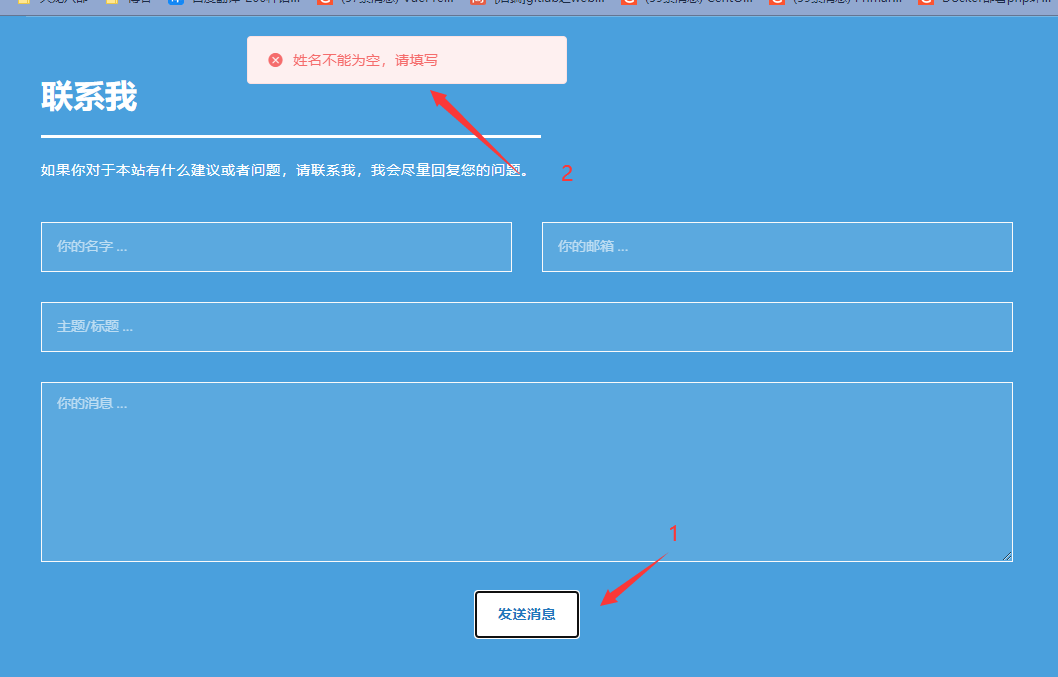
我设计了四个提示,分别是成功绿色,提示灰色,警告黄色,错误红色。而提示语前面的图标,需要自己去阿里云的矢量库进行获取,并在首页引用,矢量库跳转 (opens new window)。
# 404部署
你喜欢 Nginx 自带的 404 页面吗?我可能不是特别喜欢,所以我们可以自定义好看的 404 页面,又或者去网上下载别人做好的 404 页面模板。如我的 404 页面如图:
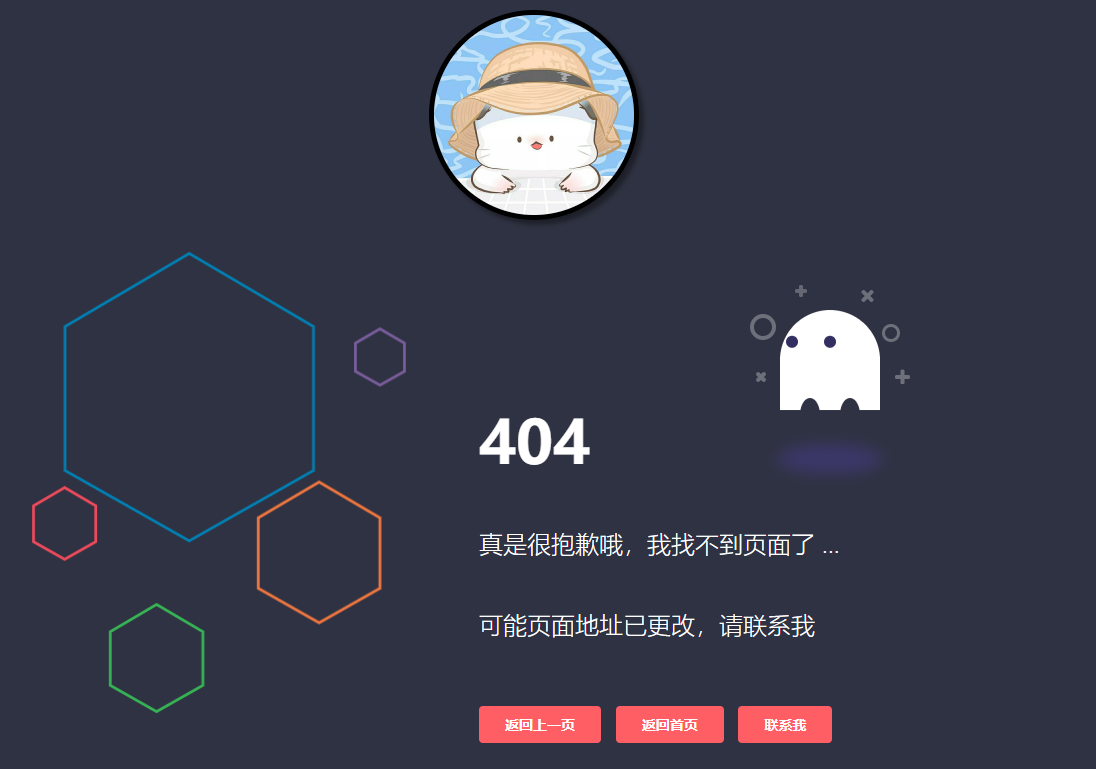
点击头像还能播放音乐。
利用 xftp 将 404 页面上传到服务器上,我在 Nginx 根目录下创建了一个 404 文件夹,将 404 页面和其 CSS 和 JS 文件放到这个 404 文件夹里。
目录结构:
根目录
|—— 404(这是个目录)
│   ├── 404.html( 404 页面)
│   ├── css(样式目录)
│   ├── img(图片目录)
│   ├── js(JavaScript 目录)
|	├── music(音乐目录)
|
├── index.html(其他页面)
2
3
4
5
6
7
8
9
上传后到 Nginx 后,养成好习惯,打开 404.html,修改 CSS、JS 文件的引入路径,因为 Nginx 的获取资源规则和本地的不一样。
记得开头加 /,改为:(部分)
<link rel="stylesheet" href="/404/css/ghost.css">
<script type="text/javascript" src="/404/js/jquery.min.js"></script>
2
然后在配置文件修改 404 页面的访问路径
server {
    listen 431;		# 431 是 https 的默认端口,80 是 http 的默认端口
    server_name youngkbt.cn;
    # ...... 其他 location

    error_page   404 500 502 503 504 /404.html;
    location = /404.html {
        root    /usr/local/openresty/nginx/html/404;
        index 404.html;
    }

    # ...... 其他 location
}
2
3
4
5
6
7
8
9
10
11
12
13
此时你随便访问我的服务器地址,如 https://www.youngkbt.cn/aaa 那么就会显示我的 404 页面。在该页面中,点击我的头像后,音乐会伴随头像的旋转而缓缓响起,静静享受 404 带有的静谧时刻。
# 博客部署
我的博客已经部署在 Github 和 Gitee 中,如果你看了上一个文章,部署自己的博客到了服务器,那么就请在 Nginx 设置一个 location 模块,进行跳转吧。
我设置了两个 location 模块,当输入 /notes 或者 /note-blog 的时候,都会跳转到我的博客首页
location /notes {
    rewrite ^/notes/(\w*)$ /notes-blog/$1;
}
location /notes-blog {
    root /home/kbt;
    index index.html;
}
2
3
4
5
6
7
实际上,最终都会跳到 /note-blog 的 location 模块里。
我们不仅可以设置博客的 location,也可以设置浏览器的缓存静态文件时间,因为博客的静态文件太多,当用户每次访问都从 Nginx 服务器获取静态文件,那显然不理智,我们可以让用户访问过的静态文件,缓存到用户的浏览器中,这样,用户再次访问博客的时候,直接从浏览器本地获取,打开的速度非常快。
我设置了静态文件缓存 7 天,html 文件缓存 1 天
location ~ /note-blog/.*\.(js|css|png|jpg|jpeg|gif)$ {
    root /home/kbt;
    expires 7d;  # 缓存七天
}

location ~ /note-blog/.*\.(html)$ {
    root /home/kbt;
    expires 1d;  # 缓存一天
}
2
3
4
5
6
7
8
9
看到 root 了吗,我的博客并没有放在 Nginx 的默认路径下,而是由普通用户 kbt 管理。防止滥用 root 权限,避免被别人恶意访问。
# 邮箱部署
建议你看到这里马上停住,然后点击 测试发送邮箱 (opens new window),输入你的邮箱,进行发送,体验之后再来学习,会有更大的收获和兴趣。
邮箱项目我使用了 node 和 express 来搭建简单的服务器,然后利用 nodemailer 进行邮件发送,log4j.js 进行日志信息存储。
这是一个 node 简单项目,安装的依赖只有三个,express、nodemailer、log4js。
# 邮箱源码
我的 package.json 文件内容如下:
{
    "name": "email",
    "version": "1.0",
    "private": true,
    "scripts": {
        "dev": "node app.js"
    },
    "dependencies": {
        "express": "^4.17.1",
        "log4js": "^6.3.0",
        "nodemailer": "^6.7.2"
    }
}
2
3
4
5
6
7
8
9
10
11
12
13
依赖只有三个,如何安装呢,我使用 yarn 进行安装。
yarn add express --save
yarn add log4js --save
yarn add nodemailer --save
2
3
安装完,我们先编写 log.js 文件,实现日志功能
// 引入插件 log4js
var log4js = require('log4js')
log4js.configure({
    appenders: {	// 配置日志文件
        access: {    // 访问日志的 name
            type: 'file',
            filename: "logs/access.log",
            layout: {
                type: 'pattern',
                pattern: '[%d{yyyy-MM-dd hh:mm:ss SSS}] [%p] %c - %m'
            },
        },
        error: {    // 错误日志的 name
            type: 'file',
            filename: "logs/error.log",
            layout: {   // 定义日志输出的样式
                type: 'pattern',
                pattern: '[%d{yyyy MM dd hh:mm:ss SSS}] [%p] %c - %m%n' // 日志输出时间格式
            },
        },
    },

    categories: {	// 配置日志级别,以及引用 appenders 配置的日志文件
        default: { appenders: ['access'], level: 'info' },  // 上方 appenders 的 name
        error: { appenders: ['error'], level: 'error' }
    },
})

exports.logger = function (name) {  // name 取 categories 的 name
    return log4js.getLogger(name || 'default')
};
exports.use = function (app, logger) {
    app.use(log4js.connectLogger(logger || log4js.getLogger('default'), { level: 'info', format: '请求类型/URI:「 :method:url 」' })) // 请求类型/URI 格式设置
}
2
3
4
5
6
7
8
9
10
11
12
13
14
15
16
17
18
19
20
21
22
23
24
25
26
27
28
29
30
31
32
33
34
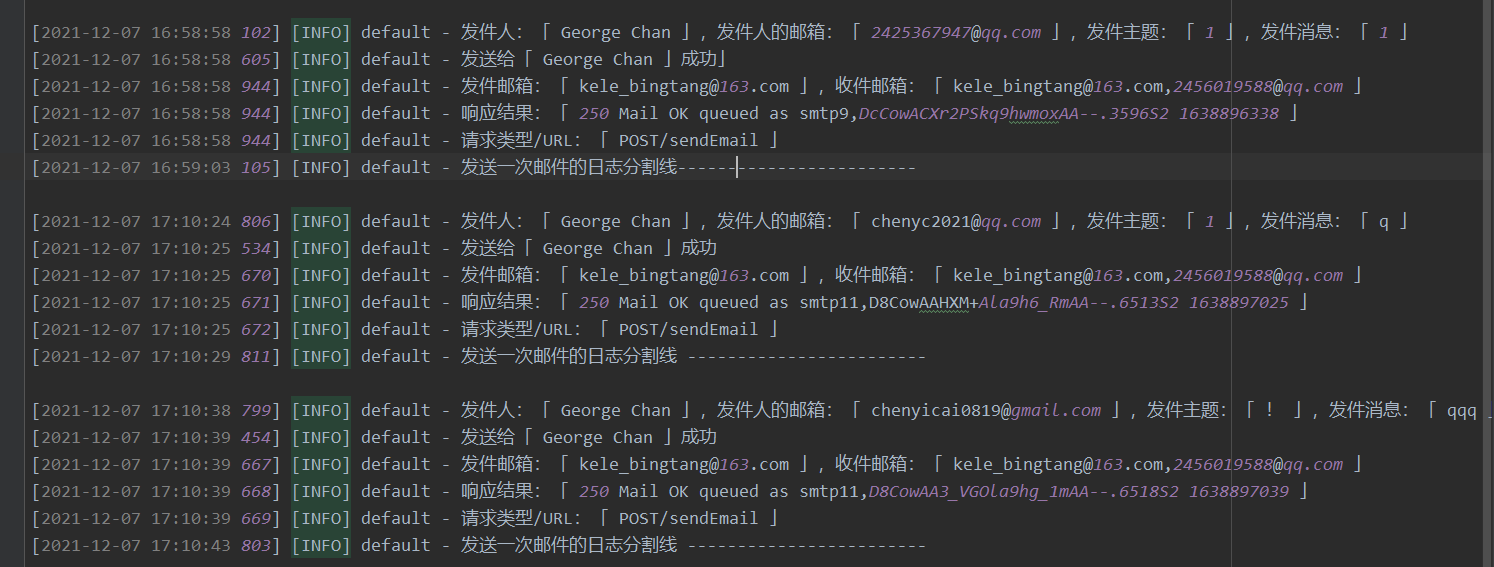
文件内容不难理解,我们首先配置要输出的日志文件路径以及名字,然后配置日志输出的信息时间格式,然后配置日志的格式,如 info 或者 error,接着配置请求类型/URI 格式,最后暴露出去。
日志的输出内容如图所示:
编写 route.js 文件,相信学过 express 的伙伴已经非常熟悉了
const express = require("express");
const router = express.Router();
// 引入日志
const logger = require("./log").logger();
const errLogger = require("./log").logger("error");
// 引入邮件发送功能
var nodemailer = require('nodemailer');

router.post("/email", (req, res) => {
    var data = req.body;
    // 获取发送的模板
    const myHtml = require("./email/emailHtml").myHtml(data);
    const otherHtml = require("./email/emailHtml").otherHtml(data);
    // 创建连接
    var transporter = nodemailer.createTransport({
        host: "smtp.163.com",
        port: 465, // SMTP 端口
        secureConnection: true, // 使用 SSL 方式(安全方式,防止被窃取信息)
        auth: {
            user: 'kele_bingtang@163.com',
            // 这里密码不是 qq 密码,是你设置的 smtp 密码
            pass: 'GJQDWNWVGYEVTSMB'
        }
    });

    // 邮件参数(我的)
    var myOptions = {
        from: 'kele_bingtang@163.com', // 发件地址
        to: 'kele_bingtang@163.com,2456019588@qq.com', // 收件列表
        subject: data.subject, // 标题
        // text 和 html 同时发送只支持一种
        html: myHtml,

        //  text: "测试",
        /*  attachments:[{  // 附件
       filename: '',   // 附件名
       path: ''    // 附件路径
     }] */
    };

    // 邮件参数(发件人)
    var otherOptions = {
        from: 'kele_bingtang@163.com', // 发件地址
        to: `kele_bingtang@163.com,${data.email}`, // 收件列表
        subject: "Young Kbt 的致谢", // 标题
        // text 和 html 同时发送只支持一种
        html: otherHtml,
    };

    // 发送邮件(给发件人)
    transporter.sendMail(otherOptions, function (error, info) {
        if (error) {
            errLogger.error("发送给「 " + data.name + " 」失败,原因:「 " + error + " 」");
            res.status(200).send("error:" + error);
        }else{
            logger.info("发送给「 " + data.name + " 」成功");
        }
        console.log("发送给发件人的响应信息:");
        console.log(info);
    });


    // 发送邮件(给我)
    transporter.sendMail(myOptions, function (error, info) {
        console.log("错误信息:" + error);
        if (error) {
            errLogger.error("发送给「 Young Kbt 」失败,原因:「 " + error + " 」");
            res.status(200).send("error:" + error);
        }else{
            res.status(200).send("OK");
            logger.info("发件邮箱:「 " + info.envelope.from + " 」,收件邮箱:「 " + info.envelope.to + " 」");
            logger.info("响应结果:「 " + info.response + " 」");
            console.log("发送给我的响应信息:");
            console.log(info);
        }
    });

    logger.info("发件人:「 " + data.name + " 」,发件人的邮箱:「 " + data.email + " 」,发件主题:「 " + data.subject + " 」,发件消息:「 " + data.message + " 」");

    setTimeout(() => {
        logger.info("发送一次邮件的日志分割线 ------------------------\n");
    }, 4000);

    setTimeout(() => {
        transporter.close();
    }, 10000);

})

module.exports = router;
2
3
4
5
6
7
8
9
10
11
12
13
14
15
16
17
18
19
20
21
22
23
24
25
26
27
28
29
30
31
32
33
34
35
36
37
38
39
40
41
42
43
44
45
46
47
48
49
50
51
52
53
54
55
56
57
58
59
60
61
62
63
64
65
66
67
68
69
70
71
72
73
74
75
76
77
78
79
80
81
82
83
84
85
86
87
88
89
90
第 12 和 13 行引用自定义的邮件页面模板,模板大家根据自己的需求设计邮件页面。
我的邮件页面代码位于根目录下的 email 目录,名字叫 emailHtml,源码为:
// 发送给我
exports.myHtml = function(data){
    return `<div style="width: 600px;margin: 0 auto;">
            <includetail>
              <table style="text-align: center; font-size: 16px; color: #333333; border-spacing: 0px; border-collapse: collapse; width: 580px; direction: ltr">
                  <tbody>
                  <tr>
                      <td style="font-size: 14px; padding: 0px 0px 7px 0px; text-align: center;color: #0044CC">
                          ${data.name} 在 Young Kbt 首页发送给您
                      </td>
                  </tr>
                  <tr style="background-color: #2279BD">
                      <td style="padding: 0px">
                          <table style="border-spacing: 0px; border-collapse: collapse; width: 100%">
                              <tbody>
                              <tr>
                                  <td style="padding: 0px; text-align: center;">
                                      <img src="https://cdn.jsdelivr.net/gh/Kele-Bingtang/static/user/20211205131212.jpg" alt="请在上方选择信任,以此显示头像">
                                  </td>
                              </tr>
                              <tr>
                                  <td style="font-size: 38px; color: #FFFFFF; padding: 12px 22px 4px 22px; text-align: center;" colspan="3">
                                      Young Kbt
                                  </td>
                              </tr>
                              <tr>
                                  <td style="font-size: 20px; color: #FFFFFF; padding: 0px 22px 18px 22px; text-align: center;" colspan="3">
                                    人闲车马慢,路遥星亦辞
                                  </td>
                              </tr>
                              </tbody>
                          </table>
                      </td>
                  </tr>
                  <tr>
                      <td style="background-color: #5BA9DF; border-bottom-style: solid; border-bottom-color: #2279BD; border-bottom-width: 4px;">
                          <table style="color: #333333; border-spacing: 0px; border-collapse: collapse; width: 100%; color: #fff">
                              <tbody>
                                <tr>
                                  <td style="font-size: 18px; padding: 0px 0px 5px 0px;">
                                    <p style="text-align: center">
                                      <span style="font-weight:bold;">${data.name} </span>
                                      <span>发送的主题:</span></p>
                                      <p style="font-size: 16px; letter-spacing: 0.5px; text-indent: 16px; padding:0 20px; line-height: 30px; text-align: left;">
                                      ${data.subject}
                                    </p>
                                  </td>
                                </tr>
                                <tr>
                                  <td style="font-size: 18px; padding: 0px 0px 5px 0px;">
                                    <p style="text-align: center; margin-top: 0;">
                                      <span style="font-weight:bold;">${data.name} </span>
                                      <span>发送的内容:</span>
                                    </p>
                                      <p style="font-size: 16px;letter-spacing: 0.5px; text-indent: 16px; padding:0 20px; line-height: 30px; text-align: left;">
                                      ${data.message}
                                    </p>
                                  </td>
                                </tr>
                                <tr>
                                    <td style="font-size: 16px; padding: 30px 20px; text-align: center">
                                      如果您希望回复他/她,请发送到他/她的邮箱:
                                      <p style="color: #0044CC; font-weight: bold">${data.email}</p>
                                    </td>
                                </tr>
                              </tbody>
                          </table>
                      </td>
                  </tr>
                  <tr>
                      <td style="padding: 35px 0px; color: #B2B2B2; font-size: 12px">
                          From Young Kbt
                          <br>
                          This is a WebSite
                          <br>
                          ${new Date().getFullYear()}-${new Date().getMonth() + 1 == 13 ? 12 : new Date().getMonth() + 1}-${new Date().getDate() > 10 ? new Date().getDate() : '0' + new Date().getDate()}
                            ${new Date().getHours() > 10 ? new Date().getHours() : '0' + new Date().getHours()}:${new Date().getMinutes() > 10 ? new Date().getMinutes() : '0' + new Date().getMinutes()}:${new Date().getSeconds() > 10 ? new Date().getSeconds() : '0' + new Date().getSeconds()}
                      </td>
                  </tr>
                  <tr>
                      <td style="padding: 0px 0px 10px 0px; color: #B2B2B2; font-size: 12px">
                          Copyright Young Kbt WebSite
                      </td>
                  </tr>
                  </tbody>
              </table>
            </includetail>
          </div`;
}

// 发送给发件人
exports.otherHtml = function(data){
    return `<div style="width: 600px;margin: 0 auto;">
            <includetail>
              <table
                style="text-align: center; font-size: 16px; color: #333333; border-spacing: 0px; border-collapse: collapse; width: 580px; direction: ltr">
                <tbody>
                  <tr>
                    <td style="font-size: 14px; padding: 0px 0px 7px 0px; text-align: center;color: #0044CC">
                      尊敬的 <span style="font-weight: bold;">${data.name}</span>,Young Kbt 感谢您的邮件
                    </td>
                  </tr>
                  <tr style="background-color: #2279BD">
                    <td style="padding: 0px">
                      <table style="border-spacing: 0px; border-collapse: collapse; width: 100%">
                        <tbody>
                          <tr>
                            <td style="padding: 0px; text-align: center;">
                              <img src="https://cdn.jsdelivr.net/gh/Kele-Bingtang/static/user/20211205131212.jpg" alt="请在上方选择信任,以此显示头像">
                            </td>
                          </tr>
                          <tr>
                            <td style="font-size: 38px; color: #FFFFFF; padding: 12px 22px 4px 22px; text-align: center;"
                              colspan="3">
                              Young Kbt
                            </td>
                          </tr>
                          <tr>
                            <td style="font-size: 20px; color: #FFFFFF; padding: 0px 22px 18px 22px; text-align: center;"
                              colspan="3">
                              人闲车马慢,路遥星亦辞
                            </td>
                          </tr>
                        </tbody>
                      </table>
                    </td>
                  </tr>
                  <tr>
                    <td
                      style="background-color: #5BA9DF; border-bottom-style: solid; border-bottom-color: #2279BD; border-bottom-width: 4px;">
                      <table style="color: #333333; border-spacing: 0px; border-collapse: collapse; width: 100%; color: #fff">
                        <tbody>
                          <tr>
                            <td style="font-size: 18px; padding: 0px 0px 5px 0px;">
                              <p style="text-align: center">
                                <span style="font-weight:bold">Young Kbt</span>
                                <span>提示您:</span>
                              </p>
                              <p
                                style="font-size: 16px; letter-spacing: 0.5px; text-indent: 32px; padding:0 20px; line-height: 30px; text-align: left;">
                                本邮件由 Young Kbt's index 网站发送给您,
                                <span style="color: #1546a8; font-weight: bold;">如果非本人操作,请忽略即可。</span>
                              </p>
                            </td>
                          </tr>
                          <tr>
                            <td style="font-size: 18px; padding: 0px 0px 5px 0px;">
                              <p style="text-align: center; margin-top: 0;">
                                <span style="font-weight:bold">Young Kbt</span>
                                <span>回复您:</span>
                              </p>
                              <p
                                style="font-size: 16px;letter-spacing: 0.5px; text-indent: 32px; padding:0 20px; line-height: 30px; text-align: left;">
                                感谢您提供的宝贵消息,我会根据您的内容尽快回复您,如果时间较延迟,请您见谅。
                              </p>
                            </td>
                          </tr>
                          <tr>
                            <td style="font-size: 16px; padding: 30px 20px; text-align: center">
                              如果您对我的网站感兴趣,请访问:
                              <p style="color: #0044CC; font-weight: bold">
                               <a href="youngkbt.cn" style="color: #0044CC; text-decoration: none">youngkbt.cn</a>
                              </p>
                              <p style="color: #0c3388;font-size: 14px; margin: 15px 0 0 0;">本网站仅是个人使用,并不带有商业用途</p>
                            </td>
                          </tr>
                        </tbody>
                      </table>
                    </td>
                  </tr>
                  <tr>
                    <td style="padding: 35px 0px; color: #B2B2B2; font-size: 12px">
                      From Young Kbt
                      <br>
                      This is a WebSite
                      <br>
                      ${new Date().getFullYear()}-${new Date().getMonth() + 1 == 13 ? 12 : new Date().getMonth() + 1}-${new
    Date().getDate() > 10 ? new Date().getDate() : '0' + new Date().getDate()}
                      ${new Date().getHours() > 10 ? new Date().getHours() : '0' + new Date().getHours()}:${new
    Date().getMinutes() > 10 ? new Date().getMinutes() : '0' + new Date().getMinutes()}:${new
    Date().getSeconds() > 10 ? new Date().getSeconds() : '0' + new Date().getSeconds()}
                    </td>
                  </tr>
                  <tr>
                    <td style="padding: 0px 0px 10px 0px; color: #B2B2B2; font-size: 12px">
                      Copyright Young Kbt WebSite
                    </td>
                  </tr>
                </tbody>
              </table>
            </includetail>
          </div>`
};
2
3
4
5
6
7
8
9
10
11
12
13
14
15
16
17
18
19
20
21
22
23
24
25
26
27
28
29
30
31
32
33
34
35
36
37
38
39
40
41
42
43
44
45
46
47
48
49
50
51
52
53
54
55
56
57
58
59
60
61
62
63
64
65
66
67
68
69
70
71
72
73
74
75
76
77
78
79
80
81
82
83
84
85
86
87
88
89
90
91
92
93
94
95
96
97
98
99
100
101
102
103
104
105
106
107
108
109
110
111
112
113
114
115
116
117
118
119
120
121
122
123
124
125
126
127
128
129
130
131
132
133
134
135
136
137
138
139
140
141
142
143
144
145
146
147
148
149
150
151
152
153
154
155
156
157
158
159
160
161
162
163
164
165
166
167
168
169
170
171
172
173
174
175
176
177
178
179
180
181
182
183
184
185
186
187
188
189
190
191
192
193
编写 express 的入口文件 app.js,监听 5678 端口
const express = require("express");
const router = require("./router");
const log = require("./log");
const app = express();

log.use(app);
app.use(express.urlencoded({ extended: false }));
app.use(express.json());

app.use( ( request , response , next ) => {
    response.header( 'Access-Control-Allow-Origin' , '*') // 跨域最重要的一步 设置响应头
    next(); // 执行 next 函数执行后续代码
})

app.use('/',router);

app.listen('5678',() => {
    console.log("5678 端口的服务器启动成功");
})
2
3
4
5
6
7
8
9
10
11
12
13
14
15
16
17
18
19
写完邮箱的功能,我们可以进行测试,进入邮箱项目的根目录,使用 node app.js 启动 node 项目。
node app.js
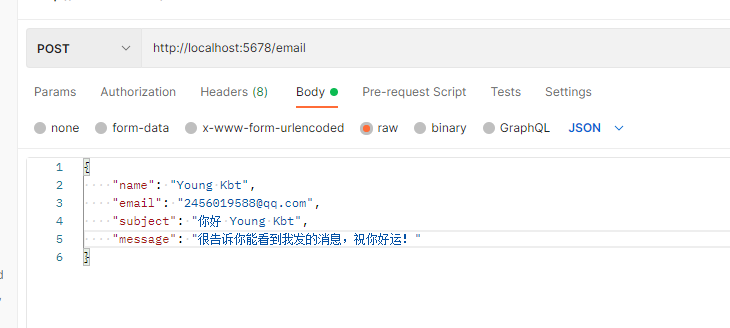
因为是 POST 请求,所以使用 Postman 等工具进行测试,访问 localhost:5678/email,填写 JSON 格式,包含 name、email、subject、message 四个参数的数据即可。
# 官方镜像部署
在本地编写测试完邮箱的功能后,我们将其上传到服务器,我上传的目录是 docker/node/email 下,然后需要服务器安装 node 环境,我使用的是 docker,所以直接拉取 node。
docker pull node
下载完 node 镜像后,不要马上启动它,因为 node 项目需要执行打包命令,生成 node_modules 目录,所以使用 Dockerfile 文件来执行打包命令。
在 docker/node/email 目录下,创建并编写 Dockerfile 文件
cd docker/node/email
vim Dockerfile
2
添加如下内容:
FROM node					# 基于 node 镜像创建新的镜像
WORKDIR /home/email			# 创建默认工作目录
COPY . /home/email			# 将当前目录的所有内容拷贝到容器中
RUN npm i					# 执行打包命令
EXPOSE 5678					# 暴露 5678 端口
ENTRYPOINT node ./app.js 	# 启动容器时,启动 app.js 文件
2
3
4
5
6
不难看出,在生成 docker 镜像的同时,它会将当前目录下的所有内容拷贝到容器中,这些内容就是我们写的邮箱项目。接着它会执行打包命令 npm i,i 代表 install。然后暴露 5678 端口,最后在启动的时候,启动 app.js 文件,也就是执行项目。
写好 Dockerfile 文件,我们执行这个文件,构建基于 node 环境而搭建的「邮箱发送」镜像
docker build -t email:1.0 .
启动这个名叫 email、版本为 1.0 的容器,当启动这个容器的时候,内部就会执行 node ./app.js 命令,也就是 Dockerfile 文件的 ENTRYPOINT 指令,部署项目。
docker run -d --name email \
-v /docker/node/email/router.js:/home/email/router.js \
-v /docker/node/email/app.js:/home/email/app.js \
-v /docker/node/email/log.js:/home/email/log.js \
-v /docker/node/email/logs:/home/email/logs \
-v /docker/node/email/email:/home/email/email \
--network web --network-alias email \
email:1.0
2
3
4
5
6
7
8
不要惊讶会有那么多启动命令,这里主要实现挂载功能,只要宿主机的文件发生改变,则容器内的文件也会同步改变,毕竟谁也无法确定自己写的文件以后都不会修改,对吧。
至于第 7 行的 network 网络,因为 Nginx 所处的网络是 web 网络,而想让 Nginx 访问 node 项目,则需要让两者处于同一个网络上。 network-alias 是网络别名,Nginx 会根据这个网络别名找到处于相同网络下的 node 项目,尽量与容器名保持一致。
此时邮箱项目已经部署成功了,但是 Nginx 还无法访问这个邮箱项目,因为我们没有配置 location 模块来访问邮箱项目。
server {
    listen       5678;
    server_name  localhost;

    location /email {
	    proxy_pass http://email:5678;    # email 就是网桥别名,Nginx 通过它找到 email 容器
    }
}
2
3
4
5
6
7
8
实际上我并没有直接将上面的 server 模块放在配置文件里,而是将上面的内容放在新创建的 email_5678.conf 文件里,然后在配置文件进行转发。

因为核心配置文件使用了 include 指令将 conf 目录下的所有 .conf 文件引入,所以我们只需要创建新的配置文件 email_5678.conf 即可。
然后新的配置文件添加如下内容:
server {
    listen 431;		# 431 是 https 的默认端口,80 是 http 的默认端口
    server_name www.youngkbt.cn;
    # ...... 其他 location

    # 转发给其他的 conf 文件
    location /email {
        proxy_pass http://localhost:5678;
    }

    # ...... 其他 location
}
2
3
4
5
6
7
8
9
10
11
12
当访问 /email 的时候,触发 431 端口的的 /email,然后内部就会执行 proxy_pass 指令,将请求转发给本地的 5678 端口,此时 email_5678.conf 文件正好监听这个 5678 端口,所以就会将 /email 请求发给自己的 location ,执行新的 proxy_pass 指令,而这个指令才是将请求发给 node 邮箱项目,触发邮箱的发送。
记得重启 Ngixn,使得配置文件生效。
什么时候外界会访问 /email?
自己写一个 <a> 标签,填写你的服务器的地址加上 /email 即可。
我自己写的不是 <a> 标签,而是一个 js 文件,点击按钮触发 ajax 请求,具体源码请看 首页部署 的 JS 文件。
# 自定义镜像部署
我在使用了基于官方镜像的部署几天后,发现这个镜像太大了,有 999MB,如图:

于是我打算基于 Centos7.9 构建一个 node 环境的镜像,这里提供 Dockerfile 文件内容:
# 这是早期的版本,直接引入 node 镜像,但是该镜像太大了,构建后 999MB,所以我就自己创建一个 nodejs 镜像
# FROM node
FROM centos:7.9

# nodejs 版本
ARG NODE_VERSION="v16.13.1"

WORKDIR /opt/sendEmail
# 将当前目录的所有文件放入容器的 /opt/sendEmail
COPY . /opt/sendEmail

# 因为 COPY 也会将当前的 nodejs 压缩包添加进入,所以可以删除掉
RUN rm -f /opt/sendEmail/node-${NODE_VERSION}-linux-x64.tar.xz

# ------ 二选一,可注释 ------
# 如果事先下载的 node 压缩包,则放入 Dockerfile 所在的目录下,利用 ADD 传入并自动解压
ADD node-${NODE_VERSION}-linux-x64.tar.xz /usr/local/
# ADD 指令自动解压,所以可以删除传入的压缩包
RUN rm -f /usr/local/node-${NODE_VERSION}-linux-x64.tar.xz
# ------ ------ ------ ------ ------ ------ ------ ------ ------ ------

# ------ 二选一,可注释 ------
# 如果想要远程下载 node 压缩包,则取消下面的 RUN 指令注释
#RUN yum install -y wget tar \
#     && cd /usr/local/ \
#     && wget https://nodejs.org/dist/${NODE_VERSION}/node-${NODE_VERSION}-linux-x64.tar.xz \
#     && tar xvf node-${NODE_VERSION}-linux-x64.tar.xz \
#     && rm -f node-${NODE_VERSION}-linux-x64.tar.xz
# ------ ------ ------ ------ ------ ------ ------ ------ ------ ------

# 将解压的 node 目录重命名
RUN cd /usr/local/ \
     && mv node-${NODE_VERSION}-linux-x64 node

# 将 node 命令添加至全局变量,包括了 node 和 npm
ENV PATH=$PATH:/usr/local/node/bin

# 安装依赖包
RUN cd /opt/sendEmail \
     && npm install

# 暴露 7272 端口
EXPOSE 7272
# 启动容器后,自动执行下面的命令来启动项目
ENTRYPOINT node ./app.js
2
3
4
5
6
7
8
9
10
11
12
13
14
15
16
17
18
19
20
21
22
23
24
25
26
27
28
29
30
31
32
33
34
35
36
37
38
39
40
41
42
43
44
45
我都有注释说明,这里大概总结下:
基于 Centos7.9 系统搭建 node 镜像,首先下载 nodejs,传到与 Dockerfile 同目录下,然后执行 Dockerfile 的时候,将 nodejs 传入镜像里,自动解压,并将 node 和 npm 命令添加至全局变量,然后把邮箱项目的代码传入镜像,接着利用全局变量 npm 进行安装 nodes_modules,最后写 ENTRYPOINT 指令,该指令会在启动容器的时候自动启动项目,这样就不需要我们亲自进入容器里启动项目。
如果不喜欢先下载 nodejs,传入服务器里,那么就在构建容器时使用 wget 下载即可,上面内容的注释就是 wget 相关操作,二选一。
执行如下命令执行 Dockerfile,构建镜像:
docker build -t email:2.0 .
可以看到构建的新镜像大小已经缩小一半左右,并且功能没有任何缺失,如图:

2.0 版本的邮箱镜像构建源码我已经放到下载站点里了,如果需要,我在上方提供了下载地址,点击 序言 直达。
# 消息提示效果代码
在发送邮箱的过程,如果没有填写一些必要的信息,则会被提示,首页的提示是仿照 Element UI,只有两个函数,使用起来非常简单:
/**
 * 添加消息提示
 * content:内容
 * type:弹窗类型(tip、success、warning、danger)
 * startHeight:第一个弹窗的高度,默认 50
 * dieTime:弹窗消失时间(毫秒),默认 3000 毫秒
 */
function addTip(content, type, startHeight = 50, dieTime = 3000) {
  var tip = document.querySelectorAll(".tip");
  var time = new Date().getTime();
  // 获取最后消息提示元素的高度
  var top = tip.length == 0 ? 0 : tip[tip.length - 1].getAttribute("data-top");
  // 如果产生两个以上的消息提示,则出现在上一个提示的下面,即高度添加,否则默认 50
  var lastTop =
    parseInt(top) +
    (tip.length != 0 ? tip[tip.length - 1].offsetHeight + 17 : startHeight);

  let div = document.createElement("div");
  div.className = `tip tip-${type} ${time}`;
  div.style.top = parseInt(top) + "px";
  div.setAttribute("data-top", lastTop);
  if (type == "info" || type == 1) {
    div.innerHTML = `<i class="iconfont icon-info icon"></i><p class="tip-info-content">${content}</p>`;
  } else if (type == "success" || type == 2) {
    div.innerHTML = `<i class="iconfont icon-dagouyouquan icon"></i><p class="tip-success-content">${content}</p>`;
  } else if (type == "danger" || type == 3) {
    div.innerHTML = `<i class="iconfont icon-cuowu icon"></i><p class="tip-danger-content">${content}</p>`;
  } else if (type == "warning" || type == 4) {
    div.innerHTML = `<i class="iconfont icon-gantanhao icon"></i><p class="tip-warning-content">${content}</p>`;
  }
  document.body.appendChild(div);

  let timeTip = document.getElementsByClassName(time)[0];
  setTimeout(() => {
    timeTip.style.top = parseInt(lastTop) + "px";
    timeTip.style.opacity = "1";
  }, 10);

  // 消息提示 dieTime 秒后隐藏并被删除
  setTimeout(() => {
    timeTip.style.top = "0px";
    timeTip.style.opacity = "0";

    // 下面的所有元素回到各自曾经的出发点
    var allTipElement = nextAllTipElement(timeTip);
    for (let i = 0; i < allTipElement.length; i++) {
      var next = allTipElement[i];
      var top =
        parseInt(next.getAttribute("data-top")) - next.offsetHeight - 17;
      next.setAttribute("data-top", top);
      next.style.top = top + "px";
    }
    setTimeout(() => {
      timeTip.remove();
    }, 500);
  }, dieTime);
}
/**
 * 获取后面的兄弟元素
 */
function nextAllTipElement(elem) {
  var r = [];
  var n = elem;
  for (; n; n = n.nextSibling) {
    if (n.nodeType === 1 && n !== elem) {
      r.push(n);
    }
  }
  return r;
}
2
3
4
5
6
7
8
9
10
11
12
13
14
15
16
17
18
19
20
21
22
23
24
25
26
27
28
29
30
31
32
33
34
35
36
37
38
39
40
41
42
43
44
45
46
47
48
49
50
51
52
53
54
55
56
57
58
59
60
61
62
63
64
65
66
67
68
69
70
CSS 样式:
/* 提示框元素 */
.tip {
  position: fixed;
  display: flex;
  top: -10px;
  left: 50%;
  opacity: 0;
  min-width: 320px;
  transform: translateX(-50%);
  transition: opacity 0.3s linear, top 0.4s, transform 0.4s;
  z-index: 99999;
  padding: 15px 15px 15px 20px;
  border: 1px solid #ebeef5;
  border-radius: 4px;
  grid-row: 1;
  line-height: 17px;
}

.tip p {
  line-height: 17px;
  margin: 0;
  font-size: 14px;
}

.icon {
  margin-right: 10px;
  line-height: 17px;
}

.tip-success {
  color: #67c23a;
  background-color: #f0f9eb;
  border-color: #e1f3d8;
}

.tip-success .tip-success-content {
  color: #67c23a;
}

.tip-danger {
  color: #f56c6c;
  background-color: #fef0f0;
  border-color: #fde2e2;
}

.tip-danger .tip-danger-content {
  color: #f56c6c;
}

.tip-info {
  background-color: #edf2fc;
  border-color: #ebeef5;
}

.tip-info .tip-info-content {
  color: #909399;
}

.tip-warning {
  color: #e6a23c;
  background-color: #fdf6ec;
  border-color: #faecd8;
}

.tip-warning .tip-warning-content {
  margin: 0;
  color: #e6a23c;
  line-height: 21px;
  font-size: 14px;
}
2
3
4
5
6
7
8
9
10
11
12
13
14
15
16
17
18
19
20
21
22
23
24
25
26
27
28
29
30
31
32
33
34
35
36
37
38
39
40
41
42
43
44
45
46
47
48
49
50
51
52
53
54
55
56
57
58
59
60
61
62
63
64
65
66
67
68
69
70
图片是阿里云的图标库,在线地址:
<link rel="stylesheet" href="//at.alicdn.com/t/font_3114978_qe0b39no76.css">
使用只需要调用 addTip 即可:
function test() {
    var hours = new Date().getHours();
    var minutes = new Date().getMinutes();
    var seconds = new Date().getSeconds();
    hours = hours < 10 ? "0" + hours : hours;
    minutes = minutes < 10 ? "0" + minutes : minutes;
    seconds = seconds < 10 ? "0" + seconds : seconds;
    if (hours >= 6 && hours < 11) {
        addTip(
            `早上好呀~~,现在是 ${hours}:${minutes}:${seconds},吃早餐了吗?😊🤭`,
            "info",
            50,
            4000
        );
    } else if (hours >= 12 && hours <= 16) {
        addTip(
            `下午好呀~~,现在是 ${hours}:${minutes}:${seconds},繁忙的下午也要适当休息哦🥤🏀~~`,
            "info",
            50,
            4000
        );
    } else if (hours >= 16 && hours <= 19) {
        addTip(
            `到黄昏了~~,现在是 ${hours}:${minutes}:${seconds},该准备吃饭啦🥗🍖~~`,
            "info",
            50,
            4000
        );
    } else if (hours >= 19 && hours < 24) {
        addTip(
            `晚上好呀~~,现在是 ${hours}:${minutes}:${seconds},该准备洗漱睡觉啦🥱😪~~`,
            "info",
            50,
            4000
        );
    } else if (hours >= 0 && hours < 6) {
        addTip(
            `别再熬夜了~~,现在是 ${hours}:${minutes}:${seconds},早点睡吧,让我们一起欣赏早上的太阳~~😇🛏`,
            "info",
            50,
            4000
        );
    }
}
2
3
4
5
6
7
8
9
10
11
12
13
14
15
16
17
18
19
20
21
22
23
24
25
26
27
28
29
30
31
32
33
34
35
36
37
38
39
40
41
42
43
44
