 Docker - 网络网桥
# 网桥原理
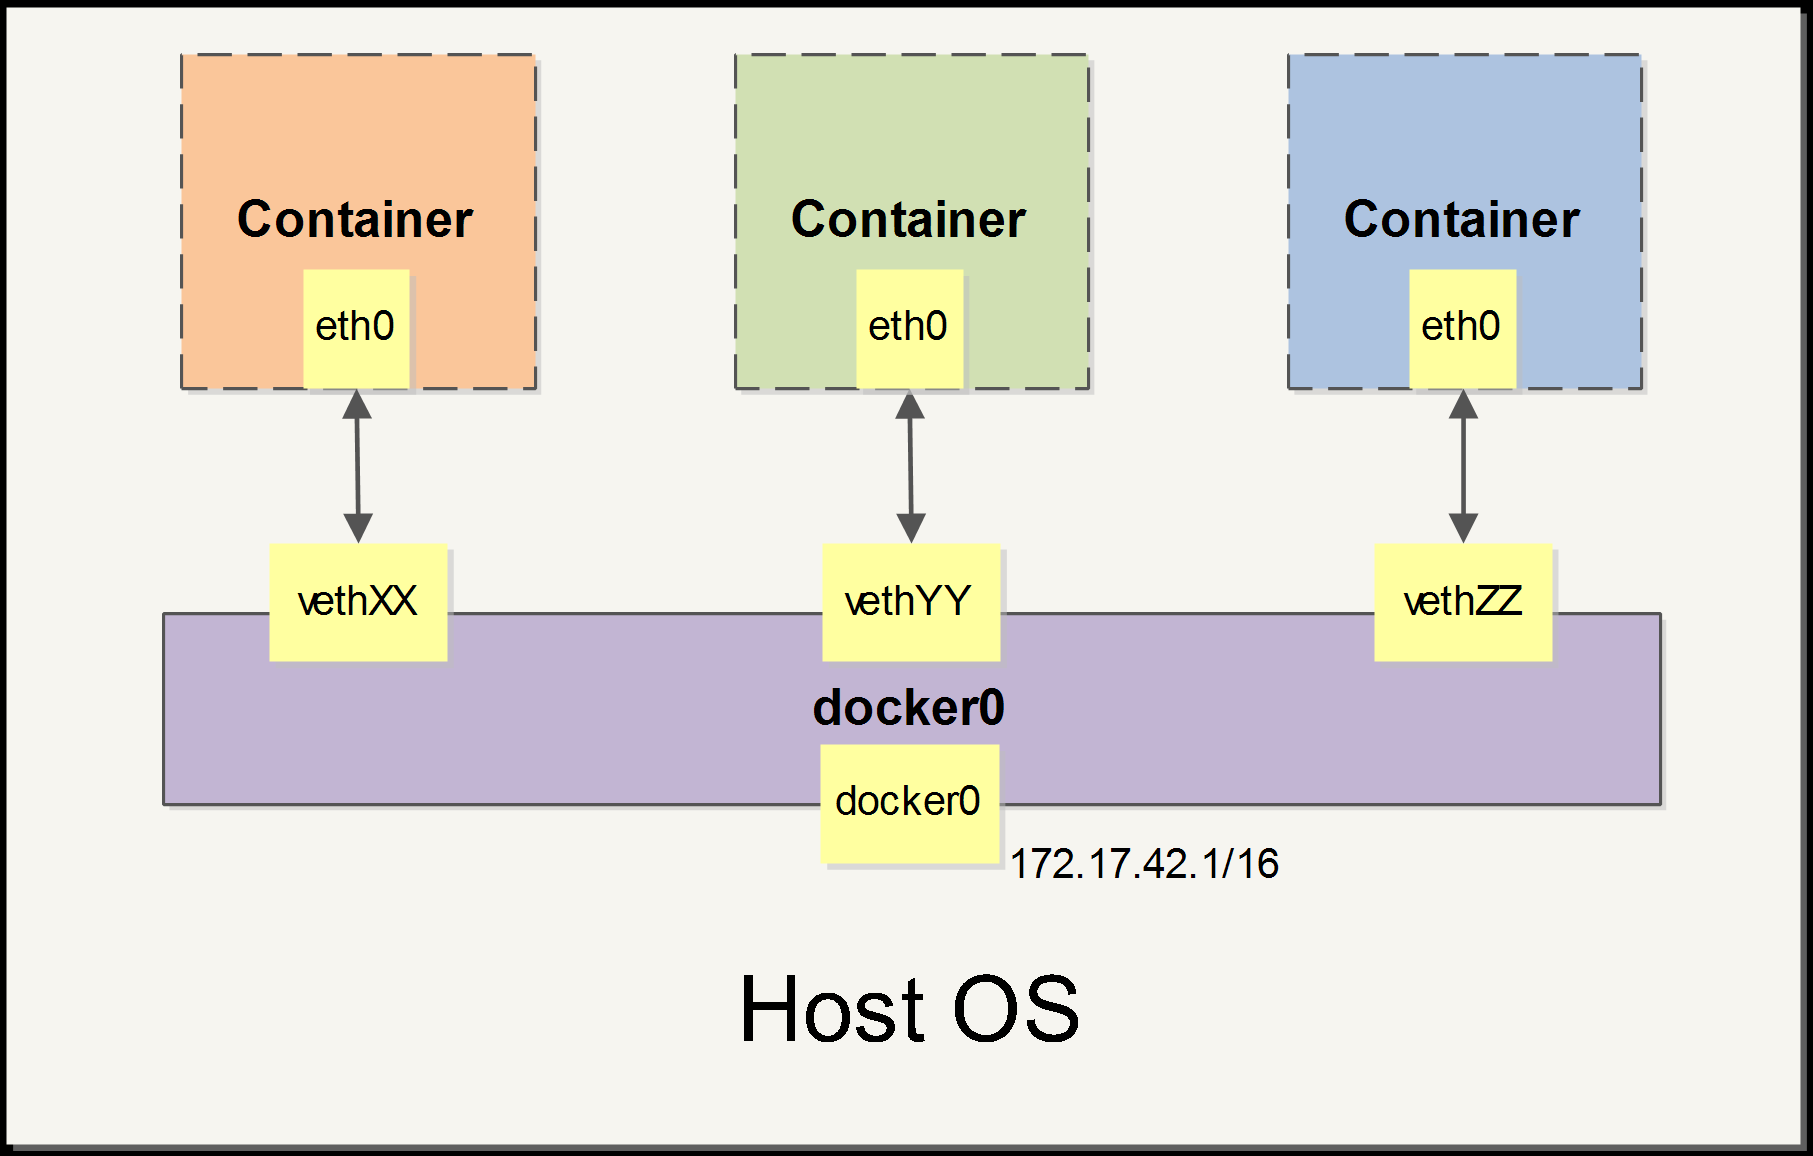
当 Docker 启动时,会自动在主机上创建一个 docker0 虚拟网桥,实际上是 Linux 的一个 bridge,可以理解为一个软件交换机。它会在挂载到它的网口之间进行转发。
同时,Docker 随机分配一个本地未占用的私有网段(在 RFC1918 (opens new window)中定义)中的一个地址给 bridge 接口。比如典型的 172.17.42.1,掩码为 255.255.0.0。此后启动的容器内的网口也会自动分配一个同一网段(172.17.0.0/16)的地址。
当创建一个 Docker 容器的时候,同时会创建了一对 veth pair 接口(当数据包发送到一个接口时,另外一个接口也可以收到相同的数据包,它常常充当着一个桥梁。)。这对接口一端在容器内,即 eth0;另一端在本地并被挂载到 docker0 网桥,名称以 veth 开头(例如 vethAQI2QT)。通过这种方式,主机可以跟容器通信,容器之间也可以相互通信。Docker 就创建了在主机和所有容器之间一个虚拟共享网络。
# 理解网桥
首先我们可以查看操作系统的 IP,会发现 Docker 的 IP
执行命令:ip address 或者 ip a
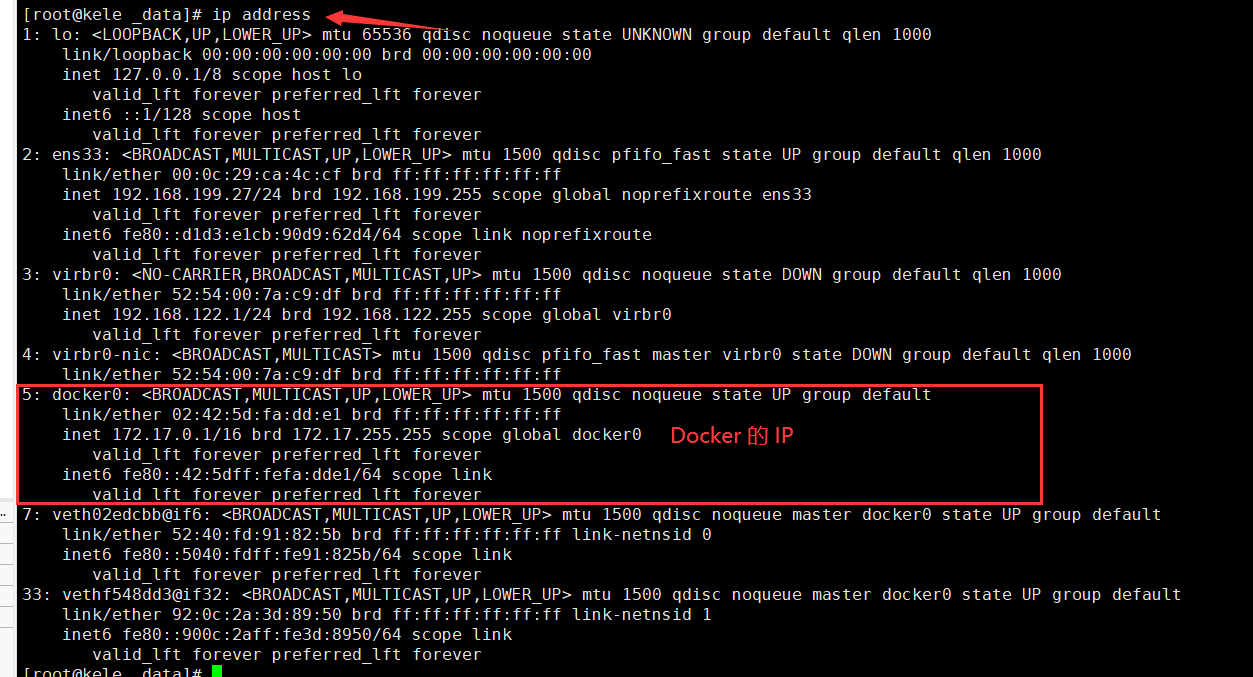
每次启动一个容器,都会增加一个 IP。
Docker 保证了容器的隔离性,但是容器之间也是可以通信的,当部署了很多项目,或者很多软件,如 MySQL,Redis,ElasticSearch。在实际生产环境上,我们不可能只是单独使用其中一个,我们需要数据的交互,如 MySQL 数据缓存到 Redis 里,那么它们就需要进行连接,容器之间是隔离的,而想要连接,就是需要通过网络。
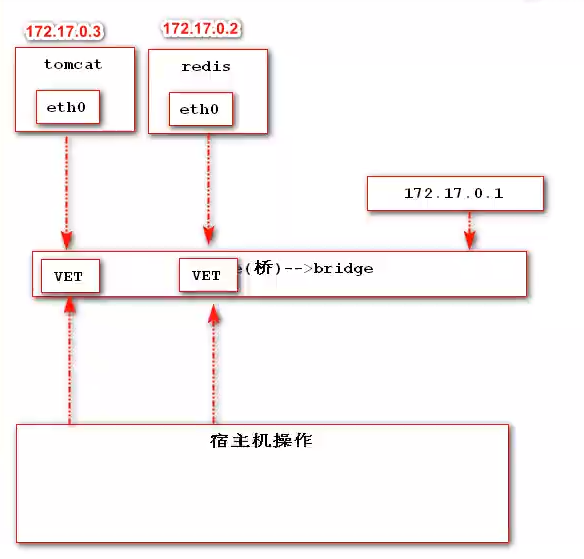
上文提到,按照 Docker 服务默认会创建一个 docker0 网桥,它在内核层连通了其他的物理或虚拟网卡,这就将所有容器和本地主机都放到同一个物理网络。
形象化理解:两个地方需要传递消息,首先需要中转站,首先两个地方要有消息站,两个地方的消息站叫做 eth0,中转站叫做 veth。消息站之间通信的方式是信号,两个地方信号是 127.17.xx.xx,中转站信号是 127.17.0.1,所以通信就非常简单了,一个地方先通过信号发给中转站,中转站再转发给另一个地方,实现联系。
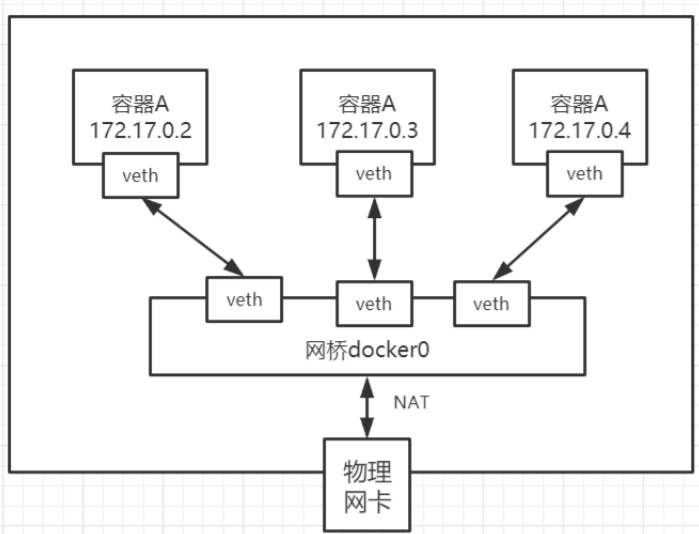
可以通过 docker network ls 命令查看网桥:
# 执行命令
docker network ls

# 返回结果
NETWORK ID     NAME      DRIVER    SCOPE
a4233d5cfcdb   bridge    bridge    local
5eeb9eeac070   host      host      local
7cbed644a605   none      null      local
2
3
4
5
6
7
8
笔记
网桥名 bridge 就是默认网桥 docker0。
习惯了叫 docker0。
2021-11-20 @Young Kbt
Docker 安装时会自动在 host 上创建三个网络:none,host,和 bridge。我们看下 docker0 网桥:(brctl 可以通过 yum install bridge-utils 安装)
# 执行命令
brctl show

# 返沪结果
bridge name	bridge id	STP   enabled	interfaces
docker0		8000.02425dfadde1	no		veth02edcbb
										vethf548dd3
virbr0		8000.5254007ac9df	yes		virbr0-nic
2
3
4
5
6
7
8
# 操作网桥
笔记
网桥和镜像、容器一样,也有两个标识:id 和 名字。
使用任意一个标识都可以操作网桥,本内容使用网桥的名字(name)
2021-11-20 @Young Kbt
# 为什么不使用默认的网桥
首先要知道,启动一个容器,默认是使用网桥 docker0,但是实际生产环境,我们不可能把 N 多个项目或者环境都放在一个网桥上。网桥是通信的媒介,我们应该自己创建网桥,把关联的项目放在一个网桥上,不关联的项目放到另一个网桥上,防止毫不相干的项目因为争夺资源等因素影响其他项目的运行,因为不同的网桥是隔离的。

# 网桥命令列表
# 执行命令
docker network --help

# 返回结果
docker network
Usage:  docker network COMMAND
Manage networks
Commands:
  connect     Connect a container to a network  # 网桥连接一个容器
  create      Create a network   # 创建网桥
  disconnect  Disconnect a container from a network  # 容器取消连接网桥
  inspect     Display detailed information on one or more networks  # 查看网桥的具体配置信息
  ls          List networks  # 查看网桥列表
  prune       Remove all unused networks   # 删除所有未使用的网桥
  rm          Remove one or more networks  # 删除指定的网桥
Run 'docker network COMMAND --help' for more information on a command.
2
3
4
5
6
7
8
9
10
11
12
13
14
15
16
# 查看网桥列表
# 执行命令
docker network ls

# 返回结果
docker network ls
NETWORK ID     NAME      DRIVER    SCOPE
a4233d5cfcdb   bridge    bridge    local
5eeb9eeac070   host      host      local
7cbed644a605   none      null      local
2
3
4
5
6
7
8
9
# 创建自定义网桥
创建自定义网桥命令格式:docker network create [options] <网桥名>
docker network create [options] <网桥名>

# 指定 DRIVER,默认是 bridge
docker network create -d xxx <网桥名>

# 指定 子网掩码
docker network create --subnet <子网掩码 IP> <网桥名>

# 指定 网关
docker network create --gateway  <网关 IP> <网桥名>

# 完整
docker network create -d xxx --subnet <子网掩码 IP> --gateway <网关 IP> xxx <网桥名>
2
3
4
5
6
7
8
9
10
11
12
13
使用 -d,配置网络的类型(DRIVER),默认是 bridge
例子:创建 kele 网桥
# 执行命令
docker network create kele

# 返回结果
922ea0d2e922b48bb5cd3adc2c63fc02079927a6971c491fc5a1a2e4a45e2073

# 执行命令
docker network ls

# 返回结果
NETWORK ID     NAME      DRIVER    SCOPE
a4233d5cfcdb   bridge    bridge    local
5eeb9eeac070   host      host      local
922ea0d2e922   kele      bridge    local
7cbed644a605   none      null      local
2
3
4
5
6
7
8
9
10
11
12
13
14
15
例子:创建 bing 网桥,指定该网桥的网关和子网掩码
# 执行命令
docker network create -d bridge --subnet 192.168.0.0/16 --gateway 192.168.0.1 bing

# 返回结果
7e9d2f900b52563588e10e8c3071219c629203356c5fe0f3fec25fec477c0757

# 执行命令
docker network ls

# 返回结果
NETWORK ID     NAME      DRIVER    SCOPE
7e9d2f900b52   bing      bridge    local
a4233d5cfcdb   bridge    bridge    local
5eeb9eeac070   host      host      local
922ea0d2e922   kele      bridge    local
7cbed644a605   none      null      local
2
3
4
5
6
7
8
9
10
11
12
13
14
15
16
# 查看网桥详细信息
docker network inspect <网桥id | 网桥名>
例子:查看 bridge 的详细信息
# 执行命令
docker network inspect a4233d5cfcdb
# 或者
docker network inspect bridge

# 返回结果
[
    {
        "Name": "bridge",
        "Id": "a4233d5cfcdbf99321aa1893c1846278497008f60e10787bf2341f45a830beee",
        "Created": "2021-11-20T11:30:23.135345272+08:00",
        "Scope": "local",
        "Driver": "bridge",
        "EnableIPv6": false,
        "IPAM": {
            "Driver": "default",
            "Options": null,
            "Config": [
                {
                    "Subnet": "172.17.0.0/16",
                    "Gateway": "172.17.0.1"
                }
            ]
        },
        "Internal": false,
        "Attachable": false,
        "Ingress": false,
        "ConfigFrom": {
            "Network": ""
        },
        "ConfigOnly": false,
        "Containers": {
            "1365f332be6b57943dfbfc1ececddac3a2b3c6ad12a17313a427041e27a2c044": {
                "Name": "tomcat01",
                "EndpointID": "8f96af6293e77ee301c83f8325f1f78c3cc027641a5e95ea93160bfba7315ad3",
                "MacAddress": "02:42:ac:11:00:02",
                "IPv4Address": "172.17.0.2/16",
                "IPv6Address": ""
            },
            "e2bb571eb1687719f346bce4cec6bd5dff5240b8bf090b451ef05c2cb6bee167": {
                "Name": "tomcat02",
                "EndpointID": "6e397e04b57a5ecbbd04d506c0170391f5fbdca5270bb826b1d7daf48e1de92e",
                "MacAddress": "02:42:ac:11:00:03",
                "IPv4Address": "172.17.0.3/16",
                "IPv6Address": ""
            }
        },
        "Options": {
            "com.docker.network.bridge.default_bridge": "true",
            "com.docker.network.bridge.enable_icc": "true",
            "com.docker.network.bridge.enable_ip_masquerade": "true",
            "com.docker.network.bridge.host_binding_ipv4": "0.0.0.0",
            "com.docker.network.bridge.name": "docker0",
            "com.docker.network.driver.mtu": "1500"
        },
        "Labels": {}
    }
]
2
3
4
5
6
7
8
9
10
11
12
13
14
15
16
17
18
19
20
21
22
23
24
25
26
27
28
29
30
31
32
33
34
35
36
37
38
39
40
41
42
43
44
45
46
47
48
49
50
51
52
53
54
55
56
57
58
20 - 21 行代码可以看出默认网桥的网关就是 172.17.0.1。
34 和 41 行代码可以看出该网桥上的容器是 tomcat01 和 tomcat02。
# 删除网桥
删除某个网桥命令格式:docker network rm <网桥名称 | 网桥 id>
删除全部未使用的网桥命令格式:docker network prune
# 删除某个网桥
docker network rm <网桥名称 | 网桥 id>

# 删除全部网桥
docker network prune
2
3
4
5
例子:删除 kele 网桥
# 执行命令
docker network ls

# 返回结果
NETWORK ID     NAME      DRIVER    SCOPE
a4233d5cfcdb   bridge    bridge    local
5eeb9eeac070   host      host      local
922ea0d2e922   kele      bridge    local
7cbed644a605   none      null      local

# 删除网桥
docker network rm 922ea0d2e922
# 或者
docker network rm kele
2
3
4
5
6
7
8
9
10
11
12
13
14
例子 2:删除所有网桥
docker network prune
警告
这个命令谨慎操作!
2021-11-20 @Young Kbt
# 容器使用网桥
启动一个容器默认使用 bridge 网桥,我们在启动的时候指定某一个网桥。
一旦在启动容器时指定了网桥之后,日后可以在任何这个网桥关联的容器中使用 容器名字 进行与其他容器通信。
格式:docker run -d -p 宿主机端口:容器端口 --name <自定义名> --network <网桥名> <镜像>:<TAG | ID>
docker run -d -p 宿主机端口:容器端口 --name <自定义名> --network <网桥名> <镜像>:<TAG | ID>

# 或者
docker run -d -p 宿主机端口:容器端口 --network <网桥名> --network-alias <网桥别名> <镜像>:<TAG | ID>
2
3
4
如果不指定 --network,创建的容器默认都会挂到 docker0 上,使用本地主机上 docker0 接口的 IP 作为所有容器的默认网关。
Docker 在创建一个容器的时候,会执行如下操作:
- 创建一对虚拟接口/网卡,也就是 veth pair,分别放到本地主机和新容器中;
- 本地主机一端桥接到默认的 docker0 或指定网桥上,并具有一个唯一的名字,如 vethxxxxx;
- 容器一端放到新容器中,并修改名字作为 eth0,这个网卡/接口只在容器的名字空间可见;
- 从网桥可用地址段中(也就是与该 bridge 对应的 network)获取一个空闲地址分配给容器的 eth0,并配置默认路由到桥接网卡 vethxxxx。
例子:启动两个 Tomcat 容器,绑定 kele 网桥,并验证互相连接
启动容器,绑定网桥
# 执行命令
docker images tomcat

# 返回结果
REPOSITORY    TAG       IMAGE ID       CREATED        SIZE
tomcat        8.5.73    7ec084df520c   47 hours ago   249MB

# 启动一个容器,绑定 kele 网桥,名字叫做 tomcat02
docker run -d -p 8081:8080 --name tomcat02 --network kele tomcat:8.5.73

# 启动一个容器,绑定 kele 网桥,名字叫做 tomcat03
docker run -d -p 8082:8080 --name tomcat03 --network kele tomcat:8.5.73

# 执行命令
docker ps

# 返回结果
CONTAINER ID   IMAGE           COMMAND             CREATED         STATUS         PORTS                                       NAMES
b8151edb05f3   tomcat:8.5.73   "catalina.sh run"   8 seconds ago   Up 7 seconds   0.0.0.0:8082->8080/tcp, :::8082->8080/tcp   tomcat03
58224b3d8a32   tomcat:8.5.73   "catalina.sh run"   2 minutes ago   Up 2 minutes   0.0.0.0:8081->8080/tcp, :::8081->8080/tcp   tomcat02
2
3
4
5
6
7
8
9
10
11
12
13
14
15
16
17
18
19
20
进入其中一个容器,验证是否能连接另一个容器,这里进入 tomcat02 容器
首先知道 tomcat03 的 IP 地址
docker inspect tomcat03

# 返回结果(部分)
"Networks": {
    "kele": {
        "IPAMConfig": null,
        "Links": null,
        "Aliases": [
        	"b8151edb05f3"
    	],
        "NetworkID": "922ea0d2e922b48bb5cd3adc2c63fc02079927a6971c491fc5a1a2e4a45e2073",
        "EndpointID": "71cbf2b0317d5776931d51979e77100d00b91433b76770651c5f1a8dd88d21e0",
        "Gateway": "172.18.0.1",
        "IPAddress": "172.18.0.3",
        "IPPrefixLen": 16,
        "IPv6Gateway": "",
        "GlobalIPv6Address": "",
        "GlobalIPv6PrefixLen": 0,
        "MacAddress": "02:42:ac:12:00:03",
        "DriverOpts": null
    }
}
2
3
4
5
6
7
8
9
10
11
12
13
14
15
16
17
18
19
20
21
22
可以知道 tomcat03 的 IP 是 172.18.0.3
# 进入 tomcat02
docker exec -it tomcat02 bash

# curl 拉取资源
root@58224b3d8a32:/usr/local/tomcat# curl http://172.18.0.2:8080

# 返回结果(部分)
!doctype html><html lang="en"><head><title>HTTP Status 404 – Not Found</title><style type="text/css">body {font-family:Tahoma,Arial,sans-serif;} h1, h2, h3, b {color:white;background-color:#525D76;} h1 {font-size:22px;} h2 {font-size:16px;} h3 {font-size:14px;} p {font-size:12px;} a {color:black;} .line {height:1px;background-color:#525D76;border:none;}</style></head><body><h1>HTTP Status 404 – Not Found</h1><hr class="line" /><p><b>Type</b> Status Report</p><p><b>Description</b> The origin server did not find a current representation for the target resource or is not willing to disclose that one exists.</p><hr class="line" /><h3>Apache Tomcat/8.5
2
3
4
5
6
7
8
只要返回结果不报错,代表容器之间可以通信,报错案例:
curl: (7) Failed to connect to 172.18.0.3 port 8082: Connection refused
此时应该意识到一个问题:通过 IP 访问 其他容器非常麻烦,如果其他容器 IP 被修改,那么将无法访问,那如何解决呢?
别忘了容器的 name(姓名),Docker 在启动容器的时候,自动将 name(姓名)与 IP 进行绑定,所以访问其他容器 name(姓名)也能访问其他容器
# curl 拉取资源
root@58224b3d8a32:/usr/local/tomcat# curl http://tomcat03:8080

# 返回结果(部分)
!doctype html><html lang="en"><head><title>HTTP Status 404 – Not Found</title><style type="text/css">body {font-family:Tahoma,Arial,sans-serif;} h1, h2, h3, b {color:white;background-color:#525D76;} h1 {font-size:22px;} h2 {font-size:16px;} h3 {font-size:14px;} p {font-size:12px;} a {color:black;} .line {height:1px;background-color:#525D76;border:none;}</style></head><body><h1>HTTP Status 404 – Not Found</h1><hr class="line" /><p><b>Type</b> Status Report</p><p><b>Description</b> The origin server did not find a current representation for the target resource or is not willing to disclose that one exists.</p><hr class="line" /><h3>Apache Tomcat/8.5
2
3
4
5
如果不喜欢使用 name(姓名)进行访问,也可以在启动时给网桥单独去别名,只属于自己的网桥别名,通过该别名也能访问
# 启动一个容器,给所在的网桥取个别名
docker run -d --name tomcat04 --network kele --network-alias kele_tomcat tomcat:8.5.7
2
这样,也可以通过网桥的别名访问该容器:
# curl 拉取资源
root@58224b3d8a32:/usr/local/tomcat# curl http://kele_tomcat:8080
2
当然,建议网桥的别名和容器的 name(姓名)保持一致。
那么,处于 kele 网桥的容器能访问其他网桥容器吗?
启动新的 Tomcat 容器,让他处于默认网桥 docker0,名字叫做 tomcat01
# 如果不加 --network xx,会自动加上,并且 xx 是 bridge
docker run -d -p 8081:8080 --name tomcat01--network bridge tomcat:8.5.73

# 执行命令
docker ps

# 返回结果
CONTAINER ID   IMAGE           COMMAND             CREATED        STATUS       PORTS                                       NAMES
b8151edb05f3   tomcat:8.5.73   "catalina.sh run"   2 hours ago    Up 2 hours   0.0.0.0:8082->8080/tcp, :::8082->8080/tcp   tomcat03
58224b3d8a32   tomcat:8.5.73   "catalina.sh run"   2 hours ago    Up 2 hours   0.0.0.0:8081->8080/tcp, :::8081->8080/tcp   tomcat02
1365f332be6b   tomcat:8.5.73   "catalina.sh run"   22 hours ago   Up 9 hours   0.0.0.0:8080->8080/tcp, :::8080->8080/tcp   tomcat01
2
3
4
5
6
7
8
9
10
11
进入 tomcat01 容器,访问 tomcat02 或者 tomcat03 容器
# 进入容器
docker exec -it tomcat01 bash

# 访问 tomcat02
root@1365f332be6b:/usr/local/tomcat# curl http://tomcat02:8080

# 返回结果,失败
curl: (6) Could not resolve host: tomcat02
2
3
4
5
6
7
8
明显是失败的,说明不同网桥的容器无法互相访问,这就解决了容器之间互相争夺资源(CPU、内存)的清空。
所以项目比较多时,建议创建自定义网桥,不要全部堆积在默认网桥。
# Link连接容器
这是一个过时的命令,我们不推荐使用! 我们建议使用 容器使用网桥,但是这里还是简单演示该操作。
该命令是在启动容器时使用,格式:docker run -d -p 宿主机端口:容器端口 --name <自定义名> --link <其他容器名 | 容器 id> <镜像>:<TAG | ID>
它连接的其他容器必须处于默认网桥 docker0 上。
docker run -d -p 宿主机端口:容器端口 --name <自定义名> --link <其他容器名 | 容器 id> <镜像>:<TAG | ID>
--link 其他容器,就是连接其他容器的网桥。
例子 1:启动 tomcat04 容器时,连接 tomcat 03 容器
使用 -P(大写)容器端口会随机映射宿主机端口,如果不打算外部访问,只是 Docker 内部使用,则可以使用该命令
# 执行命令
docker run -d -P --name tomcat04 --link tomcat03 tomcat:8.5.73

# 返回结果,报错了
docker: Error response from daemon: Cannot link to /tomcat03, as it does not belong to the default network.
2
3
4
5
从返回结果得出,--link 只能连接处于默认网桥 docker0 的容器
例子 2:启动 tomcat04 容器时,连接 tomcat 01 容器
首先删除 tomcat04,虽然例子 1 报错了,但是还是成功创建了 tomcat04,并且 tomcat04 绑定的时默认网桥
docker rm tomcat04
然后开始连接 tomcat01 容器
# 执行命令
docker run -d -p 8084:8080 --name tomcat04 --link tomcat01 tomcat:8.5.73

# 返回结果,报错了
docker: Error response from daemon: Cannot link to /tomcat03, as it does not belong to the default network.

# 进入 tomcat04 容器
docker exec -it tomcat04 bash
# 访问 tomcat01
root@c175286f1fa4:/usr/local/tomcat# curl http://tomcat01:8080

# 返回结果(部分)
<!DOCTYPE html>
<html lang="en">
    <head>
        <meta charset="UTF-8" />
        <title>Apache Tomcat/8.5.73</title>
        <link href="favicon.ico" rel="icon" type="image/x-icon" />
        <link href="tomcat.css" rel="stylesheet" type="text/css" />
    </head>
    ......
    ......
 </htm>
2
3
4
5
6
7
8
9
10
11
12
13
14
15
16
17
18
19
20
21
22
23
说明连接上了 tomcat01 容器的网桥。
# 连接多个网桥
回答
容器启动时指定连接了一个网桥,那么还可以连接其他网桥吗?答案是可以的。
2021-11-20 @Young Kbt
连接多个网桥命令格式:docker network connect <容器名 | 容器 id> <网桥名 | 网桥 id>
docker network connect <容器名 | 容器 id> <网桥名 | 网桥 id>
例子:tomcat 04 连接 kele 桥段
tomcat04 已经连接了 bridge 网桥,我们也可以让它连接上其他的网桥如 kele 网桥
# 执行命令
docker network connect kele tomcat04
2
如何查看是否连接上了呢?
docker inspect tomcat04
返回结果:
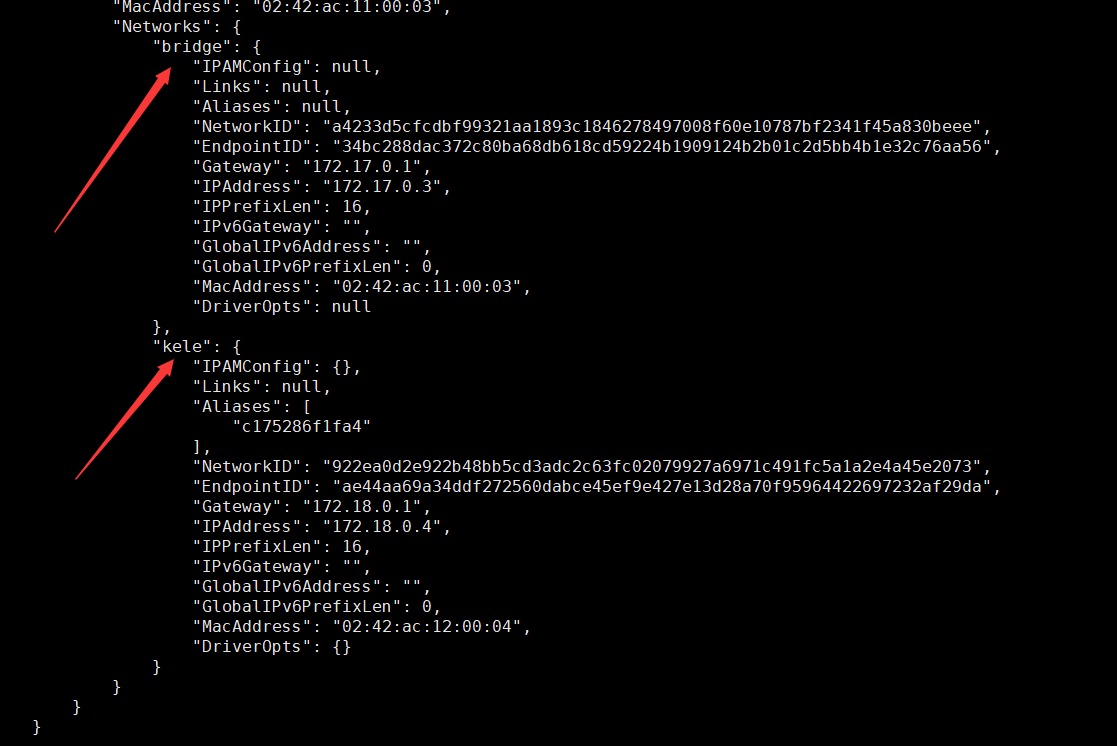
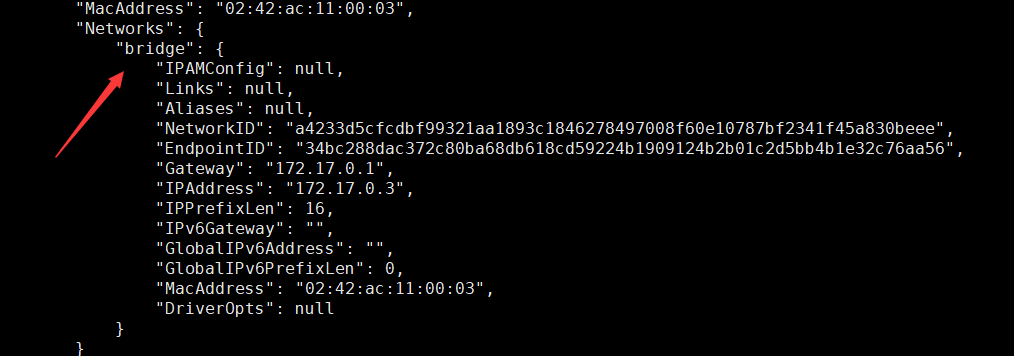
可以知道 tomcat04 既连接上了 bridge 网桥,也连接上了 kele 网桥。
结论:如果要跨网络操作别人,就需要使用 docker network connect <容器名 | 容器 id> <网桥名 | 网桥 id> 进行连接。
# 取消连接网桥
笔记
当一个容器连接了多个网桥,比如上面的 tomcat04 连接了 bridge 和 kele 网桥,如何取消连接某个网桥呢?
2021-11-20 @Young Kbt
取消连接网桥命令格式:docker network disconnect <容器名 | 容器 id> <网桥名 | 网桥 id>
docker network disconnect <容器名 | 容器 id> <网桥名 | 网桥 id>
例子:tomcat04 取消连接 kele 网桥
docker network disconnect kele tomcat04
如何查看是否取消连接了呢?
docker inspect tomcat04
返回结果:只有 bridge 网桥
