 JUC - 共享模式之并发类
# StampedLock
该类自 JDK 8 加入,是为了进一步优化读性能,它的特点是在使用读锁、写锁时都必须配合「戳」使用。
加解读锁,返回时间戳,用这个来解锁,
long stamp = lock.readLock();
lock.unlockRead(stamp);
2
加解写锁,返回时间戳,用这个来解锁,
long stamp = lock.writeLock();
lock.unlockWrite(stamp);
2
乐观读,StampedLock 支持 tryOptimisticRead() 方法(乐观读),该方法内部没有任何加锁操作,只是返回一个「戳」。
读取完毕获取「戳」后,需要做一次戳校验,如果校验通过,表示这期间确实没有 写操作,数据可以安全使用,如果校验没通过,需要重新获取读锁,保证数据安全。
long stamp = lock.tryOptimisticRead();
// 验戳
if(!lock.validate(stamp)){
    // 锁升级,如升级为读锁:lock.readLock();
}
2
3
4
5
读锁是不会修改 stamp,所以可以进行多次 lock.tryOptimisticRead(),只有写锁才会修改 stamp,此时校验失败,需要升级锁。
例子
提供一个数据容器类,内部分别使用读锁保护数据的 read() 方法,写锁保护数据的 write() 方法。
class DataContainerStamped {
    private int data;
    private final StampedLock lock = new StampedLock();
    public DataContainerStamped(int data) {
        this.data = data;
    }
    public int read(int readTime) {
        // 乐观读
        long stamp = lock.tryOptimisticRead();
        log.debug("optimistic read locking...{}", stamp);
        sleep(readTime);
        // 校验「戳」
        if (lock.validate(stamp)) {
            log.debug("read finish...{}, data:{}", stamp, data);
            return data;
        }

        // 校验失败,锁升级 - 读锁
        log.debug("updating to read lock... {}", stamp);
        try {
            stamp = lock.readLock();
            log.debug("read lock {}", stamp);
            sleep(readTime);
            log.debug("read finish...{}, data:{}", stamp, data);
            return data;
        } finally {
            log.debug("read unlock {}", stamp);
            lock.unlockRead(stamp);
        }
    }
    public void write(int newData) {
        // 修改「戳」
        long stamp = lock.writeLock();
        log.debug("write lock {}", stamp);
        try {
            sleep(2);
            this.data = newData;
        } finally {
            log.debug("write unlock {}", stamp);
            lock.unlockWrite(stamp);
        }
    }
}
2
3
4
5
6
7
8
9
10
11
12
13
14
15
16
17
18
19
20
21
22
23
24
25
26
27
28
29
30
31
32
33
34
35
36
37
38
39
40
41
42
43
测试读-读,可以优化
public static void main(String[] args) {
    DataContainerStamped dataContainer = new DataContainerStamped(1);
    new Thread(() -> {
        dataContainer.read(1);
    }, "t1").start();
    sleep(0.5);
    new Thread(() -> {
        dataContainer.read(0);
    }, "t2").start();
}
2
3
4
5
6
7
8
9
10
输出结果,可以看到实际没有加读锁,说明多次读锁的「戳」是不会被修改的。
15:58:50.217 c.DataContainerStamped [t1] - optimistic read locking...256
15:58:50.717 c.DataContainerStamped [t2] - optimistic read locking...256
15:58:50.717 c.DataContainerStamped [t2] - read finish...256, data:1
15:58:51.220 c.DataContainerStamped [t1] - read finish...256, data:1
2
3
4
测试读-写时,优化读补加读锁
public static void main(String[] args) {
    DataContainerStamped dataContainer = new DataContainerStamped(1);
    new Thread(() -> {
        dataContainer.read(1);
    }, "t1").start();
    sleep(0.5);
    new Thread(() -> {
        dataContainer.write(100);
    }, "t2").start();
}
2
3
4
5
6
7
8
9
10
输出结果,可以看到乐观读获取「戳」后,写锁重新获取新的「戳」导致乐观读的「戳」被修改,所以需要锁升级为读锁。
15:57:00.219 c.DataContainerStamped [t1] - optimistic read locking...256
15:57:00.717 c.DataContainerStamped [t2] - write lock 384
15:57:01.225 c.DataContainerStamped [t1] - updating to read lock... 256
15:57:02.719 c.DataContainerStamped [t2] - write unlock 384
15:57:02.719 c.DataContainerStamped [t1] - read lock 513
15:57:03.719 c.DataContainerStamped [t1] - read finish...513, data:1000
15:57:03.719 c.DataContainerStamped [t1] - read unlock 513
2
3
4
5
6
7
注意:
- StampedLock 不支持条件变量
- StampedLock 不支持可重入
# Semaphore
# 基本使用
信号量,用来限制能同时访问共享资源的线程上限。
// permits:许可数
Semaphore semaphore = new Semaphore(int permits);
// permits:许可数,fair:是否开启公平锁
Semaphore semaphore = new Semaphore(int permits, boolean fair);
// 获取许可数
semaphore.acquire();
// 释放许可数
semaphore.release();
2
3
4
5
6
7
8
permits 就是许可数,也就是限制的线程上限,fair 是否开启公平锁,即阻塞的线程按排队顺序获取锁,非公平锁则是阻塞的线程都去竞争锁。
调用一次 acquire() 方法就是加 1,如果调用的 acquire() 方法等于 permits 许可数,则到达线程上限,再次调用 acquire() 就会在方法里阻塞线程。
release() 方法是释放许可,也就是许可数 - 1,这样其他被阻塞的线程才能获取许可数。
例子
三个许可数,十个线程运行。
public static void main(String[] args) {
    // 1. 创建 semaphore 对象
    Semaphore semaphore = new Semaphore(3);
    // 2. 10 个线程同时运行
    for (int i = 0; i < 10; i++) {
        new Thread(() -> {
            // 3. 获取许可
            try {
                semaphore.acquire(); // 如果超出三个线程,则超出的线程在此阻塞
            } catch (InterruptedException e) {
                e.printStackTrace();
            }
            try {
                log.debug("running...");
                sleep(1);
                log.debug("end...");
            } finally {
                // 4. 释放许可
                semaphore.release();
            }
        }).start();
    }
}
2
3
4
5
6
7
8
9
10
11
12
13
14
15
16
17
18
19
20
21
22
23
输出:
07:35:15.485 c.TestSemaphore [Thread-2] - running...
07:35:15.485 c.TestSemaphore [Thread-1] - running...
07:35:15.485 c.TestSemaphore [Thread-0] - running...
07:35:16.490 c.TestSemaphore [Thread-2] - end...
07:35:16.490 c.TestSemaphore [Thread-0] - end...
07:35:16.490 c.TestSemaphore [Thread-1] - end...
07:35:16.490 c.TestSemaphore [Thread-3] - running...
07:35:16.490 c.TestSemaphore [Thread-5] - running...
07:35:16.490 c.TestSemaphore [Thread-4] - running...
07:35:17.490 c.TestSemaphore [Thread-5] - end...
07:35:17.490 c.TestSemaphore [Thread-4] - end...
07:35:17.490 c.TestSemaphore [Thread-3] - end...
07:35:17.490 c.TestSemaphore [Thread-6] - running...
07:35:17.490 c.TestSemaphore [Thread-7] - running...
07:35:17.490 c.TestSemaphore [Thread-9] - running...
07:35:18.491 c.TestSemaphore [Thread-6] - end...
07:35:18.491 c.TestSemaphore [Thread-7] - end...
07:35:18.491 c.TestSemaphore [Thread-9] - end...
07:35:18.491 c.TestSemaphore [Thread-8] - running...
07:35:19.492 c.TestSemaphore [Thread-8] - end...
2
3
4
5
6
7
8
9
10
11
12
13
14
15
16
17
18
19
20
因为许可数只有三个,所以十个线程分 4 批获取三个许可数。
# Semaphore 应用
利用 Semaphore 实现简单线程池。
@Slf4j(topic = "c.Pool")
class Pool {
    // 1. 连接池大小
    private final int poolSize;

    // 2. 连接对象数组
    private Connection[] connections;

    // 3. 连接状态数组 0 表示空闲, 1 表示繁忙
    private AtomicIntegerArray states;

    private Semaphore semaphore;

    // 4. 构造方法初始化
    public Pool(int poolSize) {
        this.poolSize = poolSize;
        // 让许可数与资源数一致
        this.semaphore = new Semaphore(poolSize);
        this.connections = new Connection[poolSize];
        this.states = new AtomicIntegerArray(new int[poolSize]);
        for (int i = 0; i < poolSize; i++) {
            connections[i] = new MockConnection("连接" + (i+1));
        }
    }

    // 5. 借连接
    public Connection borrow() {
        // 获取许可
        try {
            semaphore.acquire(); // 没有许可的线程,在此等待
        } catch (InterruptedException e) {
            e.printStackTrace();
        }
        for (int i = 0; i < poolSize; i++) {
            // 获取空闲连接
            if(states.get(i) == 0) {
                if (states.compareAndSet(i, 0, 1)) {
                    log.debug("borrow {}", connections[i]);
                    return connections[i];
                }
            }
        }
        // 不会执行到这里
        return null;
    }
    // 6. 归还连接
    public void free(Connection conn) {
        for (int i = 0; i < poolSize; i++) {
            if (connections[i] == conn) {
                states.set(i, 0);
                log.debug("free {}", conn);
                // 释放许可
                semaphore.release();
                break;
            }
        }
    }
}
class MockConnection implements Connection {
    // ...
}
2
3
4
5
6
7
8
9
10
11
12
13
14
15
16
17
18
19
20
21
22
23
24
25
26
27
28
29
30
31
32
33
34
35
36
37
38
39
40
41
42
43
44
45
46
47
48
49
50
51
52
53
54
55
56
57
58
59
60
61
# Semaphore 原理
视频:
https://www.bilibili.com/video/BV16J411h7Rd?p=264https://www.bilibili.com/video/BV16J411h7Rd?p=265
# 加锁解锁流程
Semaphore 有点像一个停车场,permits 就好像停车位数量,当线程获得了 permits 就像是获得了停车位,然后 停车场显示空余车位减一。
刚开始,permits(state)为 3,这时 5 个线程来获取资源
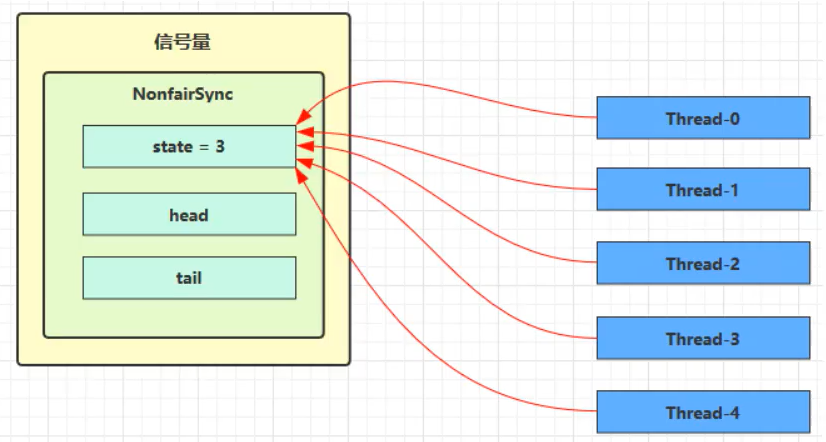
假设其中 Thread-1,Thread-2,Thread-4 cas 竞争成功,而 Thread-0 和 Thread-3 竞争失败,进入 AQS 队列 park 阻塞

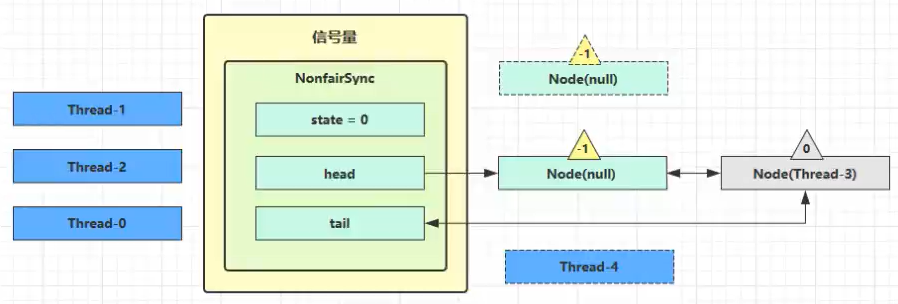
这时 Thread-4 释放了 permits,状态如下

接下来 Thread-0 竞争成功,permits 再次设置为 0,设置自己为 head 节点,断开原来的 head 节点,unpark 接下来的 Thread-3 节点,但由于 permits 是 0,因此 Thread-3 在尝试不成功后再次进入 park 状态
# 源码分析
static final class NonfairSync extends Sync {
    private static final long serialVersionUID = -2694183684443567898L;
    NonfairSync(int permits) {
        // permits 即 state
        super(permits);
    }

    // Semaphore 方法, 方便阅读, 放在此处
    public void acquire() throws InterruptedException {
        sync.acquireSharedInterruptibly(1);
    }
    // AQS 继承过来的方法, 方便阅读, 放在此处
    public final void acquireSharedInterruptibly(int arg)
        throws InterruptedException {
        if (Thread.interrupted())
            throw new InterruptedException();
        if (tryAcquireShared(arg) < 0)
            doAcquireSharedInterruptibly(arg);
    }

    // 尝试获得共享锁
    protected int tryAcquireShared(int acquires) {
        return nonfairTryAcquireShared(acquires);
    }

    // Sync 继承过来的方法, 方便阅读, 放在此处
    final int nonfairTryAcquireShared(int acquires) {
        for (;;) {
            int available = getState();
            int remaining = available - acquires;
            if (
                // 如果许可已经用完, 返回负数, 表示获取失败, 进入 doAcquireSharedInterruptibly
                remaining < 0 ||
                // 如果 cas 重试成功, 返回正数, 表示获取成功
                compareAndSetState(available, remaining)
            ) {
                return remaining;
            }
        }
    }

    // AQS 继承过来的方法, 方便阅读, 放在此处
    private void doAcquireSharedInterruptibly(int arg) throws InterruptedException {
        final Node node = addWaiter(Node.SHARED);
        boolean failed = true;
        try {
            for (;;) {
                final Node p = node.predecessor();
                if (p == head) {
                    // 再次尝试获取许可
                    int r = tryAcquireShared(arg);
                    if (r >= 0) {
                        // 成功后本线程出队(AQS), 所在 Node设置为 head
                        // 如果 head.waitStatus == Node.SIGNAL ==> 0 成功, 下一个节点 unpark
                        // 如果 head.waitStatus == 0 ==> Node.PROPAGATE
                        // r 表示可用资源数, 为 0 则不会继续传播
                        setHeadAndPropagate(node, r);
                        p.next = null; // help GC
                        failed = false;
                        return;
                    }
                }
                // 不成功, 设置上一个节点 waitStatus = Node.SIGNAL, 下轮进入 park 阻塞
                if (shouldParkAfterFailedAcquire(p, node) &&
                    parkAndCheckInterrupt())
                    throw new InterruptedException();
            }
        } finally {
            if (failed)
                cancelAcquire(node);
        }
    }

    // Semaphore 方法, 方便阅读, 放在此处
    public void release() {
        sync.releaseShared(1);
    }

    // AQS 继承过来的方法, 方便阅读, 放在此处
    public final boolean releaseShared(int arg) {
        if (tryReleaseShared(arg)) {
            doReleaseShared();
            return true;
        }
        return false;
    }

    // Sync 继承过来的方法, 方便阅读, 放在此处
    protected final boolean tryReleaseShared(int releases) {
        for (;;) {
            int current = getState();
            int next = current + releases;
            if (next < current) // overflow
                throw new Error("Maximum permit count exceeded");
            if (compareAndSetState(current, next))
                return true;
        }
    }
}
2
3
4
5
6
7
8
9
10
11
12
13
14
15
16
17
18
19
20
21
22
23
24
25
26
27
28
29
30
31
32
33
34
35
36
37
38
39
40
41
42
43
44
45
46
47
48
49
50
51
52
53
54
55
56
57
58
59
60
61
62
63
64
65
66
67
68
69
70
71
72
73
74
75
76
77
78
79
80
81
82
83
84
85
86
87
88
89
90
91
92
93
94
95
96
97
98
99
# CountDownLatch
用来进行线程同步协作,等待所有线程完成倒计时。
CountdownLatch countdownLatch = new CountdownLatch(int count);
// count - 1
countdownLatch.countDown();
// 等待 count 为 0
countdownLatch.await();
2
3
4
5
其中构造参数 count 用来初始化等待计数值,await() 用来等待计数归零,countDown() 用来让计数减一。
# 线程准备
初始化 count 为 3,然后 main 线程调用 await 进行阻塞,三个线程调用 countDown,所以最终 count - 3 = 0 ,main 线程往下执行。
public static void main(String[] args) throws InterruptedException {
    // count = 3
    CountDownLatch latch = new CountDownLatch(3);

    new Thread(() -> {
        log.debug("begin...");
        sleep(1);
        // count - 1
        latch.countDown();

        log.debug("end...{}", latch.getCount());
    }).start();

    new Thread(() -> {
        log.debug("begin...");
        sleep(2);
        // count - 1
        latch.countDown();

        log.debug("end...{}", latch.getCount());
    }).start();

    new Thread(() -> {
        log.debug("begin...");
        sleep(1.5);
        // count - 1
        latch.countDown();

        log.debug("end...{}", latch.getCount());
    }).start();

    log.debug("waiting...");
    // 等待 count 为 0
    latch.await();

    log.debug("wait end...");
}
2
3
4
5
6
7
8
9
10
11
12
13
14
15
16
17
18
19
20
21
22
23
24
25
26
27
28
29
30
31
32
33
34
35
36
37
输出
18:44:00.778 c.TestCountDownLatch [main] - waiting...
18:44:00.778 c.TestCountDownLatch [Thread-2] - begin...
18:44:00.778 c.TestCountDownLatch [Thread-0] - begin...
18:44:00.778 c.TestCountDownLatch [Thread-1] - begin...
18:44:01.782 c.TestCountDownLatch [Thread-0] - end...2
18:44:02.283 c.TestCountDownLatch [Thread-2] - end...1
18:44:02.782 c.TestCountDownLatch [Thread-1] - end...0
18:44:02.782 c.TestCountDownLatch [main] - wait end...
2
3
4
5
6
7
8
# 线程池准备
可以配合线程池使用,改进如下:
初始化 count 为 3,然后 main 线程调用 await 进行阻塞,线程池的三个线程调用 countDown,所以最终 count - 3 = 0 ,main 线程往下执行。
public static void main(String[] args) throws InterruptedException {
    // count = 3
    CountDownLatch latch = new CountDownLatch(3);
    ExecutorService service = Executors.newFixedThreadPool(4);

    service.submit(() -> {
        log.debug("begin...");
        sleep(1);
        // count - 1
        latch.countDown();
        log.debug("end...{}", latch.getCount());
    });

    service.submit(() -> {
        log.debug("begin...");
        sleep(1.5);
        // count - 1
        latch.countDown();
        log.debug("end...{}", latch.getCount());
    });

    service.submit(() -> {
        log.debug("begin...");
        sleep(2);
        // count - 1
        latch.countDown();
        log.debug("end...{}", latch.getCount());
    });

    service.submit(()->{
        try {
            log.debug("waiting...");
            // 等待 count 为 0
            latch.await();
            log.debug("wait end...");
        } catch (InterruptedException e) {
            e.printStackTrace();
        }
    });

    service.shutdown();
}
2
3
4
5
6
7
8
9
10
11
12
13
14
15
16
17
18
19
20
21
22
23
24
25
26
27
28
29
30
31
32
33
34
35
36
37
38
39
40
41
42
输出
18:52:25.831 c.TestCountDownLatch [pool-1-thread-3] - begin...
18:52:25.831 c.TestCountDownLatch [pool-1-thread-1] - begin...
18:52:25.831 c.TestCountDownLatch [pool-1-thread-2] - begin...
18:52:25.831 c.TestCountDownLatch [pool-1-thread-4] - waiting...
18:52:26.835 c.TestCountDownLatch [pool-1-thread-1] - end...2
18:52:27.335 c.TestCountDownLatch [pool-1-thread-2] - end...1
18:52:27.835 c.TestCountDownLatch [pool-1-thread-3] - end...0
18:52:27.835 c.TestCountDownLatch [pool-1-thread-4] - wait end...
2
3
4
5
6
7
8
# 多线程准备
public static void main(String[] args) throws InterruptedException {
    AtomicInteger num = new AtomicInteger(0);
    ExecutorService service = Executors.newFixedThreadPool(10, (r) -> {
        return new Thread(r, "t" + num.getAndIncrement());
    });
    // count = 10
    CountDownLatch latch = new CountDownLatch(10);
    String[] all = new String[10];
    Random r = new Random();
    // 10 个线程
    for (int j = 0; j < 10; j++) {
        int x = j;
        service.submit(() -> {
            for (int i = 0; i <= 100; i++) {
                try {
                    Thread.sleep(r.nextInt(100));
                } catch (InterruptedException e) {
                }
                all[x] = Thread.currentThread().getName() + "(" + (i + "%") + ")";
                System.out.print("\r" + Arrays.toString(all));·
            }
            // count - 1
            latch.countDown();
        });
    }
    // 等待 count 为 0
    latch.await();
    System.out.println("\n游戏开始...");
    service.shutdown();
}
2
3
4
5
6
7
8
9
10
11
12
13
14
15
16
17
18
19
20
21
22
23
24
25
26
27
28
29
30
中间输出:
[t0(52%), t1(47%), t2(51%), t3(40%), t4(49%), t5(44%), t6(49%), t7(52%), t8(46%), t9(46%)]
最终输出:
[t0(100%), t1(100%), t2(100%), t3(100%), t4(100%), t5(100%), t6(100%), t7(100%), t8(100%), t9(100%)]
游戏开始...
2
# 多远程调用
@RestController
public class TestCountDownlatchController {
    @GetMapping("/order/{id}")
    public Map<String, Object> order(@PathVariable int id) {
        HashMap<String, Object> map = new HashMap<>();
        map.put("id", id);
        map.put("total", "2300.00");
        sleep(2000);
        return map;
    }
    @GetMapping("/product/{id}")
    public Map<String, Object> product(@PathVariable int id) {
        HashMap<String, Object> map = new HashMap<>();
        if (id == 1) {
            map.put("name", "小爱音箱");
            map.put("price", 300);
        } else if (id == 2) {
            map.put("name", "小米手机");
            map.put("price", 2000);
        }
        map.put("id", id);
        sleep(1000);
        return map;
    }
    @GetMapping("/logistics/{id}")
    public Map<String, Object> logistics(@PathVariable int id) {
        HashMap<String, Object> map = new HashMap<>();
        map.put("id", id);
        map.put("name", "中通快递");
        sleep(2500);
        return map;
    }
    private void sleep(int millis) {
        try {
            Thread.sleep(millis);
        } catch (InterruptedException e) {
            e.printStackTrace();
        }
    }
}
2
3
4
5
6
7
8
9
10
11
12
13
14
15
16
17
18
19
20
21
22
23
24
25
26
27
28
29
30
31
32
33
34
35
36
37
38
39
40
rest 远程调用,利用 CountDownLatch 计数,最后在计数减到 0 时,main 线程打印数据。(如果不用 CountDownLatch 阻塞,main 线程先执行,打印为空)
public static void main(String[] args) {
    RestTemplate restTemplate = new RestTemplate();
    log.debug("begin");
    ExecutorService service = Executors.newCachedThreadPool();
    CountDownLatch latch = new CountDownLatch(4);

    Future<Map<String,Object>> f1 = service.submit(() -> {
        Map<String, Object> r = restTemplate.getForObject("http://localhost:8080/order/{1}", Map.class, 1);
        // count - 1
        latch.countDown();
        return r;
    });

    Future<Map<String, Object>> f2 = service.submit(() -> {
        Map<String, Object> r = restTemplate.getForObject("http://localhost:8080/product/{1}", Map.class, 1);
        // count - 1
        latch.countDown();
        return r;
    });

    Future<Map<String, Object>> f3 = service.submit(() -> {
        Map<String, Object> r = restTemplate.getForObject("http://localhost:8080/product/{1}", Map.class, 2);
        // count - 1
        latch.countDown();
        return r;
    });

    Future<Map<String, Object>> f4 = service.submit(() -> {
        Map<String, Object> r = restTemplate.getForObject("http://localhost:8080/logistics/{1}", Map.class, 1);
        // count - 1
        latch.countDown();
        return r;
    });

    // 等待 count 为 0
    latch.await();

    System.out.println(f1.get());
    System.out.println(f2.get());
    System.out.println(f3.get());
    System.out.println(f4.get());

    log.debug("执行完毕");
    service.shutdown();
}
2
3
4
5
6
7
8
9
10
11
12
13
14
15
16
17
18
19
20
21
22
23
24
25
26
27
28
29
30
31
32
33
34
35
36
37
38
39
40
41
42
43
44
45
执行结果
19:51:39.711 c.TestCountDownLatch [main] - begin
{total=2300.00, id=1}
{price=300, name=小爱音箱, id=1}
{price=2000, name=小米手机, id=2}
{name=中通快递, id=1}
19:51:42.407 c.TestCountDownLatch [main] - 执行完毕
2
3
4
5
6
# CyclicBarrier
CountDownLatch 的 count 计数变为 0 后,如果想再次使用 CountDownLatch,则需要重新 new 构造器,那么有没有一个类似的类,计数变为 0 后,自动恢复到初始的 count 呢?这个类就是 CyclicBarrier。
CyclicBarrier:循环栅栏,用来进行线程协作,等待线程满足某个计数。构造时设置『计数个数』,每个线程执行到某个需要「同步」的时刻调用 await() 方法进行等待,当等待的线程数满足「计数个数」时,继续执行。
CyclicBarrier 和 CountDownLatch 不一样的方法是 CyclicBarrier 没有 countDown() 方法来进行 count - 1,而是直接 await() 方法让线程阻塞并 count - 1。
CyclicBarrier cyclicBarrier = new CyclicBarrier(int count);
// 线程阻塞并 count - 1
cyclicBarrier.await();
2
3
例子:
public static void main(String[] args) {
    CyclicBarrier cb = new CyclicBarrier(2); // 个数为 2 时才会继续执行

    new Thread(()->{
        System.out.println("线程1开始.." + new Date());
        try {
            cb.await(); // 当个数不足时,等待
        } catch (InterruptedException | BrokenBarrierException e) {
            e.printStackTrace();
        }
        System.out.println("线程1继续向下运行..." + new Date());
    }).start();

    new Thread(()->{
        System.out.println("线程2开始.." + new Date());
        try { Thread.sleep(2000); } catch (InterruptedException e) { }
        try {
            cb.await(); // 2 秒后,线程个数够 2,继续运行
        } catch (InterruptedException | BrokenBarrierException e) {
            e.printStackTrace();
        }
        System.out.println("线程2继续向下运行..." + new Date());
    }).start();
}
2
3
4
5
6
7
8
9
10
11
12
13
14
15
16
17
18
19
20
21
22
23
24
注意:CyclicBarrier 与 CountDownLatch 的主要区别在于 CyclicBarrier 是可以重用的,CyclicBarrier 可以被比喻为『人满发车』。
# 线程安全集合类概述

线程安全集合类可以分为三大类:
- 遗留的线程安全集合如 Hashtable,Vector,这些类比较旧,不推荐使用
- 使用 Collections 装饰的线程安全集合,这些类内部才是使用了装饰者模式,即继承了 Map、List 等线程不安全类,然后重写父类方法,加了
Synchronized(Object o)锁,也不推荐使用,如:Collections.synchronizedCollectionCollections.synchronizedListCollections.synchronizedMapCollections.synchronizedSetCollections.synchronizedNavigableMapCollections.synchronizedNavigableSetCollections.synchronizedSortedMapCollections.synchronizedSortedSet
java.util.concurrent.*,目前这种是新版的线程安全类,建议使用
重点介绍 java.util.concurrent.* 下的线程安全集合类,可以发现它们有规律,里面包含三类关键词:Blocking、CopyOnWrite、Concurrent。
- Blocking 类型大部分实现基于锁,并提供用来阻塞的方法,如 LinkedBlockingQueue 和 ArrayBlockingQueue 类
- CopyOnWrite 类型对于容器的修改开销相对较重,即 CopyOnWrite 类倾向于 读操作,而写操作开销很大,如 CopyOnWriteArrayList 和 CopyOnWriteArraySet 类
- Concurrent 类型的容器,内部很多操作使用 CAS 优化,一般可以提供较高吞吐量,缺点是 弱一致性:
- 遍历时弱一致性,例如,当利用迭代器遍历时,如果容器数据发生修改,迭代器仍然可以继续进行遍历,这时内容是旧的
- 求大小弱一致性,size 操作未必是 100% 准确,即长度新增了,读取的长度是旧的
- 读取弱一致性,读取的数据不一定是最新的
对于线程不安全容器来讲,遍历时如果发生了修改,则使用 fail-fast 机制,也就是让遍历立刻失败,抛出 ConcurrentModificationException,不再继续遍历。
# Blocking 阻塞队列
Interface BlockingQueue<E>
# 阻塞队列简介
阻塞:必须要阻塞、不得不阻塞
阻塞队列是一个队列,在数据结构中起的作用如下图:
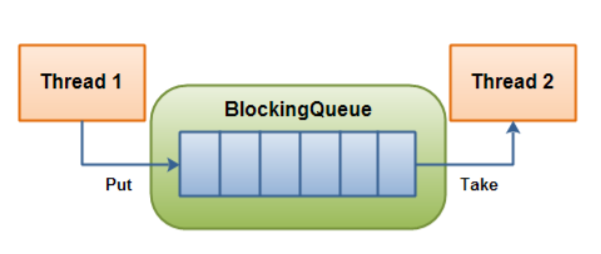
当队列是空的,从队列中 获取 元素的操作将会被阻塞
当队列是满的,从队列中 添加 元素的操作将会被阻塞
试图从空的队列中获取元素的线程将会被阻塞,直到其他线程往空的队列插入新的元素
试图向已满的队列中添加新元素的线程将会被阻塞,直到其他线程从队列中移除一个或多个元素或者完全清空,使队列变得空闲起来并后续新增
# 阻塞队列的用处
在多线程领域:所谓阻塞,在某些情况下会挂起线程(即阻塞),一旦条件满足,被挂起的线程又会自动被唤起。
为什么需要 BlockingQueue?
好处是我们不需要关心什么时候需要阻塞线程,什么时候需要唤醒线程,因为这一切 BlockingQueue 都给你一手包办了。
在 concurrent 包发布以前,在多线程环境下,我们每个程序员都必须自己去控制这些细节,尤其还要兼顾效率和线程安全,而这会给我们的程序带来不小的复杂度。
# 接口架构图

ArrayBlockingQueue:由数组结构组成的有界阻塞队列
LinkedBlockingQueue:由链表结构组成的有界(默认值为:integer.MAX_VALUE)阻塞队列
PriorityBlockingQueue:支持优先级排序的无界阻塞队列
DelayQueue:使用优先级队列实现的延迟无界阻塞队列
SynchronousQueue:不存储元素的阻塞队列,也即单个元素的队列
LinkedTransferQueue:由链表组成的无界阻塞队列
LinkedBlockingDeque:由链表组成的双向阻塞队列
# API的使用
| 方法\处理方式 | 抛出异常 | 返回特殊值 | 一直阻塞 | 超时退出 |
|---|---|---|---|---|
| 插入方法 | add(e) | offer(e) | put(e) | offer(e,time,unit) |
| 移除方法 | remove() | poll() | take() | poll(time,unit) |
| 检查方法 | element() | peek() | 不可用 | 不可用 |
解释:
抛出异常
当阻塞队列满时,再往队列里 add 插入元素会抛出 IllegalStateException: Queue full。
当阻塞队列空时,再往队列里 remove 移除元素会抛 NoSuchElementException 。
返回特殊值
插入方法,成功返回 true,失败则 false。
移除方法,成功返回队列元素,队列里没有则返回 null。
一直阻塞
当阻塞队列满时,生产者线程继续往队列里 put 元素,队列会一直阻塞生产者线程直到 put 数据或响应中断退出。
当阻塞队列空时,消费者线程从队列里 take 元素,队列会一直阻塞消费者线程直到队列可用。
超时退出
当阻塞队列满时,队列会阻塞生产者线程一定时间,超过限时后生产者线程会退出。
抛出异常
public class BlockingQueueDemo {

    public static void main(String[] args) {
        // 队列大小
        ArrayBlockingQueue blockingQueue = new ArrayBlockingQueue<>(3);
        System.out.println(blockingQueue.add("a"));
        System.out.println(blockingQueue.add("b"));
        System.out.println(blockingQueue.add("c"));

        // java.lang.IllegalStateException: Queue full
        // System.out.println(blockingQueue.add("d"));

        System.out.println("首元素:" + blockingQueue.element()); // 检测队列队首元素
        // public E remove() 返回值E,就是移除的值
        System.out.println(blockingQueue.remove()); //a
        System.out.println(blockingQueue.remove()); //b
        System.out.println(blockingQueue.remove()); //c
        // java.util.NoSuchElementException
        // System.out.println(blockingQueue.remove());

    }
}
2
3
4
5
6
7
8
9
10
11
12
13
14
15
16
17
18
19
20
21
22
返回特殊值
public class BlockingQueueDemo2 {
    public static void main(String[] args) {
        // 队列大小
        ArrayBlockingQueue blockingQueue = new ArrayBlockingQueue<>(3);

        System.out.println(blockingQueue.offer("a")); // true
        System.out.println(blockingQueue.offer("b")); // true
        System.out.println(blockingQueue.offer("c")); // true
        //System.out.println(blockingQueue.offer("d")); // false

        System.out.println("首元素:" + blockingQueue.peek()); // 检测队列队首元素!

        // public E poll()
        System.out.println(blockingQueue.poll()); // a
        System.out.println(blockingQueue.poll()); // b
        System.out.println(blockingQueue.poll()); // c
        System.out.println(blockingQueue.poll()); // null
    }
}
2
3
4
5
6
7
8
9
10
11
12
13
14
15
16
17
18
19
一直阻塞
public class BlockingQueueDemo3 {
    public static void main(String[] args) throws InterruptedException {
        // 队列大小
        ArrayBlockingQueue blockingQueue = new ArrayBlockingQueue<>(3);

        // 一直阻塞
        blockingQueue.put("a");
        blockingQueue.put("b");
        blockingQueue.put("c");
//         blockingQueue.put("d");
        System.out.println(blockingQueue.take()); // a
        System.out.println(blockingQueue.take()); // b
        System.out.println(blockingQueue.take()); // c
        System.out.println(blockingQueue.take()); // 阻塞不停止等待
    }
}
2
3
4
5
6
7
8
9
10
11
12
13
14
15
16
超时退出
public class BlockingQueueDemo4 {
    public static void main(String[] args) throws InterruptedException {
        // 队列大小
        ArrayBlockingQueue blockingQueue = new ArrayBlockingQueue<>(3);

        // 一直阻塞
        blockingQueue.put("a");
        blockingQueue.put("b");
        blockingQueue.put("c");
        blockingQueue.offer("d",2L, TimeUnit.SECONDS); // 等待2秒超时退出

        System.out.println(blockingQueue.take()); // a
        System.out.println(blockingQueue.take()); // b
        System.out.println(blockingQueue.take()); // c
        System.out.println(blockingQueue.take()); // 阻塞不停止等待
    }
}
2
3
4
5
6
7
8
9
10
11
12
13
14
15
16
17
# ConcurrentHashMap
Map 有的方法,ConcurrentHashMap 基本都有,并且使用都一样,这里只介绍 ConcurrentHashMap 的独有方法。
ConcurrentHashMap<String, Integer> c = new ConcurrentHashMap<String, Integer>();
c.computeIfAbsent(key, (key) -> { });
2
computeIfAbsent() 方法:如果第一个参数不存在,则由第二个参数计算出值,然后将第一个参数作为 key,第二个参数计算的值作为 value 存入 map 里。
第一个参数是 key,第二个参数是计算 value 的接口,支持 Lambda 表达式,参数为第一个参数 key。
# 练习:单词计数
假设有一些文件,文件里有 26 个英文字母,所有文件的 26 个英文字母都有 200 个,即 a 有 200 个,b 有 200 个,依此类推。
这里提供生成文件代码,但不是必须的。
public static void main(String[] args) {
    static final String ALPHA = "abcedfghijklmnopqrstuvwxyz";
    public static void main(String[] args) {
        int length = ALPHA.length();
        int count = 200;
        List<String> list = new ArrayList<>(length * count);
        for (int i = 0; i < length; i++) {
            char ch = ALPHA.charAt(i);
            for (int j = 0; j < count; j++) {
                list.add(String.valueOf(ch));
            }
        }
        Collections.shuffle(list);
        for (int i = 0; i < 26; i++) {
            try (PrintWriter out = new PrintWriter(
                new OutputStreamWriter(
                    new FileOutputStream("tmp/" + (i+1) + ".txt")))) {
                String collect = list.subList(i * count, (i + 1) * count).stream()
                    .collect(Collectors.joining("\n"));
                out.print(collect);
            } catch (IOException e) {
            }
        }
    }
}
2
3
4
5
6
7
8
9
10
11
12
13
14
15
16
17
18
19
20
21
22
23
24
25
编写一个读取文件所有字母出现次数的模版代码,模版代码中封装了多线程读取文件的代码(可以不看):
public class Test {
    private static <V> void demo(Supplier<Map<String,V>> supplier, BiConsumer<Map<String,V>,List<String>> consumer) {
        Map<String, V> counterMap = supplier.get();
        List<Thread> ts = new ArrayList<>();
        for (int i = 1; i <= 26; i++) {
            int idx = i;
            Thread thread = new Thread(() -> {
                List<String> words = readFromFile(idx);
                consumer.accept(counterMap, words);
            });
            ts.add(thread);
        }
        ts.forEach(t->t.start());
        ts.forEach(t-> {
            try {
                t.join();
            } catch (InterruptedException e) {
                e.printStackTrace();
            }
        }
                   });
        System.out.println(counterMap);
    }
    public static List<String> readFromFile(int i) {
        ArrayList<String> words = new ArrayList<>();
        try (BufferedReader in = new BufferedReader(new InputStreamReader(new FileInputStream("tmp/"
                                                                                              + i +".txt")))) {
            while(true) {
                String word = in.readLine();
                if(word == null) {
                    break;
                }
                words.add(word);
            }
            return words;
        } catch (IOException e) {
            throw new RuntimeException(e);
        }
    }
}
2
3
4
5
6
7
8
9
10
11
12
13
14
15
16
17
18
19
20
21
22
23
24
25
26
27
28
29
30
31
32
33
34
35
36
37
38
39
40
可以不用看上面代码,只要知道代码的 demo 方法是读取文件所有字母出现的次数,要做的是实现两个参数:
- 一是提供一个 map 集合,用来存放每个单词的计数结果,key 为单词,value 为计数
- 二是提供一组操作,保证计数的安全性,会传递 map 集合以及 单词 List
错误实现 1:HashMap
首先是利用 HashMap 来读取所有字母出现的次数,这会发生线程安全问题,即读取的字母出现次数不满 200。
public static void main(String[] args) {
    demo(
        // 创建 map 集合
        () -> new HashMap<String, Integer>(),
        // 进行计数
        (map, words) -> {
            for (String word : words) {
                Integer counter = map.get(word);
                int newValue = counter == null ? 1 : counter + 1;
                map.put(word, newValue);
            }
        }
    );
}
2
3
4
5
6
7
8
9
10
11
12
13
14
输出:
{a=197, b=198, c=195, d=198, e=192, f=197, g=198, h=199, i=197, j=196, k=198, l=196, m=197,
n=198, o=197, p=197, q=198, r=198, s=196, t=196, u=197, v=197 w=198, x=197, y=197, z=199}
2
错误实现 2:ConcurrentHashMap 基本方法
ConcurrentHashMap 仅仅保证多个线程使用同一个方法是线程安全的,但是不能保证多个方法一起使用是线程安全的。
public static void main(String[] args) {
    demo(
        // 创建 map 集合
        () -> new ConcurrentHashMap<String, Integer>(),
        // 进行计数
        (map, words) -> {
            for (String word : words) {
                Integer counter = map.get(word);
                int newValue = counter == null ? 1 : counter + 1;
                map.put(word, newValue);
            }
        }
    );
}
2
3
4
5
6
7
8
9
10
11
12
13
14
输出:
{a=197, b=198, c=195, d=198, e=192, f=197, g=198, h=199, i=197, j=196, k=198, l=196, m=197,
n=198, o=197, p=197, q=198, r=198, s=196, t=196, u=197, v=197 w=198, x=197, y=197, z=199}
2
正确实现 1:ConcurrentHashMap 的 computeIfAbsent
利用 LongAdder 累加器进行累加,key 是字母 word,value 就是字母出现的次数累加。
public static void main(String[] args) {
    demo(
        () -> new ConcurrentHashMap<String, LongAdder>(),
        (map, words) -> {
            for (String word : words) {
                // 注意不能使用 putIfAbsent,此方法返回的是上一次的 value,首次调用返回 null
                Integer value = map.computeIfAbsent(word, (key) -> new LongAdder());
                value.increment();
            }
        }
    );
}
2
3
4
5
6
7
8
9
10
11
12
输出:
{a=200, b=200, c=200, d=200, e=200, f=200, g=200, h=200, i=200, j=200, k=200, l=200, m=200,
n=200, o=200, p=200, q=200, r=200, s=200, t=200, u=200, v=200, w=200, x=200, y=200, z=200}
2
正确实现 2:ConcurrentHashMap 的 merge
public static void main(String[] args) {
    demo(
        () -> new ConcurrentHashMap<String, Integer>(),
        (map, words) -> {
            for (String word : words) {
                // 函数式编程,无需原子变量
                map.merge(word, 1, Integer::sum);
            }
        }
    );
}
2
3
4
5
6
7
8
9
10
11
# ConcurrentHashMap 原理
原理视频有 26 个视频,是 P277 ~ P302,这里提供 P277 视频地址:https://www.bilibili.com/video/BV16J411h7Rd?p=277。
# JDK 7 HashMap 并发死链
死链视频(面试问)有 4 个视频,分别是 P277、P278、P279、P280,这里提供 P277 视频地址:https://www.bilibili.com/video/BV16J411h7Rd?p=277。
死链概念:有多条链表,其中 1 指向 16,16 指向 35,即 1 -> 16 -> 35,死链变成: 1 -> 35 -> 1,即 链表指向回到原点,导致链表变成 环形链表。
并发死链原因:当 Map 发送扩容时,两个线程同时访问 Map 进行扩容。首先两个线程都获取下标为 0 的数据,假设下标为 0 的数据是一个链表,指向为 1 -> 16 -> 35,线程 1 和线程 2 获取了 1 -> 16 -> 35,然后线程 1 扩容后将链表改为 1 -> 35(16 的哈希值变了,去另一个链表里),此时线程 2 是 1 -> 35,然后进入 for 循环(源码有),获取线程 1 修改的链表,即变成 1 -> 35 -> 1 -> 35,形成环形链表,发送死链。
# 测试代码
注意:
- 必须在 JDK 7 下运行,否则扩容机制和 hash 的计算方法都变了
- 以下测试代码是精心准备的,不要随便改动
public static void main(String[] args) {
    // 测试 java 7 中哪些数字的 hash 结果相等
    System.out.println("长度为16时,桶下标为1的key");
    for (int i = 0; i < 64; i++) {
        if (hash(i) % 16 == 1) {
            System.out.println(i);
        }
    }
    System.out.println("长度为32时,桶下标为1的key");
    for (int i = 0; i < 64; i++) {
        if (hash(i) % 32 == 1) {
            System.out.println(i);
        }
    }
    // 1, 35, 16, 50 当大小为16时,它们在一个桶内
    final HashMap<Integer, Integer> map = new HashMap<Integer, Integer>();
    // 放 12 个元素
    map.put(2, null);
    map.put(3, null);
    map.put(4, null);
    map.put(5, null);
    map.put(6, null);
    map.put(7, null);
    map.put(8, null);
    map.put(9, null);
    map.put(10, null);
    map.put(16, null);
    map.put(35, null);
    map.put(1, null);
    System.out.println("扩容前大小[main]:"+map.size());
    new Thread() {
        @Override
        public void run() {
            // 放第 13 个元素, 发生扩容
            map.put(50, null);
            System.out.println("扩容后大小[Thread-0]:"+map.size());
        }
    }.start();
    new Thread() {
        @Override
        public void run() {
            // 放第 13 个元素, 发生扩容
            map.put(50, null);
            System.out.println("扩容后大小[Thread-1]:"+map.size());
        }
    }.start();
}
final static int hash(Object k) {
    int h = 0;
    if (0 != h && k instanceof String) {
        return sun.misc.Hashing.stringHash32((String) k);
    }
    h ^= k.hashCode();
    h ^= (h >>> 20) ^ (h >>> 12);
    return h ^ (h >>> 7) ^ (h >>> 4);
}
2
3
4
5
6
7
8
9
10
11
12
13
14
15
16
17
18
19
20
21
22
23
24
25
26
27
28
29
30
31
32
33
34
35
36
37
38
39
40
41
42
43
44
45
46
47
48
49
50
51
52
53
54
55
56
# 死链复现
调试工具使用 IDEA。
在 HashMap 源码 590 行加断点
int newCapacity = newTable.length;
断点的条件如下,目的是让 HashMap 在扩容为 32 时,并且线程为 Thread-0 或 Thread-1 时停下来。
newTable.length==32 &&
    (
    Thread.currentThread().getName().equals("Thread-0")||
    Thread.currentThread().getName().equals("Thread-1")
)
2
3
4
5
断点暂停方式选择 Thread,否则在调试 Thread-0 时,Thread-1 无法恢复运行。
运行代码,程序在预料的断点位置停了下来,输出:
长度为16时,桶下标为1的key
1
16
35
50
长度为32时,桶下标为1的key
1
35
扩容前大小[main]:12
2
3
4
5
6
7
8
9
接下来进入扩容流程调试,在 HashMap 源码 594 行加断点:
Entry<K,V> next = e.next; // 593 行
if (rehash) // 594 行
// ...
2
3
这是为了观察 e 节点和 next 节点的状态,Thread-0 单步执行到 594 行,再 594 处再添加一个断点(条件 Thread.currentThread().getName().equals("Thread-0"))。
这时可以在 Variables 面板观察到 e 和 next 变量,使用 view as -> Object 查看节点状态:
e   (1)->(35)->(16)->null
next   (35)->(16)->null
2
在 Threads 面板选中 Thread-1 恢复运行,可以看到控制台输出新的内容如下,Thread-1 扩容已完成:
newTable[1]   (35)->(1)->null

扩容后大小:13
2
3
这时 Thread-0 还停在 594 处, Variables 面板变量的状态已经变化为:
e   (1)->null
next   (35)->(1)->null
2
为什么呢,因为 Thread-1 扩容时链表也是后加入的元素放入链表头,因此链表就倒过来了,但 Thread-1 虽然结果正确,但它结束后 Thread-0 还要继续运行。
接下来就可以单步调试(F8)观察死链的产生了。
下一轮循环到 594,将 e 搬迁到 newTable 链表头。
newTable[1]   (1)->null
e   (35)->(1)->null
next   (1)->null
2
3
下一轮循环到 594,将 e 搬迁到 newTable 链表头
newTable[1]   (35)->(1)->null
e   (1)->null
next   null
2
3
再看看源码
e.next = newTable[1];
// 这时 e (1,35)
// 而 newTable[1] (35,1)->(1,35) 因为是同一个对象
newTable[1] = e;
// 再尝试将 e 作为链表头, 死链已成
e = next;
// 虽然 next 是 null, 会进入下一个链表的复制, 但死链已经形成了
2
3
4
5
6
7
# 源码分析
HashMap 的并发死链发生在扩容时:
// 将 table 迁移至 newTable
void transfer(Entry[] newTable, boolean rehash) {
    int newCapacity = newTable.length;
    for (Entry<K,V> e : table) {
        while(null != e) {
            Entry<K,V> next = e.next;
            // 1 处
            if (rehash) {
                e.hash = null == e.key ? 0 : hash(e.key);
            }
            int i = indexFor(e.hash, newCapacity);
            // 2 处
            // 将新元素加入 newTable[i], 原 newTable[i] 作为新元素的 next
            e.next = newTable[i];
            newTable[i] = e;
            e = next;
        }
    }
}
2
3
4
5
6
7
8
9
10
11
12
13
14
15
16
17
18
19
假设 map 中初始元素是:
原始链表,格式:[下标] (key,next)
[1] (1,35)->(35,16)->(16,null)

线程 a 执行到 1 处 ,此时局部变量 e 为 (1,35),而局部变量 next 为 (35,16) 线程 a 挂起

线程 b 开始执行
第一次循环
[1] (1,null)

第二次循环
[1] (35,1)->(1,null)

第三次循环
[1] (35,1)->(1,null)
[17] (16,null)

切换回线程 a,此时局部变量 e 和 next 被恢复,引用没变但内容变了:e 的内容被改为 (1,null),而 next 的内容被改为 (35,1) 并链向 (1,null)
第一次循环
[1] (1,null)

第二次循环,注意这时 e 是 (35,1) 并链向 (1,null) 所以 next 又是 (1,null)
[1] (35,1)->(1,null)

第三次循环,e 是 (1,null),而 next 是 null,但 e 被放入链表头,这样 e.next 变成了 35 (2 处)
[1] (1,35)->(35,1)->(1,35)

已经是死链了
2
3
4
5
6
7
8
9
10
11
12
13
14
15
16
17
18
19
20
21
22
23
24
25
26
27
# 小结
- 究其原因,是因为在多线程环境下使用了非线程安全的 Map 集合,导致发生如环形链表,如 1 -> 35 -> 1 -> 35 ...
- JDK 8 虽然将扩容算法做了调整,不再将元素加入链表头(而是保持与扩容前一样的顺序,即新元素放入尾部),但仍不意味着能够在多线程环境下能够安全扩容,还会出现其它问题(如扩容丢数据)
所以 JDK 7 和 JDK 8 中 Map 的一个区别:JDK 7 采用头插法,因为发生死链,所以 JDK 8 改为尾插法。
# JDK 8 ConcurrentHashMap
# 重要属性和内部类
// 默认为 0
// 当初始化时, 为 -1
// 当扩容时, 为 -(1 + 扩容线程数)
// 当初始化或扩容完成后,为 下一次的扩容的阈值大小
private transient volatile int sizeCtl;

// 整个 ConcurrentHashMap 就是一个 Node[]
static class Node<K,V> implements Map.Entry<K,V> {}

// hash 表
transient volatile Node<K,V>[] table;

// 扩容时的 新 hash 表
private transient volatile Node<K,V>[] nextTable;

// 扩容时如果某个 bin 迁移完毕, 用 ForwardingNode 作为旧 table bin 的头结点
static final class ForwardingNode<K,V> extends Node<K,V> {}

// 用在 compute 以及 computeIfAbsent 时, 用来占位, 计算完成后替换为普通 Node
static final class ReservationNode<K,V> extends Node<K,V> {}

// 作为 treebin 的头节点, 存储 root 和 first
static final class TreeBin<K,V> extends Node<K,V> {}

// 作为 treebin 的节点, 存储 parent, left, right
static final class TreeNode<K,V> extends Node<K,V> {}
2
3
4
5
6
7
8
9
10
11
12
13
14
15
16
17
18
19
20
21
22
23
24
25
26
treebin 就是红黑树,当 Map 里的链表长度大于 8 后,先判断 Map 数组长度是否大于 64,如果小于则扩容,大于则转为红黑树,如果链表长度降成 6,则恢复链表。长度为 7 则是为了缓冲,防止红黑树和链表不断切换。
# 重要方法
// 获取 Node[] 中第 i 个 Node
static final <K,V> Node<K,V> tabAt(Node<K,V>[] tab, int i)

// cas 修改 Node[] 中第 i 个 Node 的值, c 为旧值, v 为新值
static final <K,V> boolean casTabAt(Node<K,V>[] tab, int i, Node<K,V> c, Node<K,V> v)

// 直接修改 Node[] 中第 i 个 Node 的值, v 为新值
static final <K,V> void setTabAt(Node<K,V>[] tab, int i, Node<K,V> v)
2
3
4
5
6
7
8
# 构造器分析
可以看到实现了懒惰初始化,在构造方法中仅仅计算了 table 的大小,以后在第一次使用时才会真正创建,
public ConcurrentHashMap(int initialCapacity, float loadFactor, int concurrencyLevel) {
    if (!(loadFactor > 0.0f) || initialCapacity < 0 || concurrencyLevel <= 0)
        throw new IllegalArgumentException();
    if (initialCapacity < concurrencyLevel) // Use at least as many bins
        initialCapacity = concurrencyLevel; // as estimated threads
    long size = (long)(1.0 + (long)initialCapacity / loadFactor);
    // tableSizeFor 仍然是保证计算的大小是 2^n, 即 16,32,64 ...
    int cap = (size >= (long)MAXIMUM_CAPACITY) ?
        MAXIMUM_CAPACITY : tableSizeFor((int)size);
    this.sizeCtl = cap;
}
2
3
4
5
6
7
8
9
10
11
# get 流程
public V get(Object key) {
    Node<K,V>[] tab; Node<K,V> e, p; int n, eh; K ek;
    // spread 方法能确保返回结果是正数
    int h = spread(key.hashCode());
    if ((tab = table) != null && (n = tab.length) > 0 &&
        (e = tabAt(tab, (n - 1) & h)) != null) {
        // 如果头结点已经是要查找的 key
        if ((eh = e.hash) == h) {
            if ((ek = e.key) == key || (ek != null && key.equals(ek)))
                return e.val;
        }
        // hash 为负数表示该 bin 在扩容中或是 treebin, 这时调用 find 方法来查找
        else if (eh < 0)
            return (p = e.find(h, key)) != null ? p.val : null;
        // 正常遍历链表, 用 equals 比较
        while ((e = e.next) != null) {
            if (e.hash == h &&
                ((ek = e.key) == key || (ek != null && key.equals(ek))))
                return e.val;
        }
    }
    return null;
}
2
3
4
5
6
7
8
9
10
11
12
13
14
15
16
17
18
19
20
21
22
23
# put 流程
以下数组简称(table),链表简称(bin)。
public V put(K key, V value) {
    return putVal(key, value, false);
}
final V putVal(K key, V value, boolean onlyIfAbsent) {
    if (key == null || value == null) throw new NullPointerException();
    // 其中 spread 方法会综合高位低位, 具有更好的 hash 性
    int hash = spread(key.hashCode());
    int binCount = 0;
    for (Node<K,V>[] tab = table;;) {
        // f 是链表头节点
        // fh 是链表头结点的 hash
        // i 是链表在 table 中的下标
        Node<K,V> f; int n, i, fh;
        // 要创建 table
        if (tab == null || (n = tab.length) == 0)
            // 初始化 table 使用了 cas, 无需 synchronized 创建成功, 进入下一轮循环
            tab = initTable();
        // 要创建链表头节点
        else if ((f = tabAt(tab, i = (n - 1) & hash)) == null) {
            // 添加链表头使用了 cas, 无需 synchronized
            if (casTabAt(tab, i, null,
                         new Node<K,V>(hash, key, value, null)))
                break;
        }
        // 帮忙扩容
        else if ((fh = f.hash) == MOVED)
            // 帮忙之后, 进入下一轮循环
            tab = helpTransfer(tab, f);
        else {
            V oldVal = null;
            // 锁住链表头节点
            synchronized (f) {
                // 再次确认链表头节点没有被移动
                if (tabAt(tab, i) == f) {
                    // 链表
                    if (fh >= 0) {
                        binCount = 1;
                        // 遍历链表
                        for (Node<K,V> e = f;; ++binCount) {
                            K ek;
                            // 找到相同的 key
                            if (e.hash == hash &&
                                ((ek = e.key) == key ||
                                 (ek != null && key.equals(ek)))) {
                                oldVal = e.val;
                                // 更新
                                if (!onlyIfAbsent)
                                    e.val = value;
                                break;
                            }
                            Node<K,V> pred = e;
                            // 已经是最后的节点了, 新增 Node, 追加至链表尾
                            if ((e = e.next) == null) {
                                pred.next = new Node<K,V>(hash, key,
                                                          value, null);
                                break;
                            }
                        }
                    }
                    // 红黑树
                    else if (f instanceof TreeBin) {
                        Node<K,V> p;
                        binCount = 2;
                        // putTreeVal 会看 key 是否已经在树中, 是, 则返回对应的 TreeNode
                        if ((p = ((TreeBin<K,V>)f).putTreeVal(hash, key,
                                                              value)) != null) {
                            oldVal = p.val;
                            if (!onlyIfAbsent)
                                p.val = value;
                        }
                    }
                }
                // 释放链表头节点的锁
            }

            if (binCount != 0) {
                if (binCount >= TREEIFY_THRESHOLD)
                    // 如果链表长度 >= 树化阈值(8), 进行链表转为红黑树
                    treeifyBin(tab, i);
                if (oldVal != null)
                    return oldVal;
                break;
            }
        }
    }
    // 增加 size 计数
    addCount(1L, binCount);
    return null;
}
private final Node<K,V>[] initTable() {
    Node<K,V>[] tab; int sc;
    while ((tab = table) == null || tab.length == 0) {
        if ((sc = sizeCtl) < 0)
            Thread.yield();
        // 尝试将 sizeCtl 设置为 -1(表示初始化 table)
        else if (U.compareAndSwapInt(this, SIZECTL, sc, -1)) {
            // 获得锁, 创建 table, 这时其它线程会在 while() 循环中 yield 直至 table 创建
            try {
                if ((tab = table) == null || tab.length == 0) {
                    int n = (sc > 0) ? sc : DEFAULT_CAPACITY;
                    Node<K,V>[] nt = (Node<K,V>[])new Node<?,?>[n];
                    table = tab = nt;
                    sc = n - (n >>> 2);
                }
            } finally {
                sizeCtl = sc;
            }
            break;
        }
    }
    return tab;
}
// check 是之前 binCount 的个数
private final void addCount(long x, int check) {
    CounterCell[] as; long b, s;
    if (
        // 已经有了 counterCells, 向 cell 累加
        (as = counterCells) != null ||
        // 还没有, 向 baseCount 累加
        !U.compareAndSwapLong(this, BASECOUNT, b = baseCount, s = b + x)
    ) {
        CounterCell a; long v; int m;
        boolean uncontended = true;
        if (
            // 还没有 counterCells
            as == null || (m = as.length - 1) < 0 ||
            // 还没有 cell
            (a = as[ThreadLocalRandom.getProbe() & m]) == null ||
            // cell cas 增加计数失败
            !(uncontended = U.compareAndSwapLong(a, CELLVALUE, v = a.value, v + x))
        ) {
            // 创建累加单元数组和cell, 累加重试
            fullAddCount(x, uncontended);
            return;
        }
        if (check <= 1)
            return;
        // 获取元素个数
        s = sumCount();
    }
    if (check >= 0) {
        Node<K,V>[] tab, nt; int n, sc;
        while (s >= (long)(sc = sizeCtl) && (tab = table) != null &&
               (n = tab.length) < MAXIMUM_CAPACITY) {
            int rs = resizeStamp(n);
            if (sc < 0) {
                if ((sc >>> RESIZE_STAMP_SHIFT) != rs || sc == rs + 1 ||
                    sc == rs + MAX_RESIZERS || (nt = nextTable) == null ||
                    transferIndex <= 0)
                    break;
                // newtable 已经创建了,帮忙扩容
                if (U.compareAndSwapInt(this, SIZECTL, sc, sc + 1))
                    transfer(tab, nt);
            }
            // 需要扩容,这时 newtable 未创建
            else if (U.compareAndSwapInt(this, SIZECTL, sc,
                                         (rs << RESIZE_STAMP_SHIFT) + 2))
                transfer(tab, null);
            s = sumCount();
        }
    }
}
2
3
4
5
6
7
8
9
10
11
12
13
14
15
16
17
18
19
20
21
22
23
24
25
26
27
28
29
30
31
32
33
34
35
36
37
38
39
40
41
42
43
44
45
46
47
48
49
50
51
52
53
54
55
56
57
58
59
60
61
62
63
64
65
66
67
68
69
70
71
72
73
74
75
76
77
78
79
80
81
82
83
84
85
86
87
88
89
90
91
92
93
94
95
96
97
98
99
100
101
102
103
104
105
106
107
108
109
110
111
112
113
114
115
116
117
118
119
120
121
122
123
124
125
126
127
128
129
130
131
132
133
134
135
136
137
138
139
140
141
142
143
144
145
146
147
148
149
150
151
152
153
154
155
156
157
158
159
160
161
162
# size 计算流程
size 计算实际发生在 put,remove 改变集合元素的操作之中:
- 没有竞争发生,向 baseCount 累加计数
- 有竞争发生,新建 counterCells,向其中的一个 cell 累加计数
- counterCells 初始有两个 cell
- 如果计数竞争比较激烈,会创建新的 cell 来累加计数
public int size() {
    long n = sumCount();
    return ((n < 0L) ? 0 :
            (n > (long)Integer.MAX_VALUE) ? Integer.MAX_VALUE :
            (int)n);
}
final long sumCount() {
    CounterCell[] as = counterCells; CounterCell a;
    // 将 baseCount 计数与所有 cell 计数累加
    long sum = baseCount;
    if (as != null) {
        for (int i = 0; i < as.length; ++i) {
            if ((a = as[i]) != null)
                sum += a.value;
        }
    }
    return sum;
}
2
3
4
5
6
7
8
9
10
11
12
13
14
15
16
17
18
Java 8 数组(Node)+( 链表 Node | 红黑树 TreeNode ) 以下数组简称(table),链表简称(bin):
- 初始化,使用 cas 来保证并发安全,懒惰初始化 table
- 树化,当
table.length < 64时,先尝试扩容,超过 64 时,并且bin.length > 8时,会将链表树化,树化过程会用 synchronized 锁住链表头 - put,如果该 bin 尚未创建,只需要使用 cas 创建 bin;如果已经有了,锁住链表头进行后续 put 操作,元素添加至 bin 的尾部
- get,无锁操作仅需要保证可见性,扩容过程中 get 操作拿到的是 ForwardingNode 它会让 get 操作在新 table 进行搜索
- 扩容,扩容时以 bin 为单位进行,需要对 bin 进行 synchronized,但这时妙的是其它竞争线程也不是无事可做,它们会帮助把其它 bin 进行扩容,扩容时平均只有 1/6 的节点会把复制到新 table 中
- size,元素个数保存在 baseCount 中,并发时的个数变动保存在
CounterCell[]当中。最后统计数量时累加即可
# JDK 7 ConcurrentHashMap
它维护了一个 segment 数组,每个 segment 对应一把锁
- 优点:如果多个线程访问不同的 segment,实际是没有冲突的,这与 jdk8 中是类似的
- 缺点:Segments 数组默认大小为 16,这个容量初始化指定后就不能改变了,并且不是懒惰初始化
# 构造器分析
public ConcurrentHashMap(int initialCapacity, float loadFactor, int concurrencyLevel) {
    if (!(loadFactor > 0) || initialCapacity < 0 || concurrencyLevel <= 0)
        throw new IllegalArgumentException();
    if (concurrencyLevel > MAX_SEGMENTS)
        concurrencyLevel = MAX_SEGMENTS;
    // ssize 必须是 2^n, 即 2, 4, 8, 16 ... 表示了 segments 数组的大小
    int sshift = 0;
    int ssize = 1;
    while (ssize < concurrencyLevel) {
        ++sshift;
        ssize <<= 1;
    }
    // segmentShift 默认是 32 - 4 = 28
    this.segmentShift = 32 - sshift;
    // segmentMask 默认是 15 即 0000 0000 0000 1111
    this.segmentMask = ssize - 1;
    if (initialCapacity > MAXIMUM_CAPACITY)
        initialCapacity = MAXIMUM_CAPACITY;
    int c = initialCapacity / ssize;
    if (c * ssize < initialCapacity)
        ++c;
    int cap = MIN_SEGMENT_TABLE_CAPACITY;
    while (cap < c)
        cap <<= 1;
    // 创建 segments and segments[0]
    Segment<K,V> s0 =
        new Segment<K,V>(loadFactor, (int)(cap * loadFactor),
                         (HashEntry<K,V>[])new HashEntry[cap]);
    Segment<K,V>[] ss = (Segment<K,V>[])new Segment[ssize];
    UNSAFE.putOrderedObject(ss, SBASE, s0); // ordered write of segments[0]
    this.segments = ss;
}
2
3
4
5
6
7
8
9
10
11
12
13
14
15
16
17
18
19
20
21
22
23
24
25
26
27
28
29
30
31
32
构造完成,如下图所示:
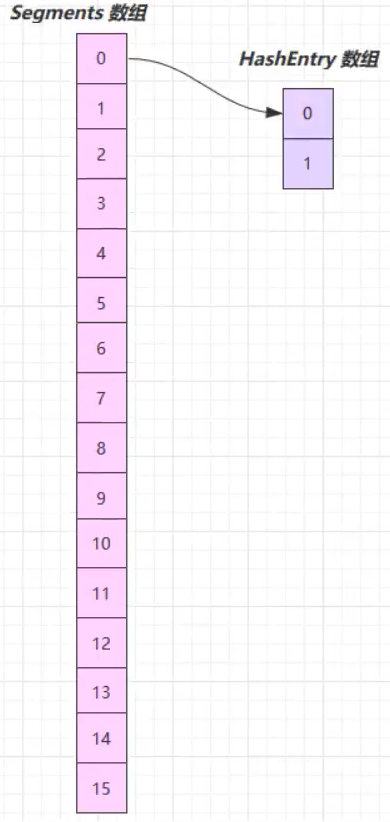
可以看到 ConcurrentHashMap 没有实现懒惰初始化,空间占用不友好。
其中 this.segmentShift 和 this.segmentMask 的作用是决定将 key 的 hash 结果匹配到哪个 segment。
例如,根据某一 hash 值求 segment 位置,先将高位向低位移动 this.segmentShift 位。

结果再与 this.segmentMask 做位于运算,最终得到 1010 即下标为 10 的 segment。

# put 流程
public V put(K key, V value) {
    Segment<K,V> s;
    if (value == null)
        throw new NullPointerException();
    int hash = hash(key);
    // 计算出 segment 下标
    int j = (hash >>> segmentShift) & segmentMask;

    // 获得 segment 对象, 判断是否为 null, 是则创建该 segment
    if ((s = (Segment<K,V>)UNSAFE.getObject
         (segments, (j << SSHIFT) + SBASE)) == null) {
        // 这时不能确定是否真的为 null, 因为其它线程也发现该 segment 为 null,
        // 因此在 ensureSegment 里用 cas 方式保证该 segment 安全性
        s = ensureSegment(j);
    }
    // 进入 segment 的put 流程
    return s.put(key, hash, value, false);
}
2
3
4
5
6
7
8
9
10
11
12
13
14
15
16
17
18
segment 继承了可重入锁(ReentrantLock),它的 put 方法为:
final V put(K key, int hash, V value, boolean onlyIfAbsent) {
    // 尝试加锁
    HashEntry<K,V> node = tryLock() ? null :
    // 如果不成功, 进入 scanAndLockForPut 流程
    // 如果是多核 cpu 最多 tryLock 64 次, 进入 lock 流程
    // 在尝试期间, 还可以顺便看该节点在链表中有没有, 如果没有顺便创建出来
    scanAndLockForPut(key, hash, value);

    // 执行到这里 segment 已经被成功加锁, 可以安全执行
    V oldValue;
    try {
        HashEntry<K,V>[] tab = table;
        int index = (tab.length - 1) & hash;
        HashEntry<K,V> first = entryAt(tab, index);
        for (HashEntry<K,V> e = first;;) {
            if (e != null) {
                // 更新
                K k;
                if ((k = e.key) == key ||
                    (e.hash == hash && key.equals(k))) {
                    oldValue = e.value;
                    if (!onlyIfAbsent) {
                        e.value = value;
                        ++modCount;
                    }
                    break;
                }
                e = e.next;
            }
            else {
                // 新增
                // 1) 之前等待锁时, node 已经被创建, next 指向链表头
                if (node != null)
                    node.setNext(first);
                else
                    // 2) 创建新 node
                    node = new HashEntry<K,V>(hash, key, value, first);
                int c = count + 1;
                // 3) 扩容
                if (c > threshold && tab.length < MAXIMUM_CAPACITY)
                    rehash(node);
                else
                    // 将 node 作为链表头
                    setEntryAt(tab, index, node);
                ++modCount;
                count = c;
                oldValue = null;
                break;
            }
        }
    } finally {
        unlock();
    }
    return oldValue;
}
2
3
4
5
6
7
8
9
10
11
12
13
14
15
16
17
18
19
20
21
22
23
24
25
26
27
28
29
30
31
32
33
34
35
36
37
38
39
40
41
42
43
44
45
46
47
48
49
50
51
52
53
54
55
# rehash 流程
发生在 put 中,因为此时已经获得了锁,因此 rehash 时不需要考虑线程安全。
private void rehash(HashEntry<K,V> node) {
    HashEntry<K,V>[] oldTable = table;
    int oldCapacity = oldTable.length;
    int newCapacity = oldCapacity << 1;
    threshold = (int)(newCapacity * loadFactor);
    HashEntry<K,V>[] newTable =
        (HashEntry<K,V>[]) new HashEntry[newCapacity];
    int sizeMask = newCapacity - 1;
    for (int i = 0; i < oldCapacity ; i++) {
        HashEntry<K,V> e = oldTable[i];
        if (e != null) {
            HashEntry<K,V> next = e.next;
            int idx = e.hash & sizeMask;
            if (next == null) // Single node on list
                newTable[idx] = e;
            else { // Reuse consecutive sequence at same slot
                HashEntry<K,V> lastRun = e;
                int lastIdx = idx;
                // 过一遍链表, 尽可能把 rehash 后 idx 不变的节点重用
                for (HashEntry<K,V> last = next;
                     last != null;
                     last = last.next) {
                    int k = last.hash & sizeMask;
                    if (k != lastIdx) {
                        lastIdx = k;
                        lastRun = last;
                    }
                }
                newTable[lastIdx] = lastRun;
                // 剩余节点需要新建
                for (HashEntry<K,V> p = e; p != lastRun; p = p.next) {
                    V v = p.value;
                    int h = p.hash;
                    int k = h & sizeMask;
                    HashEntry<K,V> n = newTable[k];
                    newTable[k] = new HashEntry<K,V>(h, p.key, v, n);
                }
            }
        }
    }
    // 扩容完成, 才加入新的节点
    int nodeIndex = node.hash & sizeMask; // add the new node
    node.setNext(newTable[nodeIndex]);
    newTable[nodeIndex] = node;

    // 替换为新的 HashEntry table
    table = newTable;
}
2
3
4
5
6
7
8
9
10
11
12
13
14
15
16
17
18
19
20
21
22
23
24
25
26
27
28
29
30
31
32
33
34
35
36
37
38
39
40
41
42
43
44
45
46
47
48
附,调试代码
public static void main(String[] args) {
    ConcurrentHashMap<Integer, String> map = new ConcurrentHashMap<>();
    for (int i = 0; i < 1000; i++) {
        int hash = hash(i);
        int segmentIndex = (hash >>> 28) & 15;
        if (segmentIndex == 4 && hash % 8 == 2) {
            System.out.println(i + "\t" + segmentIndex + "\t" + hash % 2 + "\t" + hash % 4 +
                               "\t" + hash % 8);
        }
    }
    map.put(1, "value");
    map.put(15, "value"); // 2 扩容为 4 15 的 hash%8 与其他不同
    map.put(169, "value");
    map.put(197, "value"); // 4 扩容为 8
    map.put(341, "value");
    map.put(484, "value");
    map.put(545, "value"); // 8 扩容为 16
    map.put(912, "value");
    map.put(941, "value");
    System.out.println("ok");
}
private static int hash(Object k) {
    int h = 0;
    if ((0 != h) && (k instanceof String)) {
        return sun.misc.Hashing.stringHash32((String) k);
    }
    h ^= k.hashCode();
    // Spread bits to regularize both segment and index locations,
    // using variant of single-word Wang/Jenkins hash.
    h += (h << 15) ^ 0xffffcd7d;
    h ^= (h >>> 10);
    h += (h << 3);
    h ^= (h >>> 6);
    h += (h << 2) + (h << 14);
    int v = h ^ (h >>> 16);
    return v;
}
2
3
4
5
6
7
8
9
10
11
12
13
14
15
16
17
18
19
20
21
22
23
24
25
26
27
28
29
30
31
32
33
34
35
36
37
# get 流程
get 时并未加锁,用了 UNSAFE 方法保证了可见性,扩容过程中,get 先发生就从旧表取内容,get 后发生就从新表取内容。
public V get(Object key) {
    Segment<K,V> s; // manually integrate access methods to reduce overhead
    HashEntry<K,V>[] tab;
    int h = hash(key);
    // u 为 segment 对象在数组中的偏移量
    long u = (((h >>> segmentShift) & segmentMask) << SSHIFT) + SBASE;
    // s 即为 segment
    if ((s = (Segment<K,V>)UNSAFE.getObjectVolatile(segments, u)) != null &&
        (tab = s.table) != null) {
        for (HashEntry<K,V> e = (HashEntry<K,V>) UNSAFE.getObjectVolatile
             (tab, ((long)(((tab.length - 1) & h)) << TSHIFT) + TBASE);
             e != null; e = e.next) {
            K k;
            if ((k = e.key) == key || (e.hash == h && key.equals(k)))
                return e.value;
        }
    }
    return null;
}
2
3
4
5
6
7
8
9
10
11
12
13
14
15
16
17
18
19
# size 计算流程
- 计算元素个数前,先不加锁计算两次,如果前后两次结果如一样,认为个数正确返回
- 如果不一样,进行重试,重试次数超过 3,将所有 segment 锁住,重新计算个数返回
public int size() {
    // Try a few times to get accurate count. On failure due to
    // continuous async changes in table, resort to locking.
    final Segment<K,V>[] segments = this.segments;
    int size;
    boolean overflow; // true if size overflows 32 bits
    long sum; // sum of modCounts
    long last = 0L; // previous sum
    int retries = -1; // first iteration isn't retry
    try {
        for (;;) {
            if (retries++ == RETRIES_BEFORE_LOCK) {
                // 超过重试次数, 需要创建所有 segment 并加锁
                for (int j = 0; j < segments.length; ++j)
                    ensureSegment(j).lock(); // force creation
            }
            sum = 0L;
            size = 0;
            overflow = false;
            for (int j = 0; j < segments.length; ++j) {
                Segment<K,V> seg = segmentAt(segments, j);
                if (seg != null) {
                    sum += seg.modCount;
                    int c = seg.count;
                    if (c < 0 || (size += c) < 0)
                        overflow = true;
                }
            }
            if (sum == last)
                break;
            last = sum;
        }
    } finally {
        if (retries > RETRIES_BEFORE_LOCK) {
            for (int j = 0; j < segments.length; ++j)
                segmentAt(segments, j).unlock();
        }
    }
    return overflow ? Integer.MAX_VALUE : size;
}
2
3
4
5
6
7
8
9
10
11
12
13
14
15
16
17
18
19
20
21
22
23
24
25
26
27
28
29
30
31
32
33
34
35
36
37
38
39
40
# LinkedBlockingQueue 原理
# 基本的入队出队
public class LinkedBlockingQueue<E> extends AbstractQueue<E>
    implements BlockingQueue<E>, java.io.Serializable {
    static class Node<E> {
        E item;
        /**
 * 下列三种情况之一
 * - 真正的后继节点
 * - 自己, 发生在出队时
 * - null, 表示是没有后继节点, 是最后了
 */
        Node<E> next;
        Node(E x) { item = x; }
    }
}
2
3
4
5
6
7
8
9
10
11
12
13
14
入队
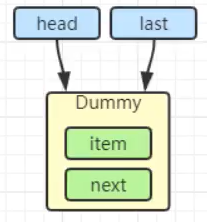
初始化链表头尾 last = head = new Node(null);,Dummy 节点用来占位,item 为 null
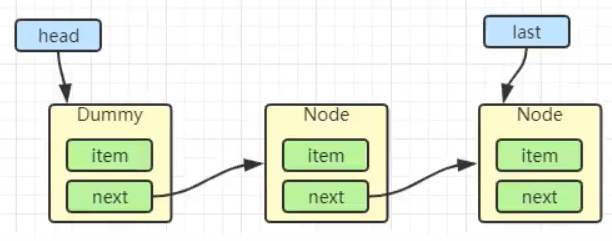
当一个节点入队 last = last.next = node;

再来一个节点入队 last = last.next = node;
出队
Node<E> h = head;
Node<E> first = h.next;
h.next = h; // help GC
head = first;
E x = first.item;
first.item = null;
return x;
2
3
4
5
6
7
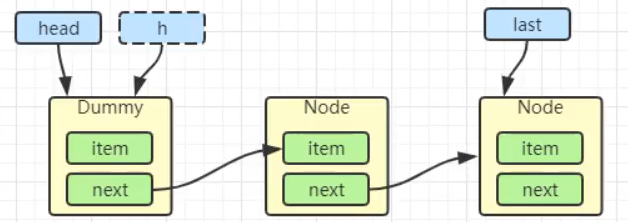
h = head:
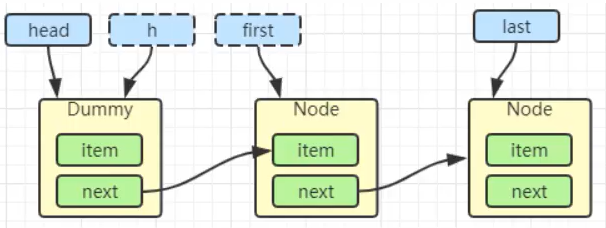
first = h.next:
h.next = h:
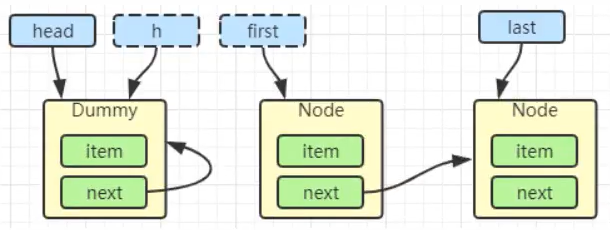
head = first:
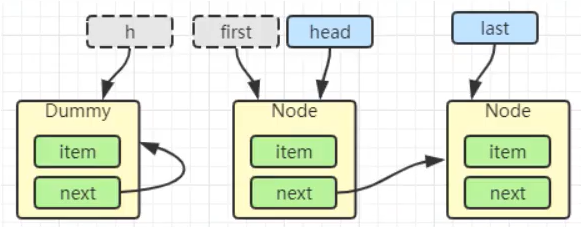
E x = first.item;
first.item = null;
return x;
2
3
# 加锁分析
LinkedBlockingQueue 加锁高明之处:用了两把锁和 dummy 节点。
- 用一把锁,同一时刻,最多只允许有一个线程(生产者或消费者,二选一)执行
- 用两把锁,同一时刻,可以允许两个线程同时(一个生产者与一个消费者)执行
- 消费者与消费者线程仍然串行
- 生产者与生产者线程仍然串行
线程安全分析:
- 当节点总数大于 2 时(包括 dummy 节点),putLock 保证的是 last 节点的线程安全,takeLock 保证的是 head 节点的线程安全。两把锁保证了入队和出队没有竞争
- 当节点总数等于 2 时(即一个 dummy 节点,一个正常节点)这时候,仍然是两把锁锁两个对象,不会竞争
- 当节点总数等于 1 时(就一个 dummy 节点)这时 take 线程会被 notEmpty 条件阻塞,有竞争,会阻塞
// 用于 put(阻塞) offer(非阻塞)
private final ReentrantLock putLock = new ReentrantLock();

// 用户 take(阻塞) poll(非阻塞)
private final ReentrantLock takeLock = new ReentrantLock();
2
3
4
5
put 操作
public void put(E e) throws InterruptedException {
    if (e == null) throw new NullPointerException();
    int c = -1;
    Node<E> node = new Node<E>(e);
    final ReentrantLock putLock = this.putLock;
    // count 用来维护元素计数
    final AtomicInteger count = this.count;
    putLock.lockInterruptibly();
    try {
        // 满了等待
        while (count.get() == capacity) {
            // 倒过来读就好: 等待 notFull
            notFull.await();
        }
        // 有空位, 入队且计数加一
        enqueue(node);
        c = count.getAndIncrement();
        // 除了自己 put 以外, 队列还有空位, 由自己叫醒其他 put 线程
        if (c + 1 < capacity)
            notFull.signal();
    } finally {
        putLock.unlock();
    }
    // 如果队列中有一个元素, 叫醒 take 线程
    if (c == 0)
        // 这里调用的是 notEmpty.signal() 而不是 notEmpty.signalAll() 是为了减少竞争
        signalNotEmpty();
}
2
3
4
5
6
7
8
9
10
11
12
13
14
15
16
17
18
19
20
21
22
23
24
25
26
27
28
take 操作
public E take() throws InterruptedException {
    E x;
    int c = -1;
    final AtomicInteger count = this.count;
    final ReentrantLock takeLock = this.takeLock;
    takeLock.lockInterruptibly();
    try {
        while (count.get() == 0) {
            notEmpty.await();
        }
        x = dequeue();
        c = count.getAndDecrement();
        if (c > 1)
            notEmpty.signal();
    } finally {
        takeLock.unlock();
    }
    // 如果队列中只有一个空位时, 叫醒 put 线程
    // 如果有多个线程进行出队, 第一个线程满足 c == capacity, 但后续线程 c < capacity
    if (c == capacity)
        // 这里调用的是 notFull.signal() 而不是 notFull.signalAll() 是为了减少竞争
        signalNotFull()
        return x;
}
2
3
4
5
6
7
8
9
10
11
12
13
14
15
16
17
18
19
20
21
22
23
24
由 put 唤醒 put 是为了避免信号不足。
# 性能比较
主要列举 LinkedBlockingQueue 与 ArrayBlockingQueue 的性能比较:
- Linked 支持有界,Array 强制有界
- Linked 实现是链表,Array 实现是数组
- Linked 是懒惰的,而 Array 需要提前初始化 Node 数组
- Linked 每次入队会生成新 Node,而 Array 的 Node 是提前创建好的
- Linked 两把锁,Array 一把锁
# ConcurrentLinkedQueue
ConcurrentLinkedQueue 的设计与 LinkedBlockingQueue 非常像,也是:
- 两把「锁」,同一时刻,可以允许两个线程同时(一个生产者与一个消费者)执行
- dummy 节点的引入让两把「锁」将来锁住的是不同对象,避免竞争
- 只是这「锁」使用了 cas 来实现(最大不同点)
事实上,ConcurrentLinkedQueue 应用还是非常广泛的。
例如之前讲的 Tomcat 的 Connector 结构时,Acceptor 作为生产者向 Poller 消费者传递事件信息时,正是采用了 ConcurrentLinkedQueue 将 SocketChannel 给 Poller 使用。

# ConcurrentLinkedQueue 原理
# 模仿 ConcurrentLinkedQueue
初始代码
public class Test3 {
    public static void main(String[] args) {
        MyQueue<String> queue = new MyQueue<>();
        queue.offer("1");
        queue.offer("2");
        queue.offer("3");
        System.out.println(queue);
    }
}
class MyQueue<E> implements Queue<E> {
    @Override
    public String toString() {
        StringBuilder sb = new StringBuilder();
        for (Node<E> p = head; p != null; p = p.next.get()) {
            E item = p.item;
            if (item != null) {
                sb.append(item).append("->");
            }
        }
        sb.append("null");
        return sb.toString();
    }

    // 重写方法 ...

    public MyQueue() {
        head = last = new Node<>(null, null);
    }
    private volatile Node<E> last;
    private volatile Node<E> head;
    private E dequeue() {
        /*Node<E> h = head;
         Node<E> first = h.next;
         h.next = h;
         head = first;
         E x = first.item;
         first.item = null;
         return x;*/
        return null;
    }
    @Override
    public E poll() {
        return null;
    }
    @Override
    public boolean offer(E e) {
        return true;
    }
    static class Node<E> {
        volatile E item;
        public Node(E item, Node<E> next) {
            this.item = item;
            this.next = new AtomicReference<>(next);
        }
        AtomicReference<Node<E>> next;
    }
}
2
3
4
5
6
7
8
9
10
11
12
13
14
15
16
17
18
19
20
21
22
23
24
25
26
27
28
29
30
31
32
33
34
35
36
37
38
39
40
41
42
43
44
45
46
47
48
49
50
51
52
53
54
55
56
57
# offer
public boolean offer(E e) {
    Node<E> n = new Node<>(e, null);
    while(true) {
        // 获取尾节点
        AtomicReference<Node<E>> next = last.next;
        // S1: 真正尾节点的 next 是 null, cas 从 null 到新节点
        if(next.compareAndSet(null, n)) {
            // 这时的 last 已经是倒数第二, next 不为空了, 其它线程的 cas 肯定失败
            // S2: 更新 last 为倒数第一的节点
            last = n;
            return true;
        }
    }
}
2
3
4
5
6
7
8
9
10
11
12
13
14
# CopyOnWriteArrayList
CopyOnWriteArraySet 是它的马甲 底层实现采用了 写入时拷贝 的思想,增删改操作会将底层 Array 数组拷贝一份,更改操作在新数组上执行,这时不影响其它线程的并发读,读写分离。
以新增为例:
public boolean add(E e) {
    synchronized (lock) {
        // 获取旧的数组
        Object[] es = getArray();
        int len = es.length;
        // 拷贝新的数组(这里是比较耗时的操作,但不影响其它读线程)
        es = Arrays.copyOf(es, len + 1);
        // 添加新元素
        es[len] = e;
        // 替换旧的数组
        setArray(es);
        return true;
    }
}
2
3
4
5
6
7
8
9
10
11
12
13
14
这里的源码版本是 Java 11,在 Java 1.8 中使用的是 ReentrantLock 可重入锁而不是 synchronized。
其它读操作并未加锁,例如:
public void forEach(Consumer<? super E> action) {
    Objects.requireNonNull(action);
    for (Object x : getArray()) {
        @SuppressWarnings("unchecked") E e = (E) x;
        action.accept(e);
    }
}
2
3
4
5
6
7
适合『读多写少』的应用场景。
# get 弱一致性
读取弱一致性,读取的数据不一定是最新的
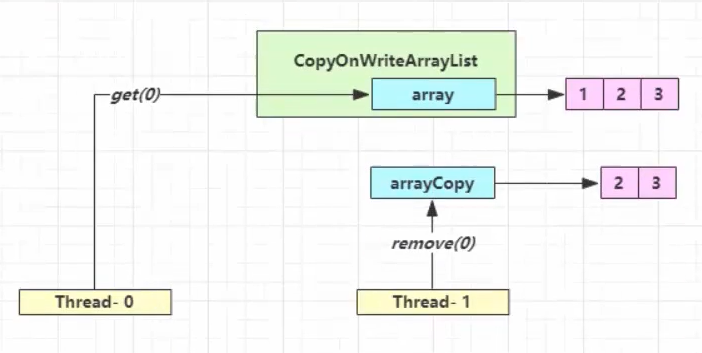
| 时间点 | 操作 |
|---|---|
| 1 | Thread-0 getArray() |
| 2 | Thread-1 getArray() |
| 3 | Thread-1 setArray(arrayCopy) |
| 4 | Thread-0 array[index] |
# 迭代器弱一致性
遍历时弱一致性,例如,当利用迭代器遍历时,如果容器数据发生修改,迭代器仍然可以继续进行遍历,这时内容是旧的
public static void main(String[] args) {
    CopyOnWriteArrayList<Integer> list = new CopyOnWriteArrayList<>();
    list.add(1);
    list.add(2);
    list.add(3);
    Iterator<Integer> iter = list.iterator();

    new Thread(() -> {
        list.remove(0);
        System.out.println(list);
    }).start();

    sleep1s();
    while (iter.hasNext()) {
        System.out.println(iter.next());
    }
}
2
3
4
5
6
7
8
9
10
11
12
13
14
15
16
17
不要觉得弱一致性就不好:
- 数据库的 MVCC 都是弱一致性的表现
- 并发高和一致性是矛盾的,需要权衡
