 Maven - 上传中央仓库
笔记
记录我上传 jar 包 Maven 中央仓库的过程,以及遇到的一些问题。
2022-02-07 @Young Kbt
# 介绍
我上传了我的 dbdtobean.jar 到 Maven 中央仓库,全名是 database data to java bean。
作用:读取数据库的表字段,生成 bean 文件,也就是实体类文件,并且可以选择的生成 MVC 类文件:Controller、Service、Mapper、Dao,其中每一个类文件可以选择生成五种方法:CRUD(增删改查)。
花了半天研究如何上传,期间也踩了一些坑,上传完立马过来记录过程。
# 使用网址
工单管理:https://issues.sonatype.org (opens new window)
这是我们的第一步,在这里面申请上传资格,以及注册自己的 groupId。
构建仓库 : https://s01.oss.sonatype.org/#welcome (opens new window)
获得上传资格后,我们把 jar 包上传到这里,并管理 jar 包,最终也在这里申请 Release 后,然会同步到 Maven 中央仓库。
说明,这个网址是官网提供最新的,网上一些旧的教程提供的是另一个网址,那个网址无法登录和上传。
仓库镜像: https://mvnrepository.com/ (opens new window)
同步到 Maven 中央仓库后,等待 1-2 小时,我们就可以在这里面查看我们的 jar 包。
# 工单管理
# 注册账号
首先我们需要注册 JIRA 账号,也就是 Maven 仓库账号。
JIRA 是一个项目管理服务,类似于国内的 Teambition。Sonatype 通过 JIRA 来管理 OSSRH 仓库。
注册地址:https://issues.sonatype.org/secure/Signup!default.jspa (opens new window)
需要填写 Email,Full Name,Username 以及 Password,其中 Username 与 Password 后面的步骤需要用到,请记下来。
# 创建issue
这一步就是申请上传 jar 包的资格。
登录成功后,上方有个 Create(中文是创建)的按钮,点击后选择项目 Community Support - Open Source Project Repository Hosting (OSSRH)
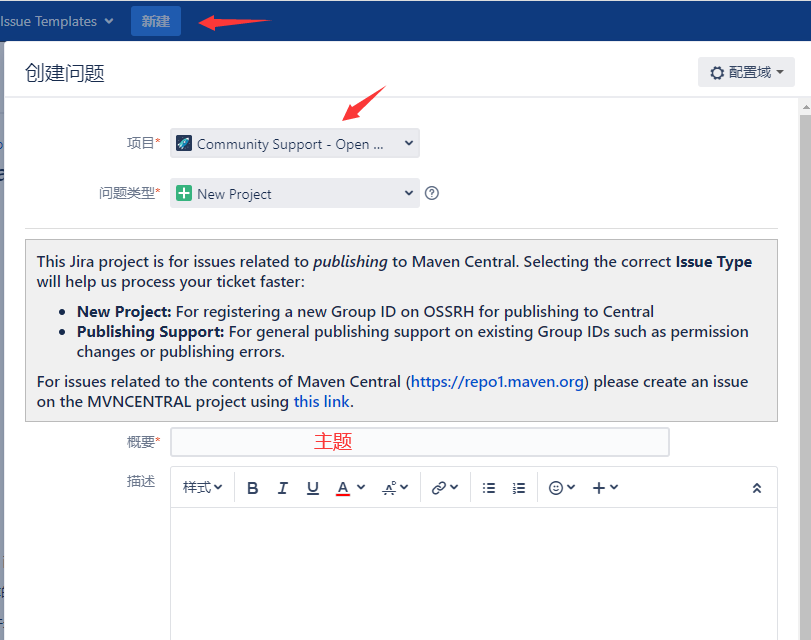
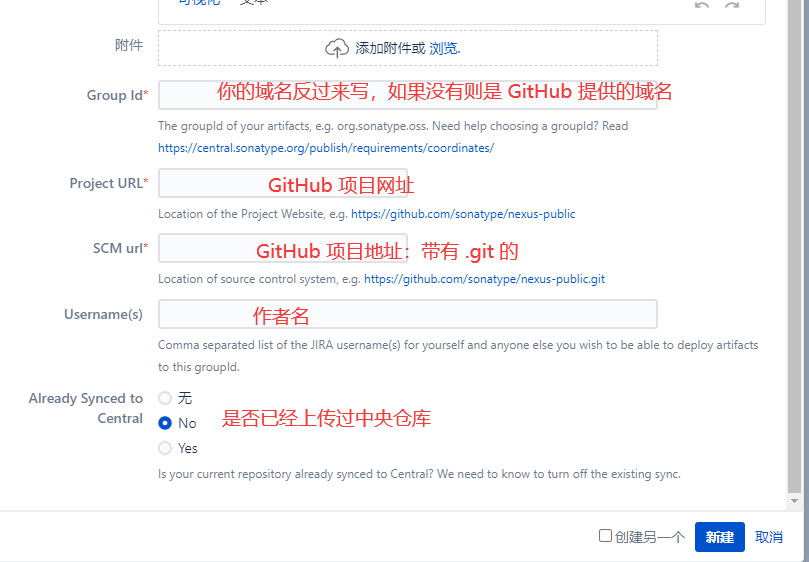
新建后,稍等几分钟到几个小时,可以看到管理员会提示去进行域名解析,添加提供好的字符串。
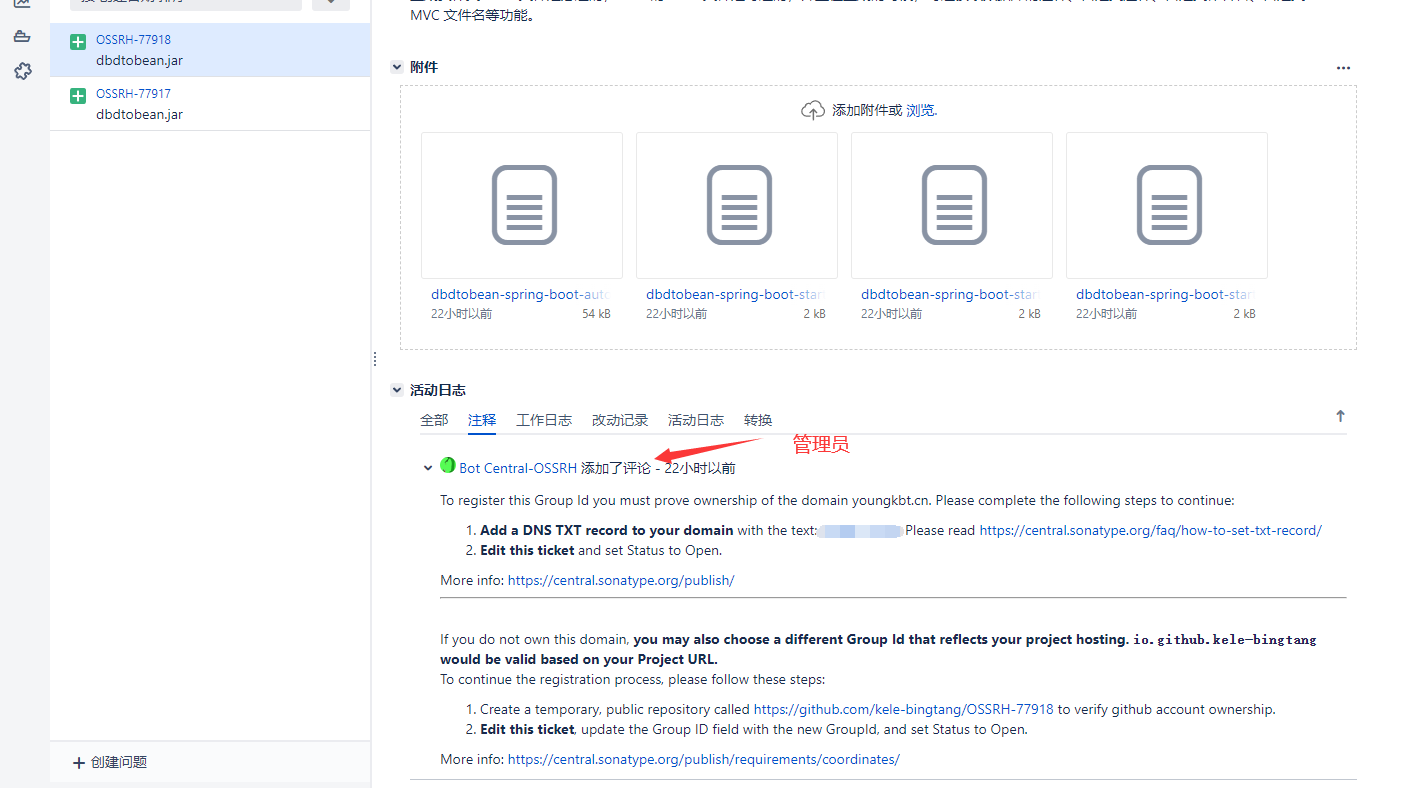
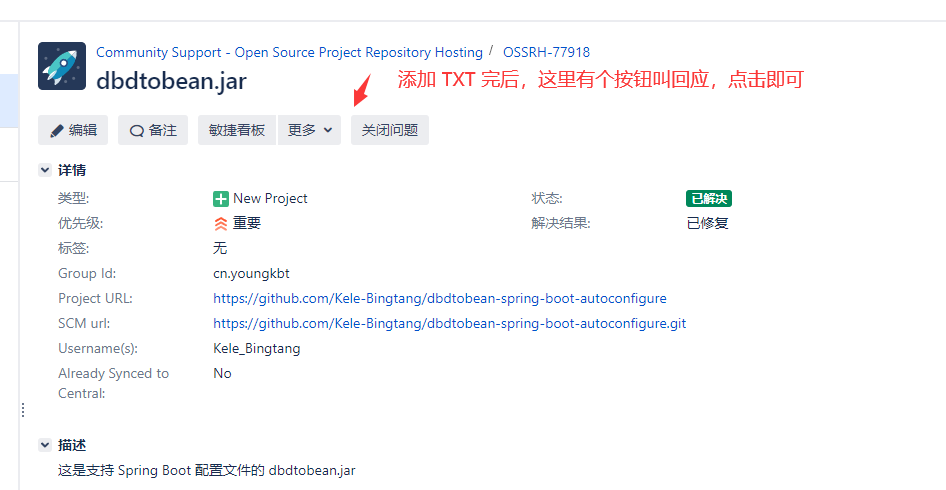
添加成功后,在页面上方点击「回应」,即可让管理员知道你的操作。
当 Issue 的 Status 变为 RESOLVED(中文是已解决,下图的绿色背景)后,就可以进行下一步操作了,否则,就先等待。
# GPG配置
发布到 Maven 仓库中的所有文件都要使用 GPG 签名,以保障完整性。因此,我们需要在本地安装并配置 GPG。
安装 GPG 非常简单,下载并安装 GPG (opens new window) 即可,根据自己的操作系统选择。
PS:必须安装 GPG,不然 Maven 不允许发布到中央仓库。
安装完后在命令行查看版本,验证是否成功:
gpg --version
# 生成GPG密钥对
生成 GPG 密钥对,建议在 Git Bash Here 里(其实 Git 自带简易版 GPG,如果不想安装 GPG,则需要去环境变量配置 GPG,路径在 Git 根目录/usr/bin)。
生成 GPG 密钥对命令:
gpg --gen-key
生成密钥时将需要输入 name、email 以及 password。password 在之后的步骤需要用到,请记下来。
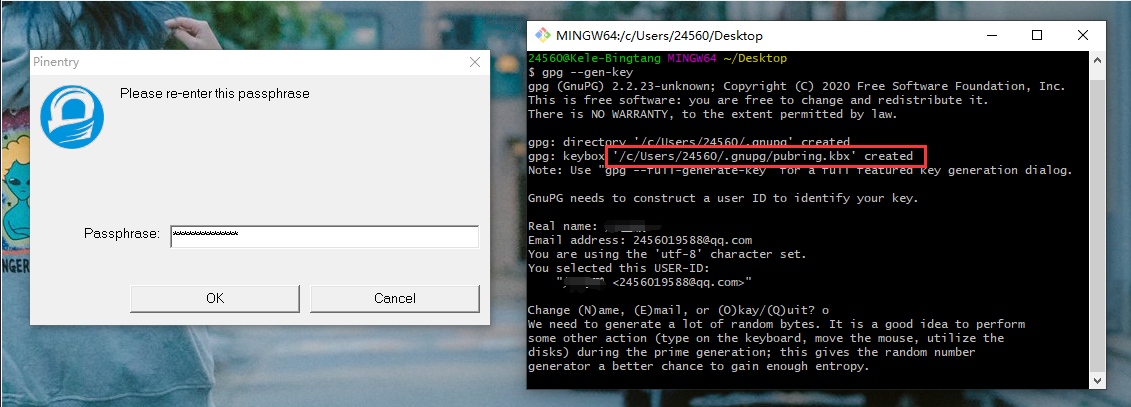
如果忘记了内容,则去 C/Users/用户名/.gnupg/pubring.kbx 查看内容。
# 上传GPG公钥
生成密钥后,要将公钥上传到公共的密钥服务器,这样其他人才可以通过公钥来验证 jar 包的完整性。
有三种方式,三选一即可,我选了第一个,因为第二个和第三个上传总是失败。
gpg --keyserver keyserver.ubuntu.com --send-keys 【your public key】
gpg --keyserver keys.openpgp.org --send-keys 【your public key】
gpg --keyserver pgp.mit.edu --send-keys 【your public key】
2
3
如我的:
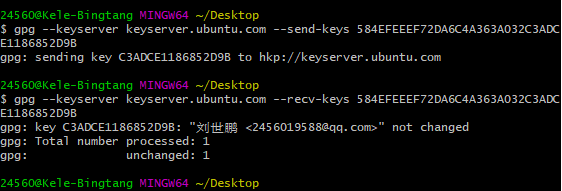
gpg --keyserver keyserver.ubuntu.com --send-keys 584EFEEEF72DA6C4A363A032C3ADCE1186852D9B
查询是否上传成功:(对应上面的上传地址)
gpg --keyserver keyserver.ubuntu.com --recv-keys 【your public key】
gpg --keyserver keys.openpgp.org  --recv-keys 【your public key】
gpg --keyserver pgp.mit.edu --recv-keys 【your public key】
2
3
如图:
# 项目配置
接下来就是项目的配置了:
- 配置上传的 Maven 中央仓库地址
- 配置上传的项目内容
- 配置文档生成插件
- 配置项目的 Git 地址
......
# 配置settings.xml
配置 Maven 的 setting.xml,路径在 Maven 根目录下的 conf 目录下。
打开后,找到 servers 节点,添加两个 server 子节点
<servers>
    <server>
        <id>sonatype-nexus-snapshots</id>
        <username>Sonatype 账号</username>
        <password>Sonatype 密码</password>
    </server>
    <server>
        <id>sonatype-nexus-staging</id>
        <username>Sonatype 账号</username>
        <password>Sonatype 密码</password>
    </server>
</servers>
2
3
4
5
6
7
8
9
10
11
12
两个 id 不要随便要改,下面的内容需要这两个 id,如果改,则下面的也要改。
Sonatype 账号和密码就是在工单管理注册的账号和密码。
# 配置pom.xml
下面的配置是额外配置,一些基本的 pom 配置如依赖 dependencies,就是你的内容。
前面先介绍一步一步添加,后面我会提供完整版。
配置 groupId,和申请 issue 的一致,配置你的 name、description、url,如我的:
<groupId>cn.youngkbt</groupId>
<artifactId>dbdtobean-spring-boot-autoconfigure</artifactId>
<version>1.4</version>
<name>dbdtobean-spring-boot-autoconfigure</name>
<description>Read the table fields of the database and generate entity class files and curd class files of controller, service, Dao and mapper layers</description>
<url>https://github.com/Kele-Bingtang/DBDToBean</url>
2
3
4
5
6
配置 licenses,这里直接使用 apache 提供的(无需修改)
<licenses>
    <license>
        <name>Server Side Public License</name>
        <url>http://www.apache.org/licenses/LICENSE-2.0.txt</url>
        <distribution>repo</distribution>
    </license>
</licenses>
2
3
4
5
6
7
配置 scm,这是你的项目 Git 地址(需要修改)
<scm>
    <tag>master</tag>
    <!-- 项目的 Git 地址 -->
    <url>https://github.com/Kele-Bingtang/dbdtobean-spring-boot-autoconfigure</url>
    <!-- 项目的 http Git 地址 -->
    <connection>https://github.com/Kele-Bingtang/dbdtobean-spring-boot-autoconfigure.git</connection>
</scm>
2
3
4
5
6
7
配置 repositories,这里的 id 对应配置 settings.xml 的 id(id 可修改,其他无需修改)
<repositories>
    <repository>
        <id>sonatype-nexus-snapshots</id>
        <name>Sonatype Nexus Snapshots</name>
        <url>https://oss.sonatype.org/content/repositories/snapshots</url>
        <releases>
            <enabled>false</enabled>
        </releases>
        <snapshots>
            <enabled>true</enabled>
        </snapshots>
    </repository>
</repositories>
2
3
4
5
6
7
8
9
10
11
12
13
配置 distributionManagement。这是上传的仓库地址:快照版(Snapshots)和发布版(Release)(无需修改)
<distributionManagement>
    <snapshotRepository>
        <id>sonatype-nexus-snapshots</id>
        <name>Sonatype Nexus Snapshots</name>
        <url>https://s01.oss.sonatype.org/content/repositories/snapshots/</url>
    </snapshotRepository>
    <repository>
        <id>sonatype-nexus-staging</id>
        <name>Nexus Release Repository</name>
        <url>https://s01.oss.sonatype.org/service/local/staging/deploy/maven2/</url>
    </repository>
</distributionManagement>
2
3
4
5
6
7
8
9
10
11
12
配置 profiles,里面的插件是 Maven 需要校验用到,如生成文档插件给开发人员看如何使用(无需修改)
注意:如果下载失败,则把
groupId、artifactId、version内容剪切到dependencies里下载成功后,再剪切回来。
<profiles>
    <profile>
        <id>sonatype-oss-release</id>
        <activation>
            <activeByDefault>true</activeByDefault>
        </activation>
        <build>
            <plugins>
                <plugin>
                    <groupId>org.apache.maven.plugins</groupId>
                    <artifactId>maven-source-plugin</artifactId>
                    <version>3.2.1</version>
                    <executions>
                        <execution>
                            <id>package</id>
                            <goals>
                                <goal>jar-no-fork</goal>
                            </goals>
                        </execution>
                    </executions>
                </plugin>
                <plugin>
                    <groupId>org.apache.maven.plugins</groupId>
                    <artifactId>maven-javadoc-plugin</artifactId>
                    <version>3.2.0</version>
                    <executions>
                        <execution>
                            <phase>package</phase>
                            <goals>
                                <goal>jar</goal>
                            </goals>
                        </execution>
                    </executions>
                </plugin>
                <plugin>
                    <groupId>org.apache.maven.plugins</groupId>
                    <artifactId>maven-gpg-plugin</artifactId>
                    <version>1.6</version>
                    <executions>
                        <execution>
                            <id>sign-artifacts</id>
                            <phase>verify</phase>
                            <goals>
                                <goal>sign</goal>
                            </goals>
                        </execution>
                    </executions>
                </plugin>
            </plugins>
        </build>
    </profile>
</profiles>
2
3
4
5
6
7
8
9
10
11
12
13
14
15
16
17
18
19
20
21
22
23
24
25
26
27
28
29
30
31
32
33
34
35
36
37
38
39
40
41
42
43
44
45
46
47
48
49
50
51
52
最后配置你的 developers 个人信息(需要修改)
<developers>
    <developer>
        <name>Kele_Bingtang</name>
        <id>Kele_Bingtang</id>
        <email>2456019588@qq.com</email>
        <roles>
            <role>Developer</role>
        </roles>
        <timezone>+8</timezone>
    </developer>
</developers>
2
3
4
5
6
7
8
9
10
11
我的 pom 完整版:
<?xml version="1.0" encoding="UTF-8"?>
<project xmlns="http://maven.apache.org/POM/4.0.0"
         xmlns:xsi="http://www.w3.org/2001/XMLSchema-instance"
         xsi:schemaLocation="http://maven.apache.org/POM/4.0.0 http://maven.apache.org/xsd/maven-4.0.0.xsd">
    <modelVersion>4.0.0</modelVersion>

    <groupId>cn.youngkbt</groupId>
    <artifactId>dbdtobean</artifactId>
    <version>1.4</version>
    <name>dbdtobean</name>
    <description>Read the table fields of the database and generate entity class files and curd class files of controller, service, Dao and mapper layers</description>
    <url>https://github.com/Kele-Bingtang/DBDToBean</url>

    <properties>
        <maven.compiler.source>8</maven.compiler.source>
        <maven.compiler.target>8</maven.compiler.target>
        <project.build.sourceEncoding>UTF-8</project.build.sourceEncoding>
    </properties>


    <licenses>
        <license>
            <name>Server Side Public License</name>
            <url>http://www.apache.org/licenses/LICENSE-2.0.txt</url>
            <distribution>repo</distribution>
        </license>
    </licenses>

    <scm>
        <tag>master</tag>
        <!-- 项目的 Git 地址 -->
        <url>https://github.com/Kele-Bingtang/DBDToBean</url>
        <!-- 项目的 http Git 地址 -->
        <connection>https://github.com/Kele-Bingtang/DBDToBean.git</connection>
    </scm>

    <repositories>
        <repository>
            <id>sonatype-nexus-snapshots</id>
            <name>Sonatype Nexus Snapshots</name>
            <url>https://oss.sonatype.org/content/repositories/snapshots</url>
            <releases>
                <enabled>false</enabled>
            </releases>
            <snapshots>
                <enabled>true</enabled>
            </snapshots>
        </repository>
    </repositories>


    <distributionManagement>
        <snapshotRepository>
            <id>sonatype-nexus-snapshots</id>
            <name>Sonatype Nexus Snapshots</name>
            <url>https://s01.oss.sonatype.org/content/repositories/snapshots/</url>
        </snapshotRepository>
        <repository>
            <id>sonatype-nexus-staging</id>
            <name>Nexus Release Repository</name>
            <url>https://s01.oss.sonatype.org/service/local/staging/deploy/maven2/</url>
        </repository>
    </distributionManagement>


    <profiles>
        <profile>
            <id>sonatype-oss-release</id>
            <activation>
                <activeByDefault>true</activeByDefault>
            </activation>
            <build>
                <plugins>
                    <plugin>
                        <groupId>org.apache.maven.plugins</groupId>
                        <artifactId>maven-source-plugin</artifactId>
                        <version>3.2.1</version>
                        <executions>
                            <execution>
                                <id>package</id>
                                <goals>
                                    <goal>jar-no-fork</goal>
                                </goals>
                            </execution>
                        </executions>
                    </plugin>
                    <plugin>
                        <groupId>org.apache.maven.plugins</groupId>
                        <artifactId>maven-javadoc-plugin</artifactId>
                        <version>3.2.0</version>
                        <executions>
                            <execution>
                                <phase>package</phase>
                                <goals>
                                    <goal>jar</goal>
                                </goals>
                            </execution>
                        </executions>
                    </plugin>
                    <plugin>
                        <groupId>org.apache.maven.plugins</groupId>
                        <artifactId>maven-gpg-plugin</artifactId>
                        <version>1.6</version>
                        <executions>
                            <execution>
                                <id>sign-artifacts</id>
                                <phase>verify</phase>
                                <goals>
                                    <goal>sign</goal>
                                </goals>
                            </execution>
                        </executions>
                    </plugin>
                </plugins>
            </build>
        </profile>
    </profiles>

    <developers>
        <developer>
            <name>Kele_Bingtang</name>
            <id>Kele_Bingtang</id>
            <email>2456019588@qq.com</email>
            <roles>
                <role>Developer</role>
            </roles>
            <timezone>+8</timezone>
        </developer>
    </developers>

</project>
2
3
4
5
6
7
8
9
10
11
12
13
14
15
16
17
18
19
20
21
22
23
24
25
26
27
28
29
30
31
32
33
34
35
36
37
38
39
40
41
42
43
44
45
46
47
48
49
50
51
52
53
54
55
56
57
58
59
60
61
62
63
64
65
66
67
68
69
70
71
72
73
74
75
76
77
78
79
80
81
82
83
84
85
86
87
88
89
90
91
92
93
94
95
96
97
98
99
100
101
102
103
104
105
106
107
108
109
110
111
112
113
114
115
116
117
118
119
120
121
122
123
124
125
126
127
128
129
130
131
# 构建仓库
# 部署项目
项目配置成功后,开始部署到构建仓库
mvn clean deploy -P sonatype-oss-release -Darguments="gpg.passphrase=密钥密码"
或者使用 IDEA 的界面操作
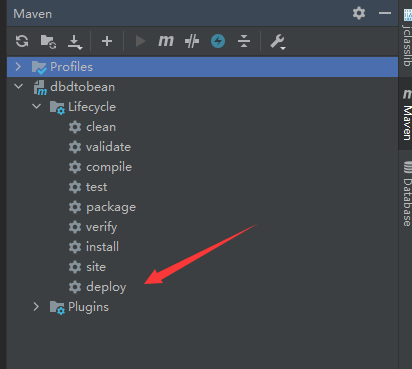
然后后弹出密码框,输入 gpg.passphrase,也就是之前生成 GPG 密钥对写的 passphrase。
执行成功的命令行会有 BUILD SUCCESS 提示。
# 上传中央仓库
mvn clean deploy 命令执行成功,使用 JIRA 账号登陆(界面右上角的 Login In):https://s01.oss.sonatype.org/#welcome (opens new window)。
登录成功后,点击左侧的 Staging Repositories 就可以看到你所发布的 jar 包了:
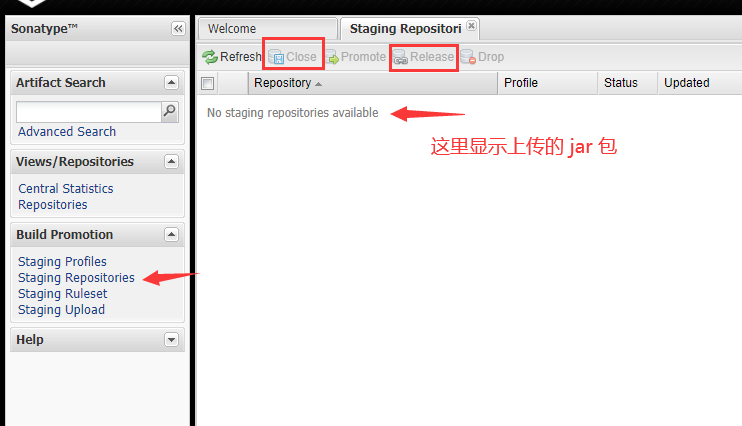
然后点击上方的 Close,并点击弹出的 Confrim,该按钮将会对上传的 jar 包进行检查校验
如果符合 Maven 的标准,则
Release按钮变亮,点击Release并点击Comfirm后,等待 1-2 小时,就可以前往 https://mvnrepository.com/ (opens new window) 搜索自己的 jar 包。如果不符合 Maven 的标准,则在下方点击
Activity选项卡,查看错误信息,并回到项目代码进行修改

# 问题
Q:mvn clean deploy 时报 Failed to execute goal org.apache.maven.plugins:maven-gpg-plugin:1.5:sign (default) on project xxxx: Exit code: 1 -> [Help 1]
A:没有安装 GPG 或者没有配置 GPG 的环境变量,如果安装了 GPG,则在安装的过程 已经自动 配好环境变量。
Q:java.lang.IllegalArgumentException
A:环境变量的 Classpath 中把 %JAVA__HOME% 换成 JDK 的绝对路径。
Q:Failed to execute goal org.apache.maven.plugins:maven-javadoc-plugin:3.2.0
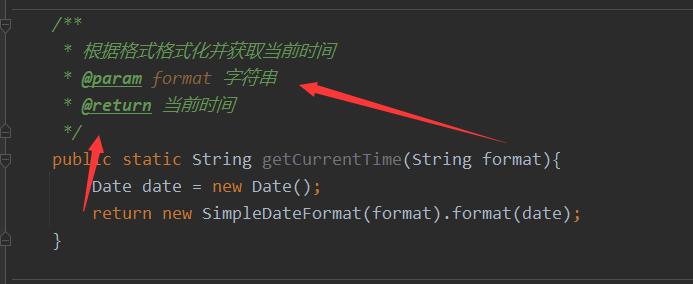
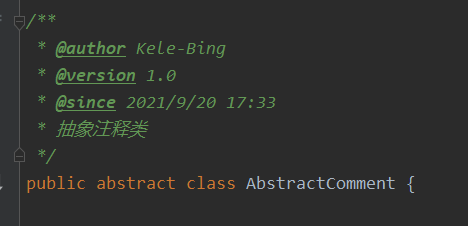
方法的注释必须有@参数,开头的类注释只能是 @author、@version、@since,如下图:
Close 时,找不到 javadoc、source 等错误。
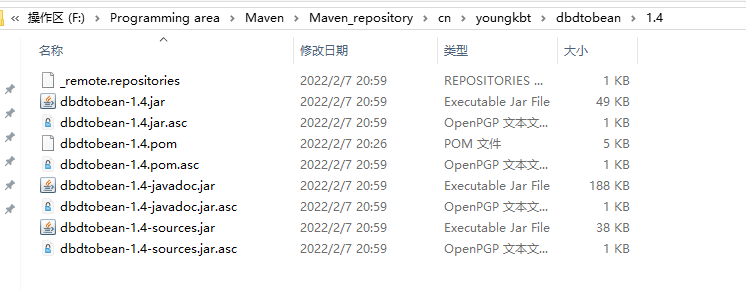
mvn clean deploy 时不能跳过 source、javadoc、gpg 插件。在个人的 maven repository 中要看到如下图文件后缀的文件
